You don’t need fancy gadgets or pro skills to check this. A simple bubble level—yep, the kind you might have from Ikea assembly projects—is the main tool. Whether you’ve got a classic Stanley, an inexpensive Empire, or even a cheap plastic level from a hardware store bundle, they’ll all do the trick. The key is *how* you use it. Let me explain how to check your exterior door’s alignment step-by-step, even if you have zero DIY experience.
Why Exterior Door Alignment Matters (and What Goes Wrong If It’s Off)
Honestly, no door stays perfectly straight forever. Wood swells and shrinks with weather. Hinges loosen after a few years of use. Even a new door—whether you installed it yourself or paid a pro—can shift out of place. That’s why doors that once closed smoothly might suddenly scrape the floor or let in a chilly breeze.
Here’s the thing: an out-of-alignment door isn’t just annoying. It can mess with your home’s energy efficiency, letting heat (or cool air) escape. Rain or snow can seep in, leading to damage or even mold. You might start shoving the door to make it latch—risking a broken lock or frame. And over time, that tiny misalignment just gets worse.
Using a level is your first step in figuring out if the door or the frame is the problem. This way, you avoid guessing games, extra trips to the hardware store, or calling a handyman for something you can spot yourself.
What Kind of Level Do You Need for Checking a Door?
If you’re not a tool person, don’t stress. Any standard spirit level (bubble level) will work. These come in different lengths, but a level between 2 and 4 feet long is ideal for doors. You might see magnetic or digital levels, but honestly, the basic models from brands like Stanley or Empire are perfectly fine—no code or battery needed.
Here’s what matters:
- Long enough to span most of the door edge, but not so big it’s clumsy.
- Clear, easy-to-read bubble vials (the little tubes with the bubble inside).
- Flat, straight edges—avoid levels that are bent, cracked, or warped.
If you only have a short, 9-inch level, you can still use it—just measure in small sections along the door and frame. If you’re shopping for your first level, most hardware stores carry sturdy, affordable choices. No need to pair it with anything fancy or worry about syncing with digital tools.
How To Prep Your Door Before Checking Alignment
Before you grab the level, give your exterior door a quick once-over. Make sure the area’s clear and you can swing the door open and closed freely. Move any mats, shoes, or potted plants out of the way—trust me, they’ll trip you up at the worst possible time.
Next, check that your door is fully closed and latched. You want to see how the door sits in the frame under normal use. If the hinges are super squeaky or stiff, add a drop of lubricant and work it in by swinging the door a few times. That way, the readings you get from the level are accurate and not thrown off by friction or stuck hardware.
It’s also a good idea to have a helper if your door is especially heavy. They can steady the door while you work (no need to call the whole family—one person is enough). And if you’re working on a storm door or screen door, check alignment with both the storm door open and closed. Sometimes, pressure from one can affect the other, especially if the doors were installed at different times.
Step-By-Step: How To Use a Level To Check Exterior Door Alignment
You might be wondering, “Where do I even put the level?” Here’s a slow, step-by-step breakdown for total beginners. No need to rush—take your time.
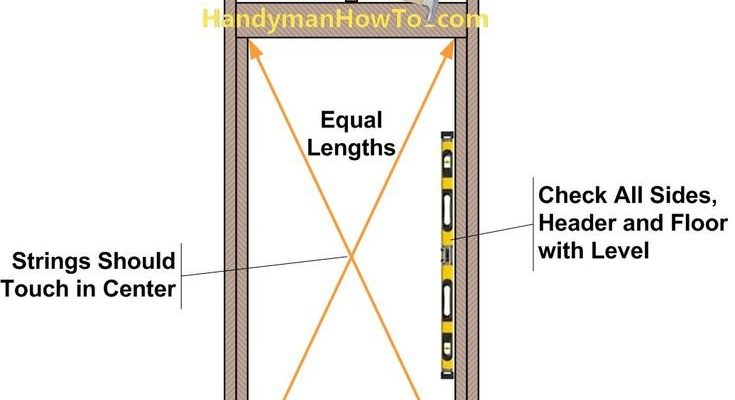
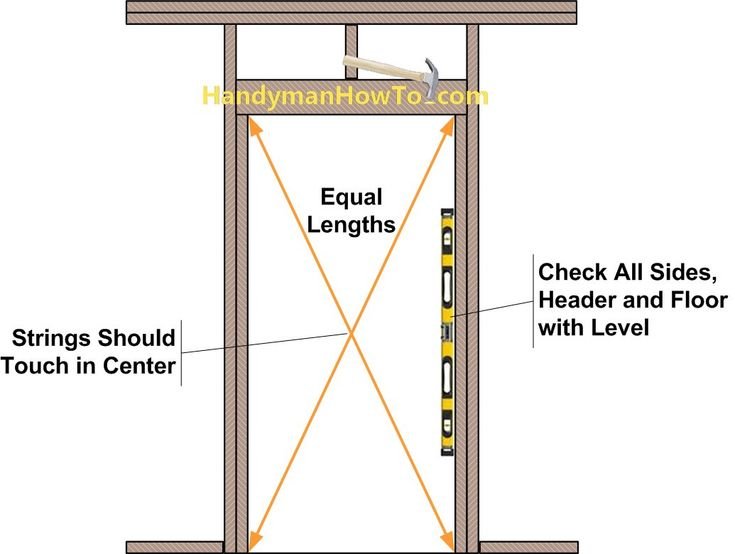
- Check the vertical (plumb) alignment: Place the level along the side edge of the door (the edge with the hinges). The level should touch as much of the edge as possible. Look at the bubble—is it centered between the lines? If it’s off, your door is leaning inward or outward, which is a classic sign of misalignment.
- Check the horizontal (level) alignment: Next, lay the level across the top of the door (called the “head jamb”). This checks whether the door is tilted to one side. Again, check the bubble position. If your house has settled or the hinges are loose, the top of the door might not be perfectly level.
- Check the frame, too: Sometimes, it’s actually the frame that’s wonky—not the door itself. Run the level along the vertical sides (jambs) and the top of the frame. Compare the bubble’s position to what you saw when measuring the door. If the frame and door are out of sync, that’s a key troubleshooting clue.
Tip: If you get different results on the latch side versus the hinge side, your door could be twisted. Take readings in several spots to get the full picture.
Common Causes of Door Misalignment (and How To Spot Them)
Here’s the truth: Sometimes, no amount of measuring will help unless you know why the door’s out of whack. Using a level gives you a clear sign *where* things are off, but it’s worth knowing the usual suspects.
- Loose or sagging hinges: A hinge that’s lost a screw or has stripped holes will let the door drop out of place. When you measure, the level will show a tilt—usually with the latch side drooping lower than the hinge side.
- Warped door or frame: Changes in temperature and humidity can make wood bend or swell. The level might show the door bowing in the middle or not matching the frame’s line.
- Settling foundation: Over time, houses move. If your level shows both the door and frame are tilted the same way, your whole wall might have shifted. That’s a bigger issue, but at least you know what you’re dealing with.
If you see gaps at the top or bottom when you close the door, or if the door locks easily in one season but not another, those are classic symptoms. The level just confirms what your eyes have been telling you.
How To Fix Exterior Door Alignment Issues After Checking
Finding that your door isn’t quite right can feel intimidating, but don’t worry—you’ve already done the hardest part by diagnosing the problem with your level. The next steps depend on what you found, and most fixes don’t require special codes, pairing, or extensive troubleshooting.
If the door is slightly out of plumb or level due to loose hinges:
- Tighten all hinge screws: Sometimes, this is all it takes. Use a screwdriver—not a power drill, which can strip old screws.
- Replace damaged screws: If they spin in place, swap them for longer screws that reach deeper into the framing.
If the frame is out of level but the door itself is fine:
- Shim the hinges: Place thin cardboard or wood shims behind the hinges on the frame to nudge the door back into place. Test alignment with the level after each adjustment.
- Adjust strike plates or weatherstripping: Sometimes, moving these a bit solves sticking or gaps after the door is re-aligned.
For bigger issues—like a warped door or major foundation issues—it’s smart to talk to a pro. But for most people, using a level helps you tackle the quick fixes that solve 90% of everyday misalignment problems.
What If You Don’t Have a Level? Alternatives and Quick Checks
Honestly, if you’re in a pinch and don’t have a level handy, you can still learn a lot about your door’s alignment. While nothing beats the accuracy of a proper spirit level, there are a few old-school tricks that come close.
- Use a string and weight: Tie a small weight to a string and hang it next to the edge of the door. This acts like a basic plumb line, showing you if the door leans left or right.
- Smartphone apps: There are free apps that turn your phone into a digital level. They’re not as precise, but they’re surprisingly good for quick checks if you have steady hands.
- Visual gaps: Close the door tightly and look at the gap between the door and frame all the way around. A gap that’s wider at the top or bottom—or uneven on one side—means something’s out of line.
If you need to check alignment for a single adjustment or before calling for professional help, these alternatives work in a pinch. But if you’re planning to make repairs, it’s worth grabbing an actual level for accuracy.
When to Call a Pro vs. DIY Door Alignment
You might be wondering when it’s time to throw in the towel and call a contractor. Here’s the thing: Most alignment issues, especially on newer doors or with simple hinge adjustments, are totally DIY-friendly. If the level shows just a mild tilt or you only need to tighten a few screws, go for it.
However, situations where you should consider a pro include:
- Major warping or splits in the door
- Frame or wall movement—if both the door and frame are off, you may have structural settling
- Repeated issues that keep coming back after you fix them
Also, if your exterior door is a specialty type—like an extra-large, double door, or a model with complex security hardware (think multi-point locks or smart entry systems)—it doesn’t hurt to get expert help. Some fixes require careful adjustments or even code resets for electronic locks after realignment.
Final Thoughts: Why It Pays To Check Your Door Alignment With a Level
At the end of the day, using a level to check your exterior door alignment is a simple, low-stress way to keep your home comfortable and secure. It takes just a few minutes, and you don’t need to memorize troubleshooting codes, sync up gadgets, or pair up with expensive tools. Whether you’re dealing with a decades-old wooden door or a brand-new steel model, the humble bubble level is your best friend for spotting small issues before they become big headaches.
So next time your door feels off—or you just want to avoid a future draft—grab your level and give your home a quick check. It’s one of those little DIY tasks that’s easy to skip, but makes a big difference in how your house feels and functions.