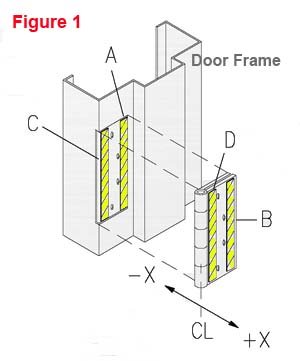
Hinge shims are small, often plastic or metal pieces that you can insert between the door hinge and the door frame. They help adjust the door’s position, making it easier to open and close. Just like using a cork under a wobbly table leg, hinge shims can bring stability to your daily routine. Let’s explore how to use a hinge shim effectively so you can get that door functioning like new again.
Understanding Hinge Shims and Their Purpose
Before diving into how to use hinge shims, let’s first understand what they are and why they’re essential. A hinge shim is designed to adjust the alignment of a door by adding a thin layer of material to the hinge area.
When a door is misaligned, it can cause various issues, like gaps between the door and the frame or difficulty in closing. Sometimes it’s due to settling in your home or the door itself warping over time. Using a shim allows you to create the right balance and alignment, ensuring the door functions smoothly.
By slipping in a shim, you can raise or lower the door slightly without the need for major renovations. It’s a quick and cost-effective fix that can save you from the hassle of replacing the entire door or frame.
Gathering Your Tools
Before you start, it’s essential to gather the right tools. Here’s what you’ll need:
- Hinge shims: These can be purchased at hardware stores or online.
- Screwdriver: A standard or power screwdriver will work fine.
- Level: To check the door’s alignment.
- Measuring tape: For accurate measurements.
- Pencil: To mark any necessary adjustments.
Having these tools on hand ensures you won’t have to interrupt your work to run to the store. Plus, it’ll make the process much smoother.
Identifying the Problem
Before jumping into action, you need to know what exactly is wrong with your door. Start by carefully inspecting the door itself. Here are a few common signs of misalignment:
1. Gaps or uneven spaces: Look for spaces between the door and the frame, especially at the top or bottom.
2. Difficulty closing or opening: Notice if the door sticks or requires extra force to operate.
3. Squeaking or grinding noises: Listen for unusual sounds when the door moves; this can indicate rubbing against the frame.
Once you identify the problem, it’ll be much easier to determine where to place your shim for the best results.
Measuring for Accuracy
Now that you’ve pinpointed the issue, it’s time to measure. Accurate measurements will help you know exactly how much adjustment your door needs. Follow these steps:
1. Use the level: Place a level against the door to check if it’s straight. If it tilts, note the direction and degree of the tilt.
2. Measure the gap: Use the measuring tape to find out the exact size of any gaps. This will tell you how thick your shim should be.
3. Mark your adjustments: Lightly mark with a pencil where the hinge needs to lift or lower.
By taking your time with measurements, you’re setting yourself up for a successful fix.
Installing the Hinge Shim
With your measurements in hand, it’s time to install the shim. Here’s how to do it in a few easy steps:
1. Remove the door: If needed, take the door off its hinges. This can make it easier to work with, especially if you’re using multiple shims.
2. Loosen the hinge screws: Use your screwdriver to slightly loosen the screws holding the hinge to the frame and door.
3. Insert the shim: Place the shim between the hinge and the door frame (or the door), depending on where it’s needed. Make sure it fits snugly.
4. Tighten the screws: Once the shim is in place, tighten the screws to secure the hinge. Be careful not to overtighten, which could warp the door or damage the shim.
5. Rehang the door (if removed): Place the door back on its hinges and test the alignment.
After reassembling, check to see if the door opens and closes smoothly. You might need to adjust the shim thickness based on how the door operates.
Testing and Adjusting
Once you’ve installed the shim, it’s crucial to test the door thoroughly. Open and close it a few times to check for smooth operation. If it still sticks or has gaps, you may need to make further adjustments.
Take note of any changes in alignment. If the door is now slightly off in one direction, you might need to add more shims or adjust the existing shim to fine-tune the alignment. This trial-and-error process is normal, especially if it’s your first time.
Maintenance and Care Tips
After you’ve successfully adjusted your door, it’s good practice to keep an eye on it for the future. Here are some tips for maintaining door alignment:
– Check regularly: Every few months, take a look at your doors to ensure they’re still aligned. Changes in humidity or temperature can affect wooden doors.
– Tighten screws: Ensure that all screws on the hinges are tight to prevent movement over time.
– Lubricate hinges: A little lubricant on the hinges will help maintain smooth operation and prevent squeaking.
By staying on top of these minor maintenance tasks, you can avoid bigger alignment issues down the road.
Using a hinge shim to correct door alignment issues is a straightforward fix that can make a world of difference. By following the steps outlined and paying attention to detail, you’ll have that door swinging smoothly in no time.
Remember, this isn’t just about aesthetics; it’s about functionality. A well-aligned door enhances safety and comfort, making your home a better place to live. So, gather your tools, take a deep breath, and tackle that door alignment issue today!