A hinge shim is a small piece of material that helps adjust the alignment of your door. Think of it like a little helper, nudging the door back into place so it behaves as it should. If your door is popping open or not closing properly, using a hinge shim might just be the solution you need. Today, we’ll take a deep dive into how to use a hinge shim to correct a door that springs back open, ensuring it operates smoothly.
Understanding Door Alignment Issues
Before we jump into using a hinge shim, let’s take a moment to understand why your door might not be closing properly. Door alignment issues can stem from several factors, including:
- Worn hinges: Over time, the weight of a door can wear down hinges, impacting how the door sits.
- Settling foundation: Changes in your home’s foundation can shift door frames, causing misalignment.
- Humidity and temperature: Wood doors can swell or shrink due to moisture levels and temperature changes, affecting their fit.
When a door is improperly aligned, the weight can cause it to swing open, especially on an incline. In many cases, a shim can easily fix these issues, bringing your door back to its functional best.
What is a Hinge Shim?
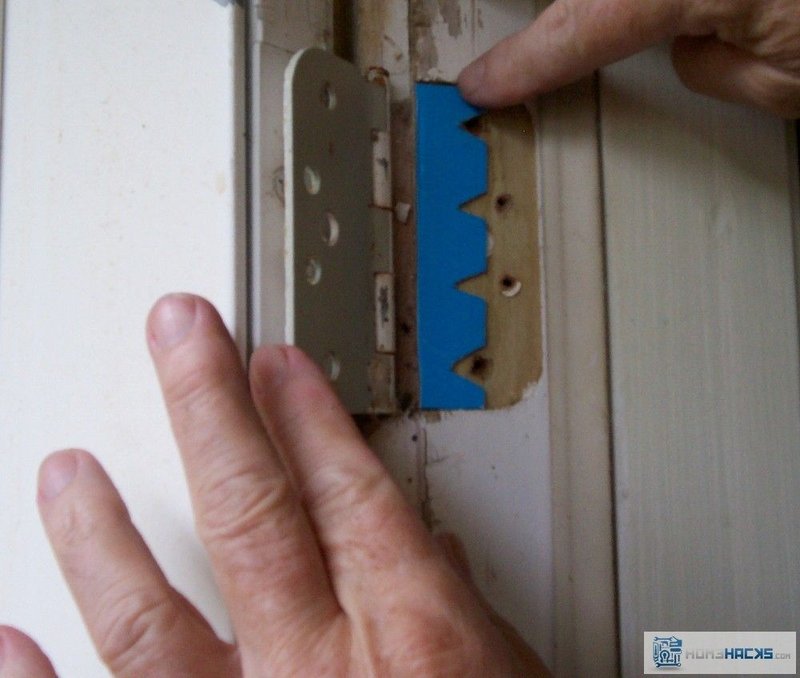
A hinge shim is a thin piece of material that you insert between the door hinge and the door frame or between the hinge and the door itself. They can be made from various materials, such as plastic, wood, or metal, and come in different thicknesses.
Here’s the thing: the shim’s job is to adjust the angle of the hinge, effectively bringing the door back into alignment. If you think of it as a wedge, it helps to fill the gap and redistributes the weight of the door more evenly. This adjustment can be just what you need to keep your door from springing back open.
Gathering Your Tools
Before you begin this little DIY project, it’s essential to gather your tools. Here’s what you’ll need:
- Hinge shims: You can buy these from any hardware store or online. Look for options that specify “door shims.”
- Screwdriver: Make sure it’s the right size for your hinge screws.
- Level: A level helps you check if the door is straight after your adjustments.
- Utility knife: You might need this to cut shims to the right size.
Once you have everything ready, you’re set to dive into the process of correcting that pesky door.
How To Identify the Problem Area
Before you start shimmying things around, it’s crucial to identify where the problem lies. Here’s how you can do that:
1. Inspect the hinges: Look for signs of wear or damage. Are they loose? Do they droop? These can be indicators that a shim is needed.
2. Check the door itself: Close the door gently and observe if it stays shut. If it springs back open, take note of which way it swings—this will help you determine where to place the shim.
3. Use a level: Place a level on the top of the door to see if it’s level. If not, you’ll need to adjust the hinges.
This step is key! By identifying the problem area, you’ll make the shimming process much more straightforward.
Installing the Hinge Shim
Now comes the fun part! Here’s how to install a hinge shim step by step:
1. Remove the hinge screws: Use your screwdriver to carefully take out the screws on the hinge you’re adjusting.
2. Insert the shim: Depending on where you need to make your adjustment, slide the shim behind the hinge plate or in front of it. Be sure it’s snug.
3. Reattach the hinge: With the shim in place, screw the hinge back onto the door frame. Make sure everything is tight, but don’t overdo it.
4. Check the alignment: Close the door and see if it stays shut. If not, you may need to add another shim or adjust the existing one.
After following these steps, your door should be behaving much better!
Testing Your Work
Once you’ve installed the shim(s), it’s time for a little test drive. Close the door several times to ensure it stays shut. If it springs back open, don’t fret—this might mean you need to adjust the shim’s thickness or position.
Sometimes, it may take a few tries to get it just right. Don’t be discouraged if it doesn’t work on the first go! Just keep adjusting until you find the sweet spot. Using a level during this process can help confirm that your door is correctly aligned.
Common Mistakes to Avoid
When adjusting your door with a shim, it’s easy to make some common mistakes. Here are a few to watch out for:
– Using the wrong shim thickness: If the shim is too thick, it can create new alignment issues. Test different thicknesses to see what works best.
– Not checking the alignment: Always check that your door is level after installation. A crooked door can cause more problems down the line.
– Over-tightening screws: You might think that tighter is better, but over-tightening can strip the screws or damage the hinges.
By keeping these points in mind, you’ll have a smoother experience and a well-functioning door.
When to Call a Professional
While most door issues can be fixed with a shim, there are times when calling in a pro is the best move. If you find that multiple doors have issues or your door is experiencing severe gaps, it might be a sign of a larger problem—like structural issues with your home.
A professional will have the expertise to diagnose and fix these problems safely. But if it’s just a matter of a door springing back open, you’re well-equipped to handle it yourself with these tips.
Fixing a door that springs back open doesn’t have to be a headache, especially with a handy tool like a hinge shim. By understanding the problem, gathering your tools, and following the proper steps, you can achieve a smooth-operating door in no time.
Remember, every door is a little different, so don’t hesitate to tweak your approach as needed. With a little patience and practice, you’ll be the shim expert in no time, keeping your doors in check and saving yourself from those grocery-carrying mishaps!