Imagine you’re preparing to install a beautiful wooden door. You could measure, then measure again, but without the right tools, you might end up with hinges that are too deep or too shallow. Using a hinge setter tool is like having a secret weapon—it simplifies the process and helps you achieve professional results, even if you’re a beginner. Brands like Kreg have specialized hinge setter tools designed to make mortising easier than ever. Let’s dive into how to make the most of this handy tool!
What is a Hinge Setter Tool?
A hinge setter tool is designed specifically for cutting mortises for door hinges. It helps you create a precise recess in the door and frame, ensuring that your hinge sits flush with the surface. If you’re picturing a complicated contraption, let me put your mind at ease: it’s usually a simple, user-friendly handheld device. Some models even have built-in guides to help you set your depth correctly.
Here’s how it works: the tool has a base that rests against the door, while the cutting action happens at a consistent depth set by the adjustable blade. This means you’ll get consistent results each time, no matter how many hinges you’re installing. Think of it as having a reliable measuring cup for baking; it ensures each batch of cookies comes out just right!
Why Mortise Depth Matters
You might be wondering, “Why should I care about mortise depth?” Well, here’s the thing: if the mortise isn’t the right depth, your hinges might not function properly. A hinge that’s too deep can make the door sag, while one that’s too shallow can prevent it from closing or opening smoothly.
Imagine trying to ride a bike with a flat tire—it just doesn’t work well! Similarly, a misaligned hinge creates frustration instead of function. The right mortise depth allows your hinges to operate smoothly, providing the durability and performance you expect from your door. Plus, your project will look much cleaner and more professional.
How to Set Up Your Hinge Setter Tool
Setting up a hinge setter tool is straightforward, which is great news! Here’s a quick guide to help you get started:
- Gather your materials: You’ll need your hinge setter tool, a pencil, a measuring tape, and wood where you’ll be installing the hinges.
- Measure carefully: Use the tape measure to determine the height at which you want to install your hinge. Mark this clearly on the wood.
- Adjust your tool: Most hinge setters allow you to adjust the depth. Set it according to the thickness of your hinges; typically, you want around 1/8 inch for a standard hinge.
- Alignment: Place the tool on your marked spot, ensuring it’s straight and flush with the wood. This will help you maintain accuracy while cutting.
With these simple steps, you’ll be ready to create those perfect mortises!
Using the Hinge Setter Tool
Now that your hinge setter tool is set up, it’s time for the fun part—actually using it! Here’s how you can dive into the mortising process:
1. Position the Tool: Place the hinge setter tool firmly against the wood at your marked location. The base should be parallel to the edge of the wood.
2. Start Cutting: Power it on (if it’s electric) or engage the cutting action. Gently push down, letting the tool do the work. It should create a nice, clean mortise without much force.
3. Check the Depth: After cutting for a few seconds, lift the tool and check the depth. You can use a small ruler or feeler gauge to ensure it’s just right.
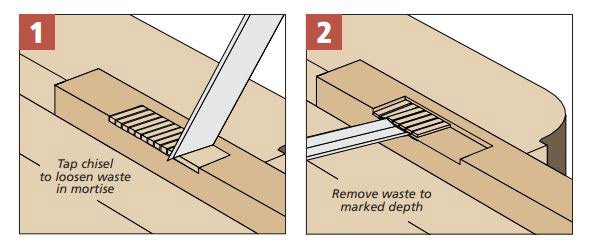
4. Tidy Up: Once you’ve reached the desired mortise depth, smooth out any rough edges. A chisel or sandpaper can come in handy here for a clean finish.
Using the tool might feel a bit intimidating at first, but with practice, it becomes second nature. Just think of it like driving a car—you get better and more confident the more you do it!
Common Mistakes to Avoid
Even seasoned pros can slip up, so here are common mistakes to watch out for when using a hinge setter tool:
– Rushing the Setup: It’s tempting to skip measuring, especially if you’re excited to start. Take those extra minutes to ensure your setup is solid.
– Ignoring Depth: If you ignore depth adjustments, you may end up with a mortise that’s either too deep or shallow. Always double-check before cutting.
– Incorrect Alignment: If your hinge isn’t aligned perfectly, your door won’t function the way it should. Take the time to ensure everything is straight and level.
– Overdoing It: Cutting too aggressively can cause splintering or damage to the wood. Gently guide the tool for best results.
Awareness of these common pitfalls can save you time and lead to a more successful project.
Maintaining Your Hinge Setter Tool
To keep your hinge setter tool in top shape, regular maintenance is essential. Here are some quick tips to ensure longevity:
– Clean After Use: Wood dust or debris can build up on your tool, affecting performance. Use a soft cloth to wipe it down after each use.
– Check the Blades: If the cutting blades become dull, replace or sharpen them promptly. Dull blades can lead to uneven cuts and frustration.
– Store Safely: Keep your hinge setter tool in a dry place to avoid rusting or damage. A toolbox or dedicated shelf works perfectly.
By taking these simple steps, you’ll keep your tool performing well for years to come!
Alternatives to Hinge Setter Tools
If a hinge setter tool isn’t for you, there are alternatives worth considering. You can use:
– Chisel and Router: A traditional method involves using a chisel and router. While it requires more skill, it offers flexibility for various hinge sizes.
– Hinge Jigs: A jig can help align and guide your cuts, providing an alternative to a hinge setter tool. However, some jigs can be bulky and less portable.
– Handheld Mortisers: These electric tools can cut full mortises quickly and accurately. They usually come at a higher price point and may not be necessary for smaller projects.
Each of these methods has its pros and cons, so choose one that fits your style and needs.
In conclusion, using a hinge setter tool for perfect mortise depth may take a bit of practice, but it’s a valuable skill worth mastering. Think of it as a way to bring your woodworking projects to a whole new level! You’ll find that with each hinge you install, you’re not just improving your skills but also gaining confidence in your abilities. So grab that tool, take your time, and enjoy the satisfaction of a job well done!