
The solution to your squeaky door might be simpler than you think. Enter the hinge pin—that small metal piece connecting the door to its frame. It’s often overlooked, but this little hero is key to solving that squeaky problem. Just like how a tiny pebble can cause a shoe to pinch your foot, a small issue with your door hinge can lead to a lot of noise. In this guide, I’ll walk you through how to use a hinge pin to troubleshoot door squeaks and restore quiet to your home.
Understanding the Hinge Pin and Its Role
Before diving into troubleshooting, let’s start with the basics. The hinge pin is the metal rod that holds the two parts of the hinge together. Think of it as the backbone of your door’s movement. When the door opens and closes, the hinge pin allows it to pivot smoothly. However, over time, dirt and grime can build up around the hinge, or the lubrication can wear off, leading to that irritating squeak.
You might wonder why a squeaky door is such a big deal. Aside from being annoying, it can indicate a more serious issue. If left unchecked, a squeaky door could lead to misalignment, which might affect how well the door closes or even lead to potential damage. So, keeping those hinges in good shape is important!
Why Do Doors Squeak?
You might be curious about what causes that squeaking noise. Typically, it results from friction between two metal surfaces—the hinge and the pin. When the lubricant inside the hinge dries out, it compacts dirt and debris, making it harder for the hinge to move smoothly. This friction creates the familiar squeaky sound. In short, a squeaky door often signals that it’s time for a little maintenance.
Gathering the Right Tools
To troubleshoot a squeaky door hinge with the hinge pin, you don’t need an elaborate toolkit. Here’s what you’ll need:
- Screwdriver: Depending on your hinge, this might be a flathead or Phillips.
- Lubricant: A silicone-based spray or even common household oils like WD-40 are great options.
- Cloth: For cleaning off dirt and old lubricant.
- Protective gear: Safety goggles can be handy to protect your eyes from debris.
Getting these items together is the first step toward a quieter door. And remember, you don’t need to be a DIY expert to handle this. Just like assembling a puzzle, taking it step by step makes it easy.
Removing the Hinge Pin
Once you have your tools ready, it’s time to get to work. Here’s how to remove the hinge pin:
1. Open the Door: Start by opening the door fully. This position gives you better access to the hinge.
2. Locate the Hinges: Find where the hinges are attached to the door frame and the door itself. Usually, they’re visible and easy to spot.
3. Use the Screwdriver: If your hinge has visible screws, use your screwdriver to remove them. If not, you might need to tap the hinge pin out. Just be gentle—a few light taps with the handle of your screwdriver usually do the trick.
4. Pull Out the Hinge Pin: Once the screws are out or the pin is slightly loosened, you can pull the hinge pin straight out. It should come out easily if it’s not too gummed up.
With the pin removed, you’ll be able to clean and lubricate it more effectively.
Cleaning and Lubricating the Hinge Pin
Now that you’ve got the hinge pin out, it’s time to clean it. Here’s how you can do that:
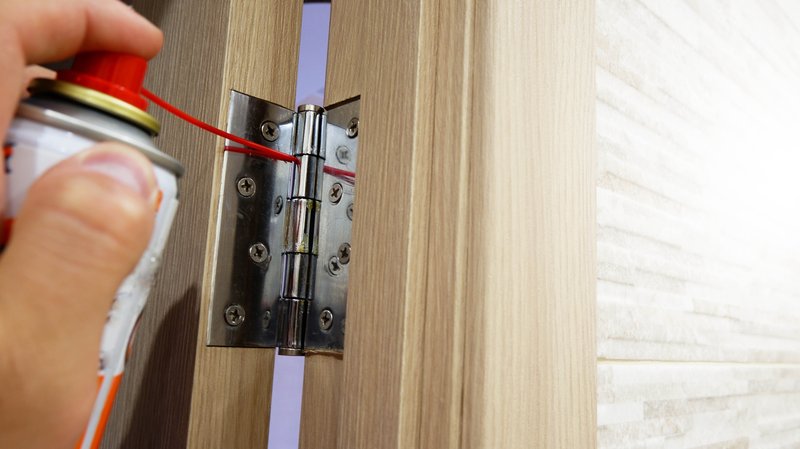
1. Wipe Down the Pin: Grab your cloth and wipe off any dirt or old lubricant on the hinge pin. Make sure it’s nice and clean. If there’s stubborn grime, you can use a bit of solvent or a stronger cleaner, but be careful not to get it on your clothes or surfaces.
2. Spray Lubricant: Once the pin is clean, apply your lubricant. If you’re using spray lubricant, hold the can about 6-8 inches away from the pin. A light, even coat is all you need.
3. Move the Pin: While you’re spraying, move the hinge pin up and down slightly to help the lubricant penetrate better.
4. Let It Settle: Allow the lubricant to sit for a few minutes so it can work its magic.
Lubricating not only helps reduce friction but also protects the hinge from future rust or corrosion, prolonging its life.
Reinstalling the Hinge Pin
After cleaning and lubricating the pin, you’re ready to reinstall it. Here’s how to do that properly:
1. Align the Pin: Place the hinge pin back into the hinge. Make sure it aligns perfectly with both the door and the frame.
2. Push It Down: Gently press the pin down until it’s snug. If it feels stuck, give it a few light taps with your screwdriver handle to get it in place.
3. Reattach the Screws: If you removed any screws, be sure to screw them back in tight. This secures the hinge pin and keeps everything in place.
4. Test the Door: Open and close the door a few times to check for any lingering squeaks. If you still hear noise, you may need to repeat the lubrication step.
Common Troubleshooting Tips
Even after all this work, sometimes the squeaking persists. Here are a few troubleshooting tips if you still have issues:
– Check for Misalignment: A misaligned door can cause extra stress on the hinges. Check if your door sits evenly in its frame.
– Inspect for Damage: Look for any signs of wear on the hinges or the door itself. A damaged hinge might need to be replaced entirely.
– Consider New Hinges: If all else fails, you might need to replace the hinge. Sometimes, investing in new hardware makes all the difference.
Remember, even minor adjustments can lead to huge improvements. Your goal is to create a door that opens and closes smoothly without that pesky sound.
Final Thoughts on Door Maintenance
Keeping your doors in good condition doesn’t just help with squeaks; it also extends their lifespan and ensures they operate smoothly. Using a hinge pin to troubleshoot door squeaks is a simple, effective way to tackle a common household issue. Plus, it’s a project that anyone can handle with a little bit of patience and the right tools.
So, don’t let squeaky doors drive you crazy. With these steps, you can enjoy a quieter home in no time. And who knows? You might even feel like a DIY pro when you’re done! Happy fixing!