Hinge pin pliers are specifically designed to safely grasp and remove hinge pins without damaging the surrounding area. Think of them as the perfect pair of tweezers but for door hardware. Brands like Irwin and K Tool International offer reliable options that can help you tackle this task with confidence. So, let’s dive into how these tools work and how you can use them effectively to get those hinges out without breaking a sweat.
What Are Hinge Pin Pliers?
Hinge pin pliers are specialized tools that help you remove and insert hinge pins with ease. The design typically features a long handle that provides leverage and a gripping mechanism that securely holds the pin. This makes it much easier than using your fingers or other tools, which might slip and cause damage.
Why choose hinge pin pliers over other methods? Well, when dealing with stubborn pins, you want a tool that minimizes the risk of damaging the hinge or the door itself. Plus, using the right tool saves you time and effort. You’ll find that once you use hinge pin pliers, you’ll wonder how you ever managed without them.
How to Identify Hinge Pins
Before you even think about using your hinge pin pliers, you need to locate the hinge pins. Typically, they are located at the center of the hinge. You can spot them easily if you’re looking at the side of the door. They are cylindrical and fit into the hinge leaves.
Sometimes, you might encounter different types of hinges, such as concealed or butt hinges. Butt hinges are the most common in residential doors and feature clearly visible pins. Take a moment to inspect your hinges before proceeding, as this will help you understand how best to use your pliers.
Gathering Your Tools
Now that you know what hinge pins are, it’s time to gather your tools. You’ll need:
- Hinge pin pliers: The star of the show. Make sure you have a quality pair that feels comfortable in your hand.
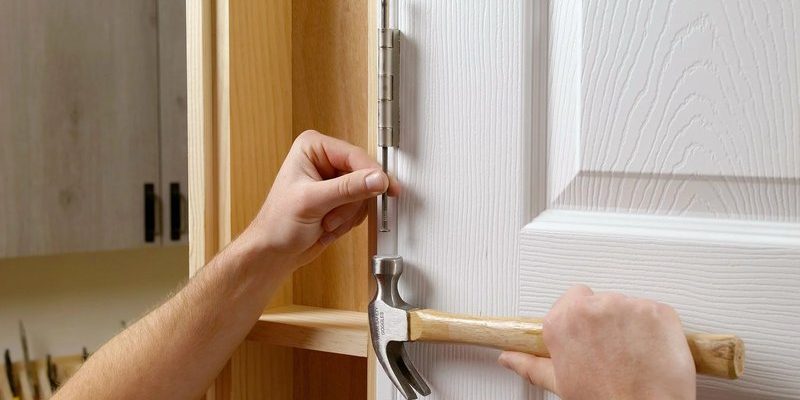
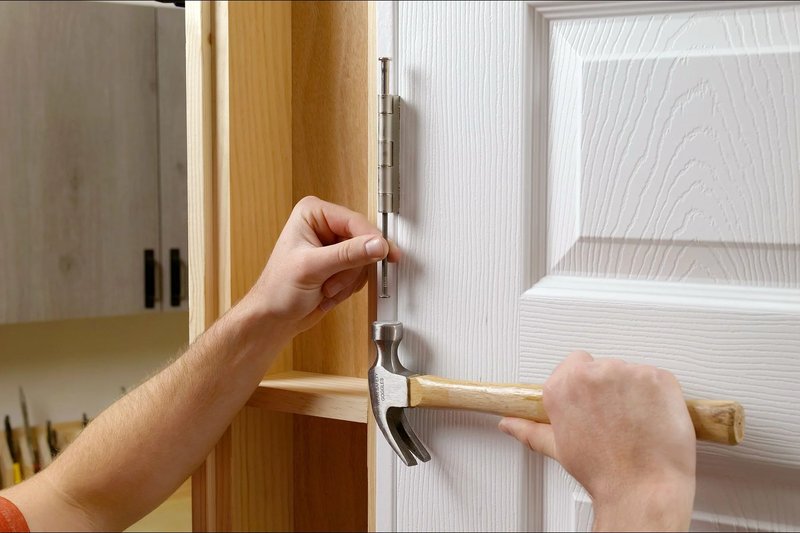
- Hammer: Sometimes, a gentle tap can help loosen stubborn pins.
- Protective eyewear: Safety first! Protect your eyes from any flying debris.
- Drop cloth or towel: To catch any falling pins or grease and to protect your floor.
Having everything ready will streamline the process, helping you get the job done more efficiently.
Using Hinge Pin Pliers Step by Step
You might be wondering how to actually use hinge pin pliers. Don’t worry; it’s simpler than it sounds! Here’s a step-by-step guide to make your experience smooth.
Step 1: Position the Door
Ensure that the door is well-supported. If you’re dealing with a heavy door, it might be a good idea to have a buddy help you hold it in place, or use wedges to keep it steady. This prevents any unnecessary strains or accidents while you work.
Step 2: Align the Pliers
Place the hinge pin pliers over the hinge pin. Make sure the gripping end of the pliers is firmly around the pin. This is crucial; if the grip is too loose, you risk slipping and damaging the hinge.
Step 3: Extract the Pin
Gently squeeze the handles of the pliers. You might find that it takes a bit of pressure to get the pin moving. If the pin doesn’t budge, don’t panic—try tapping it lightly with a hammer to loosen it. Once it starts to move, keep applying pressure and pull it straight out.
Step 4: Repeat for Other Pins
If your door has multiple hinges, repeat the above steps for each one. Once all pins are removed, carefully lift the door away from the frame.
Common Mistakes to Avoid
Using hinge pin pliers might seem straightforward, but there are a few common pitfalls that can create headaches.
- Not checking the direction: Always make sure you’re pulling the pin in the correct direction. Most hinge pins come out by pulling upwards.
- Overgripping: While it might be tempting to apply excessive force, too much pressure can warp the hinge. Apply steady, consistent pressure instead.
- Forgetting safety: Always wear protective eyewear and ensure the area is clear from any potential hazards.
By being mindful of these common mistakes, you’ll not only save time but also avoid unnecessary damage.
Why Hinge Removal is Important
You might be asking why you need to remove hinge pins in the first place. Well, hinge removal is essential for several reasons.
Firstly, it allows for easy door painting or refinishing. When a door is off its hinges, you can paint every nook and cranny without worrying about overspray. Secondly, if a hinge is damaged, removing it gives you the chance to replace it without the need for a specialist. Lastly, it’s a vital step for any renovation project involving cabinetry or furniture, ensuring everything fits perfectly.
Alternatives to Hinge Pin Pliers
If you don’t have hinge pin pliers handy, there are alternatives, although they may not be as effective. Some people use a flathead screwdriver to pry the hinge pin up, but this method can damage the pin or the hinge itself if you’re not careful.
Another option is using a pair of needle-nose pliers, though they don’t offer the same level of grip and control. If you plan on doing this often, investing in a good pair of hinge pin pliers is definitely worth it.
Using hinge pin pliers can transform a frustrating task into a straightforward one. With the right tools and knowledge, you can tackle door maintenance with confidence. You’ve learned how to identify hinge pins, gather your tools, and effectively use hinge pin pliers, all while avoiding common mistakes.
So, next time you face a stubborn door, remember this guide. Hinge pin pliers are your friends, ready to help you dive into your home projects with ease. Happy DIY-ing!