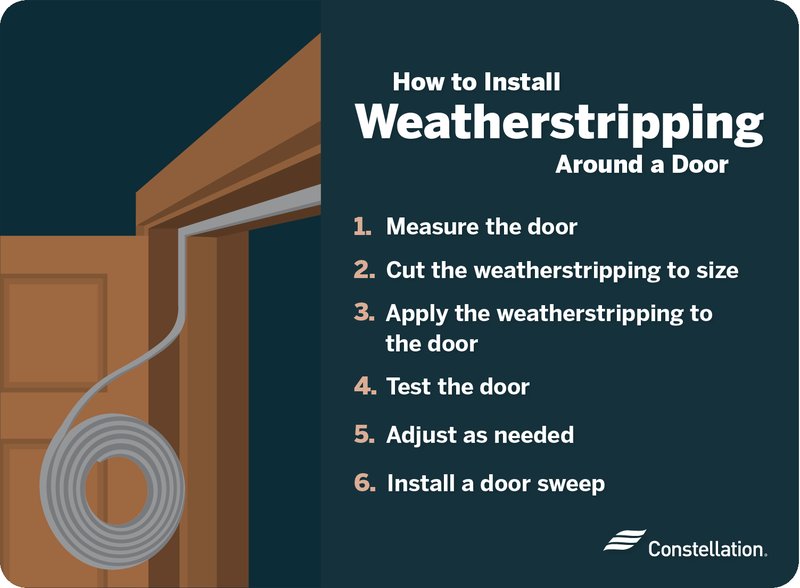
Let’s talk specifics. For most weatherstrip repairs, people reach for well-known gasket sealer brands like Permatex or 3M Black Super Weatherstrip Adhesive—think of these as the “super glue” for your car’s rubber seals or your home’s door insulation. But unlike regular glue, they’re made to flex and hold up against rain, heat, and vibration—making them perfect for this job. Today, I’ll walk you through how to use a gasket sealer for permanent weatherstrip repair, without any guesswork or DIY headaches.
What Is A Gasket Sealer And How Does It Work?
Here’s the thing—*gasket sealer* is not just another sticky substance. It’s a specialized adhesive designed to stay flexible, waterproof, and tough even when squeezed between tight surfaces. You’ll see these come in little squeeze tubes, usually black or yellow depending on the brand, and they often have a pretty strong chemical smell. That’s because they’re engineered to handle oil, water, vibration, and even engine heat.
When you use a gasket sealer on a weatherstrip, it works by forming a tight, rubbery bond between the surface and the strip itself. It fills in little gaps—even the tiny ones you can’t see—so air and moisture can’t sneak through. If you’ve got a spot where the weatherstrip keeps popping off, or you tried regular glue and it just didn’t hold, you’ll appreciate how strong this stuff is.
Honestly, a good gasket sealer like Permatex Ultra Black or 3M Weatherstrip Adhesive can make the difference between a temporary patch and a fix that truly lasts. Instead of worrying whether another rainy day will undo your repair, you’ll know the weatherstrip is back to sealing like it was meant to—no leaks, no drafts, no problem.
When Should You Use A Gasket Sealer For Weatherstrip Repair?
You might be wondering, isn’t weatherstripping just something you replace? Sometimes, yes. But there are plenty of situations where a *gasket sealer* is the better move. If you’ve got a weatherstrip that’s just peeling at one spot, or a door seal that’s loose but still in good shape, sealer can save you time, money, and hassle.
Let’s say you notice the weatherstrip on your car door is peeling off in one corner. The rest of the strip is fine, but water starts sneaking in when you drive through rain. In this case, instead of replacing the whole weatherstrip (which can be pricey and tricky to fit), a bead of gasket sealer will anchor that loose section and keep everything sealed. The same goes for home weatherstripping around old doors or windows—especially if you’re dealing with vintage woodwork where new strips just don’t fit quite right.
I’ve helped friends with both cars and houses, and honestly, once you see how permanent and clean the fix is, you might start reaching for the gasket sealer more often than you think. It’s about fixing what you have, not just swapping parts at the first sign of trouble.
Tools And Materials You’ll Need
Before you start, it’s smart to gather everything you’ll need. Trust me, nothing’s more annoying than realizing you’re missing a glove or a rag *after* you’ve started squeezing out the adhesive. Here’s what you’ll want for a clean, hassle-free weatherstrip repair:
- Gasket sealer: Pick a trusted brand like Permatex or 3M—make sure it says “weatherstrip” and “permanent” on the label.
- Disposable gloves: This stuff is sticky and tough to wash off skin.
- Clean rags or paper towels: For cleaning and quick wipe-ups.
- Rubbing alcohol or adhesive remover: To get rid of dirt, old glue, and oils so the sealer sticks well.
- Painter’s tape: For masking off areas you want to keep clean.
- Wooden stick or plastic spatula: For pressing down and smoothing the weatherstrip.
- Small brush or cotton swabs: Handy for getting sealer into tight areas.
Let me explain: prepping with the right tools means less mess and a cleaner-looking end result. If you’re patching a car door, you might also want to park in a dry, shaded spot so the adhesive doesn’t set too quickly or attract dust.
How To Prepare The Area For Repair
Before you even touch the *gasket sealer*, it’s all about the prep. Think of it like painting—a great repair starts with a clean, dry, and properly masked-off surface. If you skip this step, even the fanciest sealer might let go over time. Here’s how to get started:
- Clean the weatherstrip: Use a rag or paper towel with rubbing alcohol to wipe away dust, old glue, grease, or dirt. Give it a few minutes to dry out completely.
- Remove loose pieces: Any old bits of weatherstrip that are torn, brittle, or just hanging by a thread should be trimmed away with scissors. Clean edges mean a smoother, more permanent seal.
- Mask with painter’s tape: If you care about the paint or trim nearby, run a line of tape along the edges. This prevents sticky sealer from smearing where you don’t want it.
Honestly, I can’t tell you how many times people rush this step and end up with a repair that looks messy or fails a few weeks later. Take your time—it makes all the difference.
Step-By-Step: Applying Gasket Sealer To Weatherstrip
Here’s where things actually get sticky—in a good way! Let’s break it down:
- Squeeze out a thin bead: Run a small, steady line of gasket sealer along the edge or area where the weatherstrip comes loose. Less is more here; too much can ooze out and look messy.
- Press the weatherstrip in place: Using your gloved fingers or a plastic spatula, firmly press the weatherstrip back where it belongs. Hold it for 30 seconds to a minute to help the sealer “grab.”
- Wipe off any excess: Use a clean rag to remove sealer that squishes out the sides—do this before it dries.
- Secure while drying: For stubborn spots, a bit of painter’s tape can help hold the weatherstrip in place as it cures. Some brands set in 10–15 minutes, others need a few hours—always check the label.
“The trick is patience. Letting the gasket sealer cure fully is what makes the repair permanent. Don’t be tempted to slam the door or take the car for a drive too soon!”
If you’re patching a long strip, it’s fine to do it bit by bit. And if you need to code or pair an electronic lock with your newly sealed weatherstrip, don’t worry—cured sealer won’t mess with battery-powered gadgets or remote sensors.
How To Tell If Your Weatherstrip Repair Worked
After you’ve given the sealer time to cure, it’s time for the moment of truth. You want your weatherstrip repair to be truly “permanent”—not just good enough for the next week. Here’s what to look for:
- No more drafts or leaks: On a car, hose down the door edge and check for water sneaking in. At home, run your hand near the repair on a windy day—no cold air should come through.
- Firm attachment: Gently tug the weatherstrip where you applied the sealer. If it feels rock solid and doesn’t peel up, you’re golden.
- Clean look: The strip should sit flush, without bumpy spots or big blobs of adhesive. If there’s some extra, you can carefully trim it once it’s cured.
You might also notice less road noise in your car, or your door at home closing with a more satisfying “thunk.” That’s the sealer doing its job—making everything airtight again without needing a full reset or replacement.
Common Mistakes To Avoid With Gasket Sealer
Even the best sealer can’t fix every problem if you miss a critical step. Let me flag a few classic mistakes:
- Rushing the prep: Skipping the cleaning step means the sealer won’t bond well, leading to early failure.
- Too much or too little adhesive: A mountain of goo won’t hold better—in fact, it can delay curing or squeeze out onto trim. On the flip side, a tiny dab won’t anchor the strip for long.
- Moving the weatherstrip before it cures: This can “reset” your work, breaking the bond. Stick to the cure time on the package—even if you’re in a hurry.
- Using sealer on cracked or rotten strips: If your weatherstrip is really falling apart, it’s time for a full replacement—not just a patch.
“Permanent doesn’t mean indestructible—start with good materials, use the right amount of sealer, and don’t rush. That’s the secret to a repair you only have to do once.”
If you ever feel unsure, check the sealer’s troubleshooting tips on the package. It’s better to ask than to guess—and ending up with another draft or leak a week later.
Alternatives To Gasket Sealer For Weatherstrip Repair
You’re not totally out of luck if you don’t have gasket sealer on hand. There are alternatives, but each comes with its own pros and cons. Some folks try double-sided tape or generic super glue, and while these can work in a pinch, they aren’t made for the constant movement or weather exposure that weatherstripping faces.
Other options include:
- Silicone adhesive: It’s flexible and waterproof, but may not stick as well to certain rubber types—always check compatibility.
- Replacement weatherstrip: Sometimes it’s easier (and more permanent) to just swap out old, damaged strips for new ones. Universal weatherstrip kits exist, but matching the exact fit can be a pain, especially with older doors or windows.
- Contact cement: This can bond fast and strong, but it doesn’t flex as much as gasket sealer—so it can crack over time, especially in cars or spots that see lots of movement.
Honestly, for a job you don’t want to repeat, sticking with a true gasket sealer—like 3M Black Super Weatherstrip Adhesive or Permatex—is the safest bet. They’re specifically designed for this job, pairing flexibility with strength so your repair stands up to anything Mother Nature (or a rowdy car door) throws at it.
Final Thoughts: Lasting Results With Minimal Hassle
There’s something satisfying about getting a weatherstrip to stay put and do its job, especially when you know the repair will last for years, not just months. Using a *gasket sealer* for permanent weatherstrip repair is like giving your door or window a new lease on life—quiet, dry, and draft-free. The best part? With a little patience and attention to detail, anyone can pull off a pro-level fix. So next time you spot that loose corner or feel a chilly breeze sneaking in, you know just what to do. Roll up your sleeves, grab your trusty gasket sealer, and enjoy a repair that truly sticks.
