That’s where a feeler gauge comes in. This humble tool, usually found in mechanics’ toolkits, can turn a vague “it feels drafty” into precise numbers. Think of a feeler gauge like a set of measuring spoons but for air gaps. Whether you’re using a trusty Tekton, Starrett, or a basic budget brand, the steps are the same—they all help you measure those door gaps to get a perfect weatherproof seal.
Let me walk you through how a feeler gauge works, where to use it on your door, and what to do after you’ve got your gap measurement. If you’ve never even heard of a feeler gauge, no stress—by the end of this, you’ll be reading door gaps like a pro mechanic reading spark plugs.
Why Measuring Door Gaps Matters for Weatherstripping
If you don’t know how big your door gap is, picking weatherstripping is a gamble. You might buy something too thin, which lets air keep flowing in, or too thick, which makes your door tough to close. Both options are a headache: one costs you comfort and money, the other leads to slamming doors and cracked paint.
Here’s the thing—measuring door gaps with a feeler gauge means you can match the *right size* of weatherstripping to your exact needs. The result? Your door shuts snug like a puzzle piece, blocking drafts, dust, and bugs. Anyone who’s tried to “eyeball it” knows the pain of gaps that don’t seal or doors that suddenly feel welded shut. You’re not just making your home cozier; you’re saving on energy bills and keeping everyone more comfortable.
Honestly, weatherstripping is one of those home fixes that makes everything better without a ton of money or effort—*as long as you measure first*. With a feeler gauge, you’re working smart, not hard.
What Is a Feeler Gauge and How Does It Work?
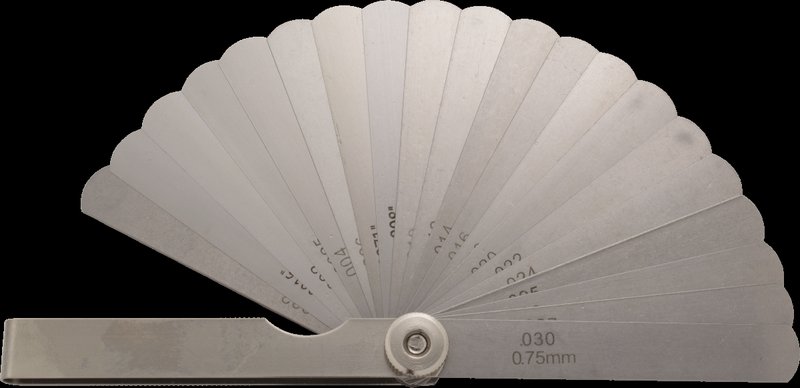
A feeler gauge is a simple tool, but if you’ve never seen one, it might look a little mysterious. It’s basically a stack of thin metal blades, each labeled with its exact thickness (in millimeters or thousandths of an inch). Imagine a pocket knife where every blade is a different width. Each blade is *super* flat and strong—they’re made to slip into tiny spaces, just like the gap between your door and the frame.
To measure a gap, *you slide different blades from the gauge into the space* until you find the one that fits snug, but not tight. Sometimes you’ll need to layer a couple blades together to get the exact thickness, especially if the gap isn’t a perfect match for a single blade. The number stamped on the blade tells you the size of the gap, down to a fraction of a millimeter.
You might be wondering, “Isn’t that for car engines?” Yep, mechanics use feeler gauges to check spark plug gaps or valve clearances. But they work for anything where *precise measurements* of small spaces matter—door gaps for weatherstripping included. Whether you grab a fancy Starrett set or a no-name kit from the hardware store, the principle is the same.
How To Prepare Your Door and Feeler Gauge
Before you dive in, a little setup goes a long way. First, grab your feeler gauge—make sure it’s clean, with no rust or oil. Wipe the blades with a dry cloth if needed. Nothing ruins an accurate reading like gunk on your tools.
Next, look at your door. *Close it fully* and latch it, just like you would when you’re trying to block drafts. Any paint chips, dirt, or old weatherstripping stuck to the frame? Go ahead and scrape those off so you’re measuring the true gap, not some built-up grime. Honestly, you want the area as clean as possible—this one step can make or break your results.
Finally, grab a flashlight. Some door gaps can be tough to see, especially at the top or along a dark hallway. Light things up so you’re not working blind. If you need to, remove any bulky weatherstripping before measuring. Don’t worry, you’ll put fresh material on once you know the right size.
Tip: Keep track of which blade(s) you use for each spot by snapping a quick photo or jotting down the sizes. Door gaps can vary along the frame!
Step-By-Step: How To Use a Feeler Gauge to Measure Door Gaps
Let me explain how to actually *use* your feeler gauge for this job. Here are the steps:
- Pick your starting spot. Most people start at the bottom of the door, but check the sides and top too. Door gaps aren’t always even.
- Slide a single blade into the gap. If it’s loose, try a thicker blade. If it won’t go in, try a thinner one.
- Find the blade that “just fits.” You want it to slide in without force, but also without wobble. That’s your gap size.
- Combine blades if needed. If the perfect fit is between two blade sizes, stack them together. Feeler gauges are designed for this! Add up their numbers for the total thickness.
- Write down each measurement. Move around the door—bottom, latch side, hinge side, and top. Gaps can change from spot to spot.
If you hit a tight spot, like near a weather seal or hinge, *try different blade angles* or gently wiggle the blade. Don’t bend it; you want to keep those blades perfectly flat. If the door moves as you measure, hold it steady or have someone press on the outside while you check.
Here’s a tiny story: The first time I did this, I thought my whole door had a “standard” gap. Turns out, the top was twice as wide as the side! Without measuring every section, I would’ve bought weatherstripping that was totally wrong for most of the door. Save yourself the headache—get a full picture before heading to the hardware store.
What To Look for When Measuring: Common Gaps and Issues
You might be surprised at what you find when you actually measure. Most doors don’t have totally even gaps. In fact, it’s normal for the gap at the bottom or near the hinges to be a little bigger or smaller than the rest. That’s just how houses settle over time.
Watch out for unusually wide gaps (over 1/4 inch, or about 6mm). That might mean your door frame is warped or the hinges are loose. In those cases, even the thickest weatherstripping might not do enough on its own. Sometimes, you’ll discover a spot that’s basically airtight—no blade will fit. That’s great for drafts, but double-check those areas after you install the weatherstrip to make sure the door still closes easily.
If your door gap changes along the frame (for example, it’s thin at the top and wide at the bottom), *measure the biggest spot.* You can always compress weatherstripping slightly, but you can’t stretch it.
Insight: If you find gaps that are huge or uneven, you may want to adjust your door before adding weatherstripping. Sometimes, tightening screws or swapping a hinge pin can work wonders!
Choosing the Right Weatherstripping Based on Your Measurement
Now that you know your exact door gap sizes, you can make a smart choice at the store. Weatherstripping comes in all shapes and materials—foam, rubber, felt, or vinyl. Most packages are labeled with the gaps they’ll fill, but here’s the main thing: Match the thickness of the weatherstripping to your largest gap measurement.
For example, if you measured a 1/8 inch (3mm) gap, buy weatherstripping meant for 1/8 inch. If your gaps are uneven, go with the *thickest necessary* and compress it slightly for smaller spots. Honestly, foam and rubber compress best, while vinyl is less forgiving.
Don’t forget to check if you need a new door sweep for the bottom—a spot that’s often much wider than the sides or top. Write down your gap sizes or bring your feeler gauge to the store to double-check packaging.
If you’re into alternatives, some folks prefer to have a pro do this with high-end digital calipers, but for basic home use, a feeler gauge is hard to beat. It’s affordable, precise, and doesn’t require batteries, codes, or fancy syncing—just slide and read.
Tips for Installing Weatherstripping After Measuring
Once you have the right weatherstripping, don’t rush the install—how you put it on matters just as much as what you buy. Here’s what makes the job easier and more effective:
- Work in a clean space. Wipe the frame where the weatherstrip will go. Dust and dirt can keep the adhesive from sticking.
- Measure and cut accurately. Use your door gap notes and a utility knife or scissors. It’s better to cut a little long and trim later than to end up short.
- Apply with even pressure. Press the strip firmly along the frame. For adhesive types, a few passes with a roller or your hand help secure it.
- Check the door movement. Open and close the door a few times after installing. Make sure the weatherstripping seals, but doesn’t block easy movement.
If something isn’t lining up—like the door now sticks, or a gap remains—go back with your feeler gauge and see if your measurements still hold. Sometimes, new strips settle or compress over a day or two, so minor adjustments are totally normal.
Pro tip: Some people like to run a hair dryer along adhesive weatherstripping after pressing it on. The heat helps the glue grab better, especially on cold days.
Comparing Feeler Gauges to Other Measuring Tools
You might be tempted to use an old credit card, a ruler, or even an eyeball estimate instead of a feeler gauge. Here’s why that usually doesn’t work out:
- Feeler gauges are precise. You’re measuring down to thousandths of an inch (or tenths of a millimeter), which you just can’t eyeball.
- Consistency matters. Other tools might be too thick, too flimsy, or not mark the measurement clearly.
- No guesswork. With a feeler gauge, the number is stamped right on the blade—no math, no codes, no battery-powered readouts to reset or pair.
If you really want to go high-tech, a digital caliper is another option. They’re quick and accurate, but more expensive, and you’ll need to keep the battery charged. For most people doing weatherstripping at home, a basic feeler gauge gets the job done with less hassle.
Final Thoughts: Give Every Gap the Right Kind of Attention
Measuring door gaps for weatherstripping with a feeler gauge takes a little extra effort up front, but honestly, it’s the smartest way to make sure all your hard work pays off. You’re not guessing, you’re not settling for a “close enough” fit, and you’re not stuck troubleshooting a sticky door or a draft that won’t quit. You’ve got the right tool for the job and real numbers to work with.
Next time you close your door and feel that solid, windproof seal, you’ll know you did it right—from the very first measurement. That’s the magic of a simple tool and a few extra minutes of care. Cozy home, quiet doors, lower bills—a feeler gauge makes all the difference.