The good news? You don’t need an engineering degree—or even much experience—to use a feeler gauge. It’s about as tricky as figuring out which TV remote actually controls the volume (and we’ve all been there). With a little patience and the right steps, you’ll get that nice, draft-free seal without making your door scrape or stick.
What Is a Feeler Gauge and Why Is It Useful For Door Thresholds?
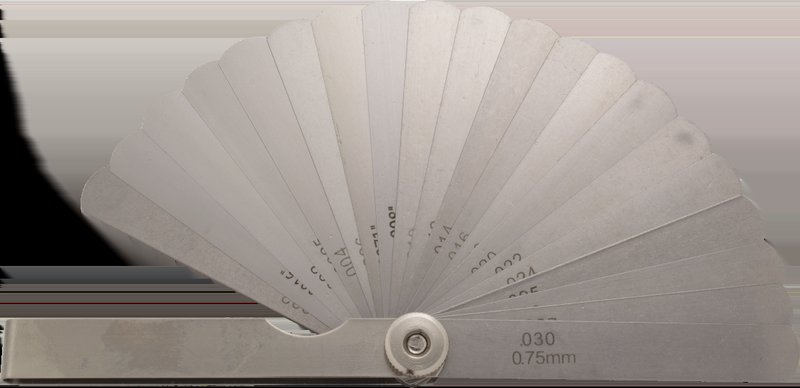
Let me explain: a feeler gauge is basically a set of thin, flat metal strips—or “blades”—each one marked with its thickness. Think of it as a deck of metal cards, with each card a slightly different size. You slip one or more of these blades into small gaps to measure exactly how wide the gap is. For doors, that means you can check just how much space is between the bottom edge and your floor or threshold.
Honestly, when you’re installing a new threshold, this matters a lot. Too much clearance, and you’ll get drafts, noise, and maybe even critters sneaking in. Too little, and your door will drag or refuse to close. The feeler gauge puts a solid number on that gap—no more hoping, no more “ish.”
You might be wondering: can’t you just use a tape measure? Not really. Tape measures don’t fit into tiny gaps or measure down to fractions of a millimeter. That’s where the feeler gauge totally shines. It saves you from repeat trips to the store for a different threshold, or endless troubleshooting when the door won’t cooperate.
How Does a Feeler Gauge Work?
Here’s the thing: a feeler gauge only looks complicated the first time you pick one up. Most kits include several blades, each one stamped with its exact thickness—like 0.010 inches or 0.25 millimeters. You simply fan out the blades, pick the one that looks close to your gap, and slide it in. If it’s loose, go thicker. If it won’t fit, go thinner.
This tool is insanely accurate. If you want even more precision, you can stack blades together. So, if you need a 0.030-inch gap, and you have a 0.010 and a 0.020 blade, you can combine them for the exact size. You’re basically “syncing” the feeler gauge to your specific measurement, just like programming a universal remote for your TV.
Feeler gauges are sometimes used for checking spark plug gaps, guitar set-ups, even machinery—anytime you need to know “just how much” space there is. For new thresholds, you’ll use that same accuracy to get a smooth-opening, energy-efficient door.
When Should You Measure Door Clearance With a Feeler Gauge?
Let’s say your old threshold is worn down, or you’ve switched to a different floor covering. Maybe you’re troubleshooting a stiff door. Any time you change the threshold or the flooring below, you need to check the clearance. If you install a new threshold without measuring, you risk a door that scrapes, leaks air, or just won’t latch.
Pro tip: Always measure the clearance before you buy a replacement threshold. Different brands and types come in various heights. If you know your door gap, you’ll pick the right threshold the first time. It’s kind of like checking the battery size before you buy a new remote—saves you a pointless trip back to the store.
Also, if you’re planning to add weatherstripping or a sweep, don’t forget to factor that in. Measure with the door closed, and make sure you’re pressing it fully into the closed position, just like it sits when you lock up at night.
What Tools Do You Need To Measure Door Clearance?
Measuring door clearance is refreshingly low-tech. Here’s what you’ll want to have ready:
- Feeler gauge set—Any standard set will work; just make sure it’s clean and the blades move freely.
- Flat surface—You’ll need a solid floor (not a messy rug) under the door for the most accurate results.
- Pen and notepad—Write down your measurements. Trust me, you’ll forget them if you try to “just remember.”
- Optional: Flashlight—Sometimes a little extra light helps you spot the gap more easily.
That’s really it. No code to reset, no fancy electronics. Just a mechanical tool, some attention to detail, and a little patience.
Step-by-Step: How To Use a Feeler Gauge for Door Threshold Clearance
Here’s a straightforward way to get this done—even if you’re a beginner who’s never even heard of a feeler gauge before today.
- Open and close the door to check for sticky spots. Make sure the hinges aren’t loose or sagging, and the door isn’t rubbing anywhere. If it is, fix that first.
- Close the door fully so it’s sitting exactly as it does when locked. You want the gap at its smallest, which is when you’ll notice issues if the clearance gets too tight.
- Fan out your feeler gauge blades and start with a medium-sized one—say, about 0.040 inches (1mm). Try to slide it under the door at several points (near the latch, middle, and hinge). If it’s loose, try a thicker blade. If it won’t go, step down in size.
- Keep testing blades until you find one that slides in with a little resistance—not forced, but not too loose. If you want extra precision, combine blades by stacking them together until they just fit.
- Write down the measurement for each spot. If the gap varies—maybe it’s wider near the latch and tighter by the hinge—use the smallest number as your clearance. That’s your “reset” point for picking a threshold that won’t bind up the door.
Good measuring now saves you from headaches later—like reinstalling a threshold or needing to “troubleshoot” a door that won’t close.
How Much Clearance Do You Actually Need?
You might be wondering what the “perfect” gap is. Most doors work best with a clearance between 1/4 inch (6mm) and 1/2 inch (12mm), but it depends on the threshold you plan to install and your specific climate. If you live somewhere with a lot of rain or bugs, a tighter fit is better—just make sure it won’t rub.
If you’re adding a threshold with a built-in seal or weatherstrip, check the manufacturer’s recommendations. Some thresholds are thicker, and others have a flexible sweep that’ll take up more room. If you’re switching brands, “pair” your measurement with the new threshold specs before installing—otherwise, you might have to reset and trim the door itself.
There’s no one-size-fits-all answer, but the idea is to leave just enough room for the door to swing easily while blocking out air, dust, and noise. That’s why measuring with a feeler gauge is worth the few extra minutes.
Common Problems (And How To Troubleshoot Them)
It sounds straightforward, but sometimes things go sideways. Here are a few hiccups you might hit along the way:
- The gap isn’t even: If the clearance varies along the length of the door, your frame or floor might be out of level. If the difference is small (1-2mm), choose the tightest spot for your measurement. If it’s bigger, you may need to adjust the threshold, plane the door, or even reset the hinges.
- The feeler gauge blades are stuck or rusty: Sometimes, especially on older sets, blades can get stiff. Give them a gentle wiggle, or add a drop of oil to “reset” them. If all else fails, pick up a new set at the hardware store—they’re not expensive.
- Door rubs after installation: Even after measuring, sometimes the door still brushes the new threshold. Double-check your measurements, and re-measure with the door closed and the new threshold held loosely in place. If you still have trouble, you may need to trim the door or adjust the threshold height.
Take your time. Getting the door and threshold to “sync” perfectly usually means less hassle (and fewer drafts) later on.
Alternatives: Is a Feeler Gauge Always Necessary?
Sure, you could use other things—a stack of paper, a credit card, or shims—to check the door clearance. But nothing beats the accuracy and consistency of a real feeler gauge. Unlike scraps or homemade tools, it shows you the actual measurement, not a rough guess. It’s like using the right battery in your remote instead of hoping something random will fit.
That said, in a pinch, you can use a plastic card (usually about 0.030 inches thick) or a folded piece of paper (about 0.004 inches per sheet). Slide these under the door until you feel a slight drag, then count how many you stacked up. But honestly, for best results and the least amount of troubleshooting, the real tool is worth using—especially if you install or repair doors regularly.
Wrapping Up: Making Door Installation Smooth and Simple
Here’s what it comes down to: using a feeler gauge to measure door clearance for new thresholds is one of those tiny steps that makes a huge difference. It’s simple, accurate, and saves you from the worst headaches of home repair—like squeaky doors, air leaks, or the endless back-and-forth of picking the right threshold. Whether you’re fixing up an old door or installing something brand new, a feeler gauge gives you confidence that you’ve got things right.
Take an extra five minutes, grab your feeler gauge, and double-check your gap before you buy or install that new threshold. It’s a small act that pays off with a door that opens easily, shuts tightly, and keeps your house comfortable. And honestly, isn’t that what we all want?