Let me explain: a Dremel tool, whether it’s a classic Dremel 3000 or a newer cordless model, spins attachments at high speed. With the right brush or polishing tip, you can power through old grease, corrosion, and gunk that’s been hiding for years. The trick is knowing which accessories to use, how much pressure to apply, and how not to accidentally gouge or ruin your decorative hardware. Think of it as a cross between miniature power-washing and fine dental cleaning for your favorite pieces.
This guide walks you through every step, from safety tips to choosing brush types, so even if you’ve never held a Dremel before, you’ll feel confident. If you’re hoping to refresh detailed hardware—antique locks, ornate hinges, or anything with a tricky pattern—read on. Let’s turn “impossibly dirty” into sparkling clean.
What Makes a Dremel Ideal for Cleaning Detailed Hardware?
A regular cleaning rag, or even a stiff brush, just can’t get into those fine grooves and nooks of fancy hardware. Here’s the thing: a Dremel is built for detail work. It’s not just a power tool—it’s a precision instrument, kind of like a dentist’s drill, but a lot less intimidating.
Here’s why it’s perfect for intricate hardware designs:
- Small Accessory Heads: The Dremel’s brush attachments are tiny—some are barely the size of a pencil eraser. That means you can get into places your fingers (or any normal brush) can’t reach.
- Variable Speed Control: You don’t have to blast at full speed. You can start slow, watch how the tool behaves, and turn up the speed only if you need more power against stubborn grime.
- Swappable Accessories: Maybe you start with a brass brush for dirt, then switch to a felt tip for polishing. The Dremel makes swapping out heads almost as easy as clicking a pen.
You might be wondering if any other tool can do what a Dremel does. Honestly, while there are generic rotary tools out there, Dremel’s reputation for quality and versatility is hard to beat—especially for delicate cleaning. And if you need to swap between cleaning, sanding, or even light grinding, the flexibility is unmatched.
Choosing the Right Dremel Attachments for Hardware Cleaning
The world of Dremel accessories is a bit like a candy store—lots of choices, and each one fits a different job. For cleaning detailed hardware, not all attachments are created equal. Let me run through what works best, and why.
- Brass Wire Brushes: These are gentle enough not to scratch most metals but tough enough to dig out grime. Go for them on brass, copper, or softer steel designs. Always use the smallest size that’ll reach your details.
- Steel Wire Brushes: If you’re dealing with tough, rusted iron, these can be your heavy-hitters—but use them gently, or you risk leaving swirl marks.
- Felt Polishing Tips: Once you’ve cleaned away the worst grime, swap to a felt tip and a dab of polishing compound. This will bring out a surprising shine in your hardware.
- Bristle Brushes: These softer, nylon-tipped brushes are perfect for painted or plated hardware where you absolutely don’t want to scratch the surface.
Here’s a pro tip: keep your Dremel’s speed moderate (think 5,000–15,000 RPM). At higher speeds, even a soft brush can suddenly become abrasive. Always start slow—you can always speed up, but you can’t undo accidental scratches.
Getting Set Up: Workspace, Safety, and Preparation
Before you even plug in your Dremel, take a minute to get organized. Working with power tools, even compact ones, means thinking ahead about safety and setup.
- Workspace: Choose a spot with good light and plenty of elbow room. You’ll want a solid table (not the kitchen counter) and maybe a tray or old towel to catch dust and tiny bits.
- Safety Gear: Eye protection isn’t optional—the Dremel spins quickly, and debris can fly. A dust mask helps if you’re cleaning old, corroded hardware. Gloves are good for handling sharp edges but keep them tight-fitting so nothing gets caught.
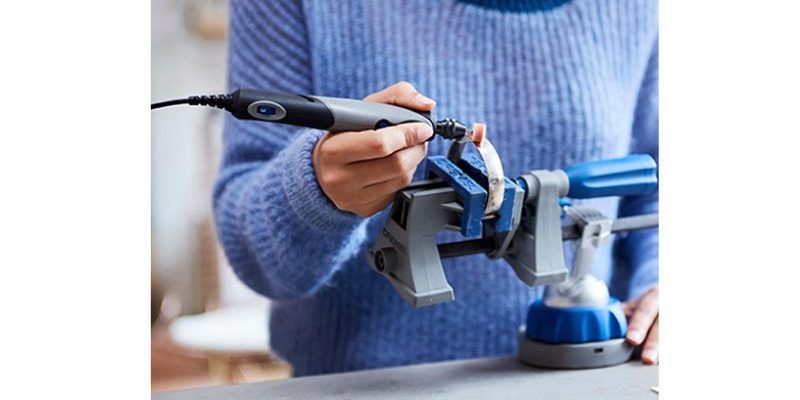
- Securing Your Piece: If your hardware is small, hold it with a clamp or small vise. Never hold it in your bare hand—one slip, and the Dremel will bounce or gouge your skin (ask me how I know).
Before starting, double-check that you’ve picked the right attachment and that it’s firmly tightened on the tool. Nothing ruins your day like a brush flying off at 12,000 RPM. And if you’re using a cordless Dremel, make sure your battery is topped up—running out halfway through is the worst.
Step-by-Step: Cleaning Intricate Hardware With a Dremel
Let’s get into the nitty-gritty—pun intended—of cleaning. Here’s how I tackle it, no matter the hardware:
- Step 1: Start With a Dry Brush. Gently buzz over the surfaces with a soft bristle or wire brush. Move slowly, letting the brush do the work. Don’t force it—the Dremel’s speed is more important than arm muscle.
- Step 2: Target the Details. For deep crevices or recessed areas, use a narrow brass brush. Angle it so the bristles sweep into the design. Short, overlapping passes work best.
- Step 3: Address Tough Spots. If there’s old paint or rust, try a steel brush—just briefly, and on the lowest possible speed. Wipe dust away between passes so you can see your progress.
- Step 4: Polish and Buff. Swap in a felt tip, apply a tiny bit of metal polishing compound, and move in small circles. This pulls out luster and gives detailed metal hardware that “brand new” look.
- Step 5: Clean Up Thoroughly. Wipe down the hardware with a soft rag, and if needed, a drop of mild cleaner. Remove any residual dust or polish to see your results clearly.
Patience is key here. If you rush or push too hard, you might damage the design or wear down lettering. Think of this job more like cleaning an expensive watch than scrubbing a pan.
Common Problems and How to Fix Them
You might run into some snags along the way. Here’s how to troubleshoot the usual suspects:
- Brush Sheds Bristles: This is normal, especially with new wire brushes. If you’re losing lots of bristles at once, check that you’re not pressing too hard or running the speed too high.
- Hardware Gets Too Hot: If the metal feels warm, pause and let it cool. Too much heat can damage delicate plating or soften old solder joints. Take short breaks if you’re working on a big job.
- Attachment Won’t Stay On: Double-check that you’ve tightened the Dremel’s collet nut securely. If it keeps loosening, maybe it’s time for a new accessory or a quick clean of the collet inside your tool.
- Missed Spots: For stubborn grime that even the Dremel can’t touch, use a fine toothpick or small steel pick as a backup, then polish again with the felt tip.
One last headache: if you notice “dull” spots or swirl marks, you probably pressed too hard or used too coarse a brush. Go back over the area with a finer tip, or buff by hand with a soft cloth and compound.
Comparing Dremel Cleaning to Other Methods
You might be tempted to just scrub hardware the old-fashioned way—or try chemical baths, ultrasonic cleaners, or even sandblasting. Here’s how the Dremel stacks up:
- Manual Brushing: Great for surface grime, but honestly, it’s exhausting and slow for detailed patterns.
- Chemical Soaks: These *can* loosen old paint and dirt, but they’re messy, often smelly, and risky for painted or plated finishes.
- Ultrasonic Cleaners: High-tech and effective for jewelry-sized pieces, but most folks don’t own one—and they don’t help with thick grime.
- Sandblasting: Total overkill for delicate hardware. You’ll almost definitely obliterate fine details.
The Dremel really shines when you want control. You decide exactly where to clean, how hard to scrub, and what finish to leave behind. For detailed, irreplaceable pieces—like antique escutcheons or family heirloom locks—powerful precision is exactly what you want.
How To Care for Your Dremel and Attachments After Cleaning
Cleaning intricate hardware isn’t just about what you do with your Dremel—it’s also making sure it’s ready for next time. Rotary tools last longer (and work better) if you keep them in top shape. Here’s how:
- Clean Off Dust and Debris: Wipe down your Dremel’s body and chuck with a dry cloth after every session. A small brush (even a clean toothbrush) helps clear vents and seams.
- Check Accessories for Wear: If a wire brush looks bent, frayed, or clogged, toss it. Worn accessories are rougher on your hardware and can slip off the tool.
- Recharge or Replace Batteries: If you’re using a cordless Dremel, pop it back on the charger so it’s ready for the next project. If it’s corded, coil the cord gently—bent wires shorten tool life.
- Store Everything Clean and Dry: Put away your Dremel, brushes, and compounds somewhere dust-free. Moisture can rust both attachments and the hardware you’ve just restored.
Every once in a while, give your Dremel a little TLC—a drop of machine oil on the shaft, a thorough check of the collet and lock. Good tools reward you with years (even decades!) of reliable service, no kidding.
When Not to Use a Dremel—And What to Try Instead
Here’s an honest note: a Dremel isn’t always the right answer. Some pieces are just too fragile. Think painted surfaces with flaking paint, gold leaf, or thin-layered decorations. Or, if your hardware is valuable and you’re not sure about the material, it’s better to start slow.
In those cases, try:
- Soft Cloth and Gentle Cleaner: Non-abrasive and safe for the most delicate surfaces.
- Cotton Swabs for Detail Work: Great for getting polish into small areas without the risk of a motorized tool.
- Professional Restoration: For items with historical or sentimental value, sometimes it’s best to consult a pro.
Don’t feel like using a Dremel means you’re skipping out on “real” restoration work. It’s just a tool—sometimes it’s perfect, sometimes there’s a better way. Trust your gut, and when in doubt, test on a hidden spot before going all-in.
Using a Dremel for cleaning intricate hardware lets you do what your hands—and most other tools—just can’t. Treat every job with patience and care, and you’ll be amazed at the hidden beauty you uncover.
Wrapping It All Up
Bringing vintage hardware back to life is oddly satisfying, especially when you have the right tools and know-how. Cleaning intricate hardware with a Dremel isn’t just about blasting away dirt—it’s about revealing the craftsmanship that went into those tiny scrolls and patterns in the first place. With the right attachment, a gentle hand, and a little patience, you can turn forgotten pieces into shiny showpieces in your home or project.
Remember, it’s all about control—let the Dremel’s speed work for you, not against you. Stay safe, go slow, and swap out attachments as needed. And if you treat both your hardware and your Dremel tool with respect, you’ll get years of use—and a collection of beautifully restored hardware to show for it.