So, what exactly is a door jig? In simple terms, it’s a tool that helps you drill holes in doors for hardware installation. It typically gives you alignment guides and templates, streamlining the process. Brands like Kreg and Milescraft have been popular for years, as they offer jigs that cater to different needs and skill levels. Ready to dive into the world of door jigs? Let’s walk through how to use one for perfect hardware installation.
Choosing the Right Door Jig
The first step to a successful door installation is picking the right jig for your project. Door jigs come in various shapes and sizes, each designed for specific types of hardware. For example, some jigs are tailored for basic doorknobs, while others handle more complex setups like mortise locks.
When choosing a door jig, consider the material and thickness of your door. Most jigs accommodate standard interior doors, but if you’re working with a thicker or solid-core door, make sure your jig can handle it. A good tip is to check the specifications on the packaging or website before you buy. You don’t want to end up frustrated halfway through your project because your jig can’t handle your door!
Additionally, think about how often you plan to use the jig. If you’re a DIY enthusiast and foresee tackling several door installations, investing in a high-quality jig will pay off. On the other hand, if it’s a one-time project, a more affordable option might be the way to go.
Setting Up Your Door Jig
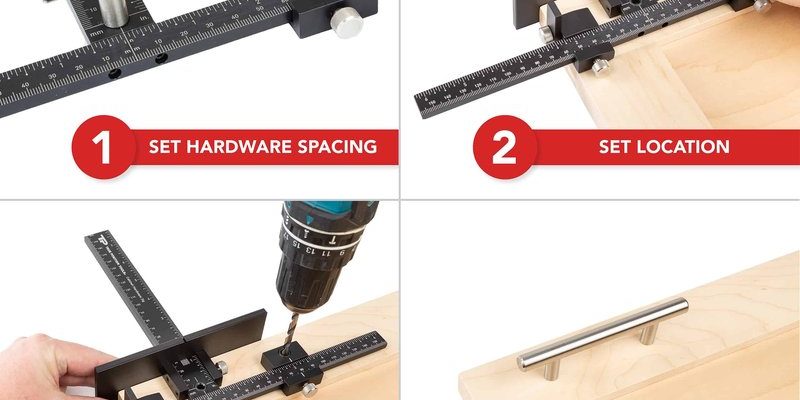
Now that you’ve selected your jig, it’s time to set it up. Most jigs come with detailed instructions, but here’s a simplified breakdown of the process:
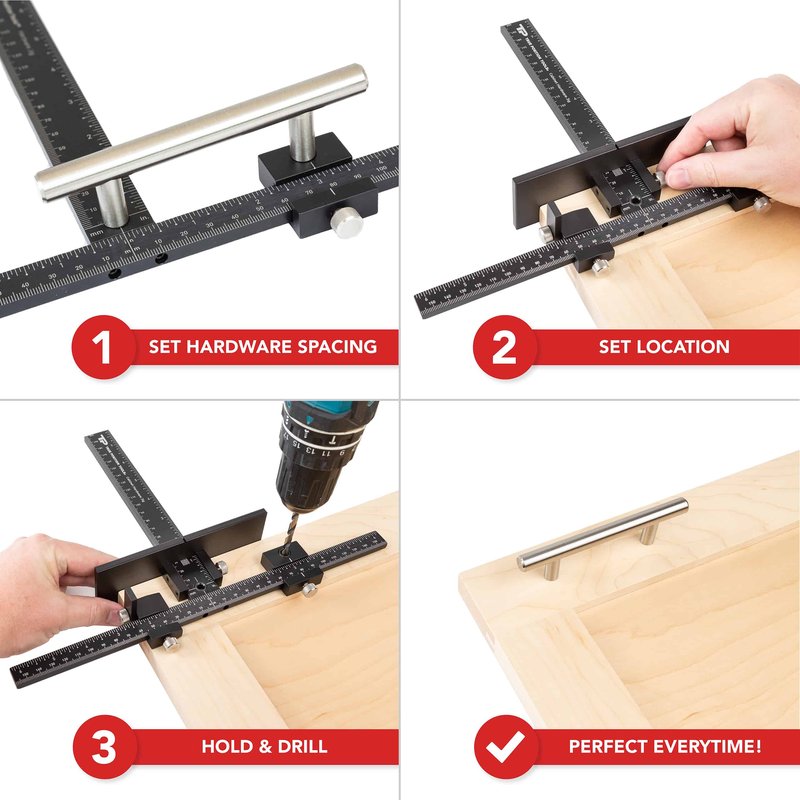
1. Align the Jig: Place the jig on the edge of the door. Make sure it’s straight and flush against the surface. The alignment is critical for achieving uniform holes.
2. Secure It: Many jigs have clamps or screws to hold them in place. Use these features to prevent any movement while you work. It’s like having a second pair of hands—very helpful!
3. Mark Your Measurements: Before you start drilling, take a moment to double-check your measurements. Use a pencil to mark where your holes will go according to the jig’s guides. This small step can save you a lot of headaches later on.
Setting up your door jig correctly is like laying the foundation for a house; without a solid base, everything else could crumble.
Drilling Holes with Your Door Jig
Once your jig is securely in place, it’s time to start drilling. This part might feel a bit nerve-racking, but remember that the jig is there to guide you. Here’s how to do it:
1. Select Your Drill Bit: Based on the hardware you’re installing, choose the appropriate drill bit size. Most jigs indicate this, so keep an eye on those specs.
2. Drill Carefully: Begin the drilling process by keeping a steady hand. Start the drill on a low speed to avoid slipping, then gradually increase the speed as needed. You might be wondering, “What if I mess up?” Don’t fret; jigs are designed to minimize mistakes.
3. Clean Up After Drilling: Once you’re done, remove the jig and clear away any wood shavings. A clean workspace is essential for the next steps and helps you avoid slipping during installation.
Drilling holes is where your preparation pays off; a well-placed jig means your hardware will fit snugly and securely.
Installing the Hardware
With your holes drilled, it’s time to install the hardware. This final step is like putting the icing on the cake—don’t rush it! Here’s how:
1. Fit the Hardware: Start by placing the doorknob or lock into its respective hole. Ensure that it sits flush against the door surface.
2. Screw It In: Use a screwdriver to carefully tighten the screws. Make sure not to overtighten, as this could damage the hardware or the door.
3. Test the Mechanism: Once everything is in place, test the hardware to make sure it functions properly. Try opening and closing the door to ensure smooth operation.
If something feels off, don’t hesitate to double-check your measurements and the alignment of the hardware. It’s better to catch a potential issue early than to have to redo the whole installation later.
Troubleshooting Common Installation Issues
Even with careful planning, things can go wrong. Here are a few common issues you might encounter and how to troubleshoot them:
– Misaligned Holes: If the hardware doesn’t fit, check if your jig was positioned correctly. It might be worth re-drilling if the alignment was off.
– Too Tight or Loose Fit: If your hardware feels too tight, you might need to sand down the edges of the holes slightly. On the flip side, if it’s too loose, consider using washers or tape as temporary fixes.
– Drill Bit Snagging: If your drill bit keeps snagging or getting stuck, ensure it’s sharpened and appropriate for the material of your door.
Here’s the thing: don’t get discouraged. Every DIY project comes with its share of bumps. With patience and a bit of adjustment, you can troubleshoot these issues and get the job done right.
Maintaining Your Door Jig
Once you’re done with your project, don’t forget about the care of your door jig. Like any tool, proper maintenance can extend its life and keep it performing well. Here are some quick tips:
– Clean It After Use: Dust and debris can affect the precision of the jig. Wipe it down with a soft cloth after each use.
– Store It Properly: Keep your jig in a dry place to prevent rust or damage. If it came with a case, that’s the best spot to keep it!
– Inspect Regularly: Before your next project, check the jig for any signs of wear or damage. A little maintenance goes a long way.
Taking care of your door jig will ensure it’s ready for your next hardware installation, saving you time and effort in future projects.
Why Using a Door Jig Matters
You might be wondering why all this matters in the first place. The truth is, using a door jig can save you time, reduce errors, and create a more professional-looking installation. Here’s why you should consider using one:
– Precision: A jig helps you drill perfectly aligned holes, ensuring that your hardware is not only functional but aesthetically pleasing.
– Efficiency: By reducing the chances of mistakes, you’ll spend less time fixing errors and more time enjoying your finished work.
– Confidence: Knowing you have the right tools at your disposal can boost your confidence as a DIYer. You’ll feel more capable and ready to tackle new projects without fear.
Plus, the sense of satisfaction you get from a job well done? That’s priceless.
In conclusion, using a door jig for hardware installation is like having a trusted friend guide you through a valuable experience. It makes the process more straightforward and efficient, no matter your skill level. Whether you’re a first-timer or a seasoned DIYer, understanding how to leverage this tool can make all the difference in your project. Happy installing!