A deburring tool is designed specifically to remove burrs—those unwanted sharp bits left on metal after cutting, drilling, or machining. There are different types available, and one of the most popular is the handheld deburring tool. Brands like X-Acto and TEKTON offer a variety of options, making it easier than ever to find one that suits your needs. Using one is pretty straightforward, but let’s break it down step-by-step so that you can get the best results.
Understanding Deburring Tools
Before diving into how to use a deburring tool, let’s clarify what it actually is. A deburring tool typically features a sharp blade or rotating head designed to scrape away the burrs. Imagine using a knife to shave down an apple; in a similar way, you’re using the tool to slice away those pesky, sharp metal edges.
There are several types of deburring tools, including handheld, electric, and even rotary attachments. Each serves the same purpose but differs in ease of use and effectiveness depending on your project. Handheld tools are great for tight spaces and small jobs, while electric options can handle larger areas much quicker.
Why You Need a Deburring Tool
Using a deburring tool isn’t just about aesthetics; it also enhances safety. Sharp edges can easily cut skin or cause injuries during handling. Think of it as rounding the sharp edges of a knife after sharpening; it makes it safer to use. For metalworkers, fabrics, or hobbyists, a deburring tool is essential for ensuring that finished projects are smooth and safe.
In addition to safety, smooth edges improve the quality of your work. Whether you’re building furniture, creating metal art, or simply fixing something around the house, a smooth finish is often a sign of professionalism. So, investing in a good deburring tool pays off in multiple ways.
Choosing the Right Deburring Tool
When selecting a deburring tool, you’ll want to consider factors like the material you’re working with and the size of the job. Handheld tools come in various shapes, like L-shaped or circular, and each style is suited for different tasks. You might want a straight blade for flat edges, while a hook blade is great for rounded surfaces.
To help you make the right choice, here’s a quick guide:
- Handheld Deburring Tools: Best for small jobs and tight spaces.
- Electric Deburring Tools: Ideal for larger projects or frequent use.
- Rotary Attachments: Perfect for those who use a drill and want to speed up the process.
Consider your projects and select a tool that matches your needs. Remember, you don’t need a fancy tool to get started; a basic handheld deburring tool can work wonders for beginners.
How to Use a Deburring Tool: A Step-by-Step Guide
Using a deburring tool is pretty straightforward. Follow these simple steps to ensure you get smooth, safe edges on your metal items.
1. Prepare Your Workspace
Make sure you’re working in a clean, well-lit area. Safety goggles can protect your eyes from flying debris. Lay out all your materials and tools, including the metal piece you’re working on and your deburring tool.
2. Identify Burrs
Take a close look at the metal edge. Burrs are usually on the cut edges and can feel sharp to the touch. Knowing where these are will help you focus your efforts.
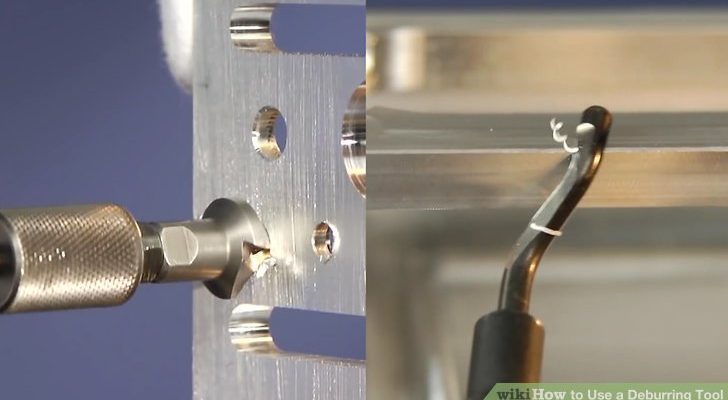
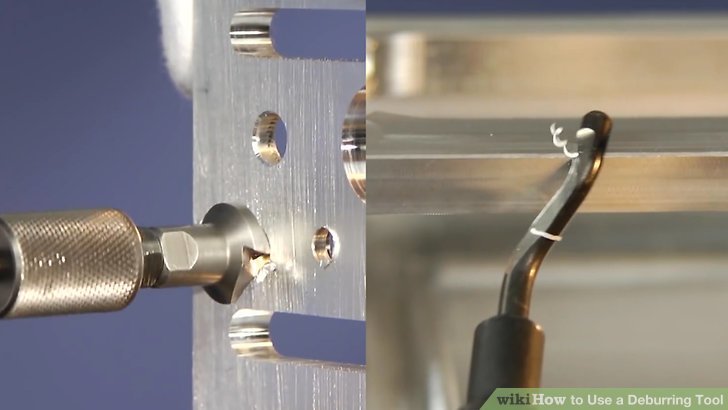
3. Deburr the Metal
Hold the deburring tool at a 45-degree angle to the edge of the metal. Apply light pressure and slide the tool along the edge in a single direction. You might feel resistance at first, but that’s normal.
4. Check Your Progress
After a few strokes, feel along the edge you’ve worked on. Is it smooth? If you can still feel burrs, keep working until it’s to your satisfaction.
5. Cleanup
Once you’re done, wipe the metal piece down to remove any metal shavings. This will help keep your workspace tidy and safe.
Common Mistakes to Avoid
Even though using a deburring tool is simple, some mistakes can lead to less-than-perfect results. Here are a few pitfalls to watch out for:
– Applying Too Much Pressure: This can create uneven edges or damage your tool. Use light pressure and let the tool do the work.
– Deburring in the Wrong Direction: Always move the tool in a single direction along the edge to avoid pulling up more burrs.
– Ignoring Safety Gear: It’s easy to overlook goggles or gloves. Remember, safety should always come first.
Maintaining Your Deburring Tool
To ensure your deburring tool performs well for years, proper maintenance is key. Here are some tips:
– Clean It Regularly: After use, wipe the blade to remove any metal shavings. This helps prevent rust.
– Store Properly: Keep your tool in a dry place to avoid moisture-related damage. A protective case can help.
– Check the Blade: Over time, blades can dull. Replace them as needed for the best performance.
Regular maintenance not only extends the life of your tool but also ensures that you get the best results every time you use it.
Deburring Alternatives
If you find that a deburring tool isn’t quite what you need, there are alternatives worth considering. For example, you could try:
– File Tools: A metal file can smooth edges but requires more elbow grease.
– Sandpaper: This is versatile but can be messy and time-consuming.
– Angle Grinders: For larger jobs, an angle grinder can do the trick but requires experience to use safely.
Each option has its pros and cons, so consider your project and choose what’s best for your needs.
Using a deburring tool might seem intimidating at first, but it’s actually a straightforward process that can dramatically improve your metalworking projects. By choosing the right tool and following a few simple steps, you can easily create smooth, safe edges on your metal pieces.
Remember, it’s not just about looks; it’s also about safety and functionality. So, grab your deburring tool and get ready to transform your metalwork into something truly special. Happy crafting!