That’s where a *deburring tool* steps in. Think of it as the eraser for your metalwork mistakes. Brands like Noga and General Tools have made names for themselves by designing simple but effective deburring tools that make the job feel less like a chore. Even if you’re completely new to metalworking, picking up a deburring tool and using it right isn’t rocket science—but a few tips and the right approach can make a night-and-day difference.
So if you’re staring down a sharp edge on a freshly cut pipe, bracket, or plate, and you’re wondering how the pros get that smooth, finished result, let’s walk through exactly how to use a deburring tool for smoothing cut edges on metal hardware.
What Is a Deburring Tool and Why Does It Matter?
Let me explain what a deburring tool actually is. Imagine a handy little gadget about the size of a marker, usually with a comfortable handle and a tiny curved blade at the tip. This blade isn’t meant for deep cuts. Instead, it’s designed to glide along sharp edges and gently shave off burrs—the jagged, rough bits left behind after you’ve sliced or drilled metal. If you’ve ever run your finger along a new cut and recoiled, you know exactly what I mean.
Here’s the thing: burrs aren’t just a minor nuisance. They can snag skin, scratch up surfaces, or even mess with how two pieces of hardware fit together. If you skip deburring, you risk injury, poor performance, and a less professional look. Honestly, once you get used to the clean finish a deburring tool leaves behind, you’ll find yourself reaching for it every time you work with metal.
Most tools from brands like Noga, General Tools, and even budget picks from Amazon, are built to last and come with replaceable blades. You can use them on pipes, sheets, brackets—basically any piece of metal hardware with a cut edge that feels risky or rough. You might be wondering if sandpaper or a file could do the job instead. While those work in a pinch, a dedicated deburring tool is way faster and safer for most small jobs.
When Should You Use a Deburring Tool?
You don’t need to overthink it—if you cut, drill, or saw any metal and end up with a rough edge, it’s time to grab a deburring tool. This is especially true for:
- Cutting pipes or tubing: Those freshly cut edges are notorious for burrs that can shred your hands or snag wiring if you’re running lines.
- Sheet metal projects: After cutting or snipping sheet metal, sharp bits can curl up along the edges, making the whole piece a hazard.
- Drilled holes: Any time you drill through metal, both the entry and exit holes usually have burrs that can interfere with fasteners or create weak points.
- Assembly tasks: Trying to fit two pieces together and something just won’t sit flush? Burrs are often the invisible culprit.
Let’s say you’re trimming some aluminum project boxes or steel brackets for a shelving system. Even if the cuts look clean, they’ll likely have sharp spots. Deburring is the finishing touch that makes your project safer, easier to assemble, and a lot more enjoyable to handle. If you’re prepping metal for painting or coating, smoothing those edges also helps the finish stick and look better.
Step-By-Step: How to Use a Deburring Tool on Metal Hardware
First off, let’s lay out what you’ll need. Pick your deburring tool—any of the classic rotary-blade types from Noga or General Tools will do for beginners. Make sure the blade is sharp and spins freely. Lay your metal piece on a sturdy surface, and if it’s small, clamp it down so it doesn’t slip. Safety goggles and gloves are always a smart move; metal shavings have a way of finding your eyes if you skip this step.
Now for the main steps:
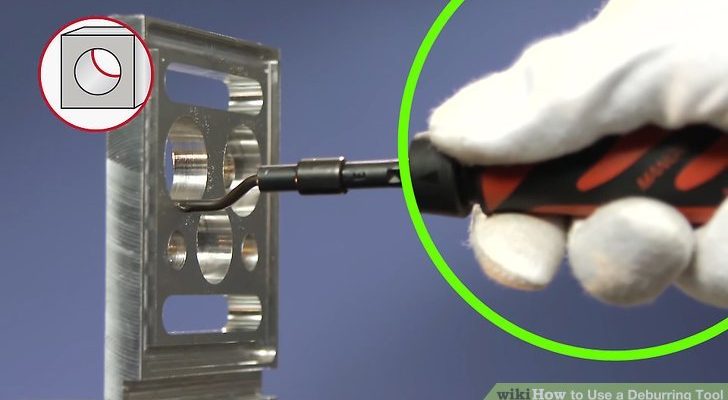
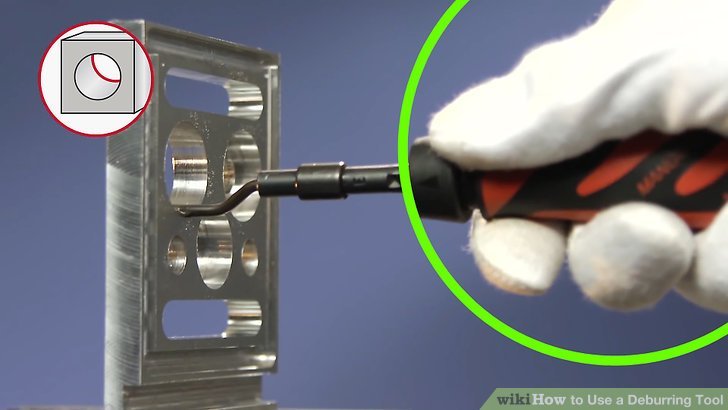
- Hold the tool like a pen, so you have good control and visibility. The curved blade should point toward the area you want to smooth.
- Place the tip of the blade just on the edge of the cut metal. Start at one end of the edge or hole.
- Apply gentle, even pressure. Glide the blade along the edge, letting it “shave” off the burrs. You don’t need to force it—just let the tool do the work. For holes, spin the blade inside the opening in a circular motion.
- Check your progress after each pass. Feel the edge (carefully) with your finger. If there’s still a rough spot, go over it again from a different angle.
The key is light, repeated passes—don’t try to remove all the burrs in one go, or you could gouge the metal.
If you’re working on a pipe, rotate the pipe as you deburr to keep your movement smooth and even. For flat sheets, move the tool in one direction: imagine you’re peeling a thin layer off the edge. The process is honestly relaxing once you get the hang of it—you’ll start seeing (and feeling) those sharp bits melt away.
Troubleshooting Common Deburring Problems
You might be wondering: what if the deburring tool isn’t working the way it should? Here are a few common hiccups beginners run into:
- Blade skips or chatters: This usually means you’re pressing too hard, or the blade is dull. Try easing up or swapping in a fresh blade (most tools make this a snap).
- Burrs keep coming back: Sometimes, especially with very thick or hard metals, you’ll need several passes. Make sure you’re keeping the blade at a shallow angle and not just scraping over the top.
- Metal curls instead of smoothing: This can happen if the edge was cut poorly to begin with or if the tool is moving too slowly. Try running the deburring tool faster and check the cut quality—sometimes trimming a little more with a file helps.
- Tool won’t reach inside holes or tight corners: Some tools are too big for tiny spots. Noga and other brands sell mini-blade attachments or specialty tools designed just for holes or slots.
If you’re having trouble, don’t be afraid to change up your grip, adjust your angle, or swap out the blade. It’s all about finding what feels smooth and controlled in your hand.
Types of Deburring Tools and Alternatives
Not all deburring tools are created equal. You’ll see a few main types on the shelf:
- Rotary-blade tools: The classic “pen with a spinning blade” style you see from Noga, General Tools, and other brands. Great for most edges and holes.
- Fixed-blade scrapers: These look a bit like a stiff utility knife. They’re fine for straight edges but not great for curves or holes.
- Countersink deburring tools: Designed specifically for holes, these look like a conical drill bit and fit into a drill or handle.
- Manual files or sandpaper: These work in a pinch, especially for very big or oddly-shaped pieces, but they’re slower and more labor-intensive.
If you’re doing a lot of projects or want the cleanest result, a rotary-blade deburring tool is the simplest and fastest choice. But if you’re improvising, a file or even a piece of fine-grit sandpaper can help finish the job.
For tight spots—such as small holes or the inside of tubes—some brands offer tiny blade attachments or flexible-shaft tools. Universal kits usually include a couple of blade shapes for different jobs. If you’re not sure what you need, start with the basic rotary-blade style and see where it takes you.
How To Clean and Maintain Your Deburring Tool
A smooth burr-shaving experience depends on keeping your tool clean and sharp. Here’s what I do after every project:
- Brush off metal shavings from the blade and handle with an old toothbrush or rag.
- Check for nicks or dullness. If the blade feels rough or isn’t cutting well, pop it out and replace it (most reputable brands make blade swaps easy).
- Store your tool dry, away from moisture. Even “stainless” blades can rust if left damp, especially after working with wet metal or coolants.
- Don’t force the tool into materials it wasn’t designed for. These blades are tough, but trying to deburr hardened steel or thick welds can chip them.
Keeping your deburring tool in good shape isn’t just about longevity—it’s about getting that smooth, effortless finish every single time.
If you use your tool a lot, consider ordering extra blades in advance. For DIYers, even the best brands rarely need more than an occasional wipe-down and blade change.
Safety Tips When Smoothing Cut Metal Edges
Metalwork can get messy—sometimes even dangerous—if you’re not careful. Here’s what I always keep in mind when using a deburring tool:
- Wear gloves to avoid both cuts from sharp metal and accidental slips with the blade.
- Safety goggles protect your eyes from fine metal shavings or broken-off burrs during cutting and deburring.
- Clamp down the workpiece if it’s small or awkward to hold. This gives you better control and keeps your fingers out of the “danger zone.”
- Go slow near edges and corners—the blade can jump if it snags on thick burrs.
- Do a final wipe-down after smoothing the edge. This clears away stray metal fragments that might be lurking.
It’s honestly tempting to skip gloves or goggles for “just a quick touch-up,” but that’s when most accidents happen. The best projects end with finished work and ten intact fingers.
Does a Deburring Tool Work for Other Materials?
You may be wondering if this tool is just for metal. Actually, deburring tools work pretty well on other tough materials, too. If you’re smoothing out plastic edges after cutting PVC pipe, or even cleaning up certain hard woods, a deburring tool can give you a crisp, professional finish.
However, not all blades handle non-metal materials equally. Some plastics stay gummy or clog up the blade, and wood can dull a metal-focused blade fast. If you plan to use your deburring tool all over your shop, check if the blade style is rated for multi-material use. Most brands will say so right on the box, and universal kits are a safe bet for mixed jobs.
Bringing It All Together
Getting a smooth, safe finish on cut metal hardware really doesn’t have to be complicated. A good deburring tool—like the classic rotary-blade style from Noga, General Tools, or even those off-brand kits—makes the difference between sharp, ragged edges and a polished, pro-level result. Don’t rush. Take those light, steady passes and keep your blame sharp. You’ll quickly get a feel for how much safer and easier your metalwork projects become.
Honestly, once you try smoothing cut edges with a deburring tool, you might wonder how you ever dealt with those painful burrs before. Whether you’re building, fixing, or just experimenting, your fingers—and your finished hardware—will thank you for the extra care.