Whether you’re fixing a chair, assembling a new shelf, or working on a delicate project that needs precision, a C-clamp can help you keep your hardware in place. It’s straightforward to use and incredibly effective, making it a must-have in every toolbox. Let me walk you through everything you need to know about using a C-clamp for holding hardware during repairs.
What Is a C-Clamp and How Does It Work?
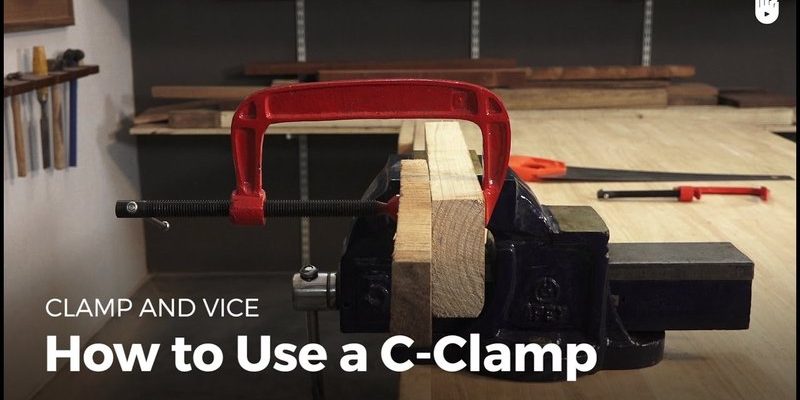
A C-clamp, also known as a carriage clamp or an adjustable clamp, is a tool designed to hold pieces of material together tightly. Its name comes from its C-shaped frame, which allows for various adjustments. The clamp consists of two arms: one fixed arm and one adjustable arm controlled by a screw mechanism.
When you tighten the screw, it pulls the adjustable arm closer to the fixed arm. Picture this as squeezing a sponge—when you apply pressure, the sponge holds more water. Similarly, a C-clamp applies pressure to hold your materials securely. This is super helpful when you need to drill a hole or make cuts, as it keeps everything stable.
The beauty of a C-clamp lies in its versatility. You can use it on wood, metal, plastic—pretty much any sturdy material. Plus, they come in various sizes, so you can pick a clamp that fits your project perfectly.
Why Use a C-Clamp During Repairs?
Using a C-clamp can significantly enhance your repair work. Here are a few reasons why it’s such a valuable tool:
- Stability: A C-clamp stabilizes your workpieces, giving you both hands free to focus on the task at hand.
- Precision: When your hardware is securely held, you can drill or cut with more accuracy, reducing the risk of mistakes.
- Safety: Keeping your pieces clamped ensures that they won’t shift unexpectedly, which could cause injury or damage.
- Versatility: As mentioned earlier, these clamps can be used for numerous materials and tasks, making them a staple in any toolkit.
If you’ve ever tried to manage multiple pieces during a repair, you might already know the value of having that steady grip. Think of it like having a reliable friend help you hold things together while you make the repairs.
How to Choose the Right C-Clamp
Selecting the right C-clamp is essential for your repair success. C-clamps come in various sizes and load capacities, so you’ll want to choose one that fits your specific needs.
1. Size Matters: Consider the size of the materials you’ll be working with. For small projects, a smaller clamp might do the trick, while larger projects may require a heavy-duty clamp.
2. Material of the Clamp: Many C-clamps are made of steel, which offers durability. Some clamps may also have rubber jaws to prevent slipping and protect the surfaces of your materials.
3. Throat Depth: The throat depth is the distance from the clamp’s screw to the frame. If you’re working with thick materials, make sure your clamp has sufficient throat depth to accommodate them.
4. Load Capacity: Ensure the clamp can handle the weight of your materials. A clamp that’s too weak could break under pressure, leading to accidents or damage.
In essence, choose a C-clamp that fits both your current project needs and future endeavors to make your repairs a breeze.
How to Use a C-Clamp Step-by-Step
Using a C-clamp might seem daunting at first, but it’s really quite simple. Here’s how to do it:
1. Gather Your Materials: Before you start, make sure you have all the items you’ll work on, including your C-clamp.
2. Position the Hardware: Place the pieces you want to hold together in the desired position. Make sure they are aligned properly to avoid any misalignments later.
3. Open the C-Clamp: Turn the screw on the clamp counterclockwise to open it wide enough to fit around your materials.
4. Align the Clamp: Place the fixed jaw of the clamp on one side of the hardware and the adjustable jaw on the other side. Ensure it wraps around both pieces snugly.
5. Tighten the Clamp: Turn the screw clockwise to tighten it. Do this slowly until it feels secure but be careful not to overtighten, as this could damage your materials.
6. Check Stability: After clamping, give the hardware a gentle tug. If everything feels secure, you’re ready to start your repair!
Following these simple steps can make a world of difference. It’s all about setting yourself up for success.
Common Mistakes to Avoid When Using a C-Clamp
Even though using a C-clamp is straightforward, there are a few common mistakes you might want to avoid:
1. Overtightening: Many people think cranking the clamp as tight as possible is the best approach. In reality, overtightening can damage your hardware or even break the clamp. Aim for a firm grip, not a death grip.
2. Poor Positioning: If the clamp isn’t positioned correctly, it won’t hold your materials effectively. Make sure to double-check the alignment before tightening.
3. Neglecting to Use Padding: If you’re working with wood or softer materials, consider using a piece of scrap wood or padding over the jaws of the clamp to prevent indentations or damage.
4. Not Testing Stability: After clamping, always check the pieces to see if they hold firm. It’s easy to miss a slight wobble that could lead to issues down the line.
Being mindful of these common pitfalls can save you headaches and make your repairs smoother.
Alternatives to C-Clamps: What Else Can You Use?
If you find a C-clamp isn’t quite right for your project, there are other options available. Here are a few alternatives:
1. Bar Clamps: Similar to C-clamps but with a longer bar, these clamps can hold larger pieces of wood or multiple components.
2. Spring Clamps: These are lightweight and easy to use, making them great for quick holds. However, they may not provide as much pressure as C-clamps.
3. Pipe Clamps: If you’re dealing with larger woodworking projects, pipe clamps can offer more extensive reach and pressure. They utilize pipes as a rail, which allows for custom lengths.
4. Toggle Clamps: These clamps provide a firm hold and are ideal for repetitive tasks. They can be attached to the work surface and are great for keeping items in place while you work.
Each of these options has its strengths, so consider what fits your specific needs best.
Final Thoughts on Using a C-Clamp for Repairs
Using a C-clamp can seriously simplify your repair projects. By holding your materials securely in place, it gives you the freedom to work efficiently and confidently. With the right clamp and the right technique, you’ll find that tackling repairs becomes less frustrating and more enjoyable.
Remember, it’s all about precision and stability. Investing in a quality C-clamp and knowing how to use it effectively will pay off in smoother repairs and a more satisfying DIY experience. So, next time you tackle a project, grab that C-clamp, and let it do the heavy lifting while you focus on what you do best!