If you’re working on cabinetry, furniture, or anything needing uniform holes—like installing handles or hinges—using a bore template quickly becomes a non-negotiable. It’s not just a time-saver; it’s a stress-saver. You’ll often see brands like Kreg or Blum mentioned in the same breath as “bore templates,” but the fundamentals are similar no matter which one you’re holding. Let me walk you through the how and why, and you’ll never have to settle for lopsided hardware again.
What Is a Bore Template and Why Use One?
Here’s the thing: a bore template is basically a simple jig that guides your drill so you can make identical holes every single time. Imagine trying to hang a row of cabinet pulls and wishing you had a “hole cheat sheet.” That’s exactly what a bore template gives you—a physical guide you lay against your workpiece, with pre-set holes for your drill bit to follow.
You might be wondering why not just measure every time. Sure, you *could* measure by hand for each hole, but even with a sharp pencil and steady hand, small errors add up fast. A bore template removes all the guesswork, so whether you’re installing 2 handles or 100, every hole ends up in the right spot. It’s an enormous help if you’re making more than one piece, or want your work to look professional (even if you’re a total beginner).
Some templates are universal, while others are made to sync perfectly with particular brands or hardware styles. For example, the Kreg Cabinet Hardware Jig is a crowd favorite because it’s adjustable for different pulls and sizes. The point is: no matter the style, a bore template helps you code a repeatable process into your drilling routine—so your holes always match up.
Main Types of Bore Templates
Let’s break down what kinds of bore templates you’ll run into, since picking the right one makes all the difference. There are two main buckets: adjustable/universal and brand-specific templates.
- Adjustable or universal templates: These let you reset the spacing for different hardware, making them flexible if you’re working with lots of styles. Think of them as the Swiss Army knife of bore templates—Kreg and Milescraft both make popular versions.
- Brand-specific templates: These are designed for a single hardware or hinge type. If you’re installing Blum soft-close hinges, for example, a Blum template will pair up exactly with those specs—no fussing required.
Honestly, for most home projects or one-offs, the universal template wins for pure versatility. But if you’re running a full shop or always dealing with the same brand, that custom fit is hard to beat. Either way, using a template puts you way ahead of just freehand measuring with a tape.
Key Tools and Materials You’ll Need
Setting up for consistent hole drilling doesn’t require a ton of fancy gear, but having the right basics on hand makes things smoother. Here’s what you’ll want before you get started:
- Bore template: Choose an adjustable or brand-specific one to match your needs.
- Drill or driver: Cordless is usually easiest to handle.
- Drill bits: Make sure you have the right size for your pulls or hardware—sometimes marked on the packaging or code from the manufacturer.
- Clamps: These help hold your template steady, especially for larger panels or heavy doors.
- Pencil or marker: For marking your starting points or lining up the template.
- Measuring tape or ruler: Just in case you need to sync your template with a unique project.
You might also want a small level if you’re worried about staying straight—nothing’s more frustrating than a row of handles that slant downhill! Don’t forget some safety glasses, and you’re ready to get started.
How to Set Up Your Bore Template
Before you start drilling away, take a few minutes to get your template set up. Prepping things right the first time will save you from a lot of curse words and patch jobs later.
First, figure out the layout for your holes. If you’re following a hardware manual, that usually gives you the distance between holes (“center to center”) and how far in from the door edge they should sit. With an adjustable bore template, reset the arms or stops to match these dimensions—most have clear markings or even click stops for popular spacings.
Line up the template with your project, making sure it’s flush with the edge and at the correct height. Hold it tight, or use a clamp to keep it from slipping. Double-check all your measurements—this is the moment to fix any errors before you start drilling. If your template has a code or chart for different hardware, check you’re using the right settings.
The best tip? Take your time in this step. Rushing the setup is the fastest way to mess up the rest.
Once everything’s in place, mark your hole locations through the guide holes, or go straight to drilling—depending on your template style.
Step-by-Step: Drilling Consistent Holes with a Bore Template
Here’s a slow, detailed walkthrough for a beginner-friendly experience:
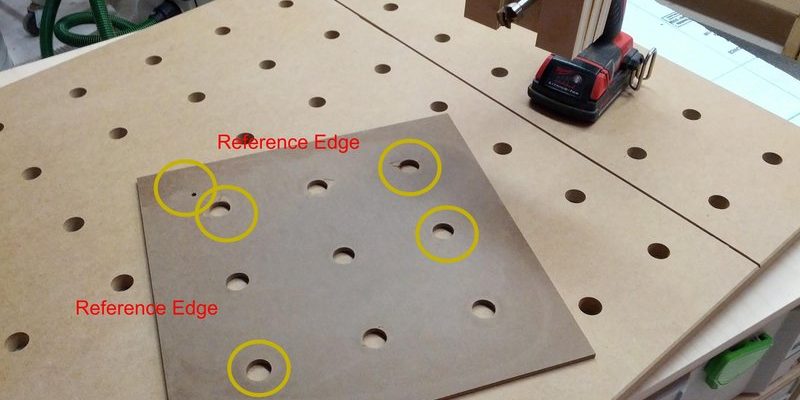
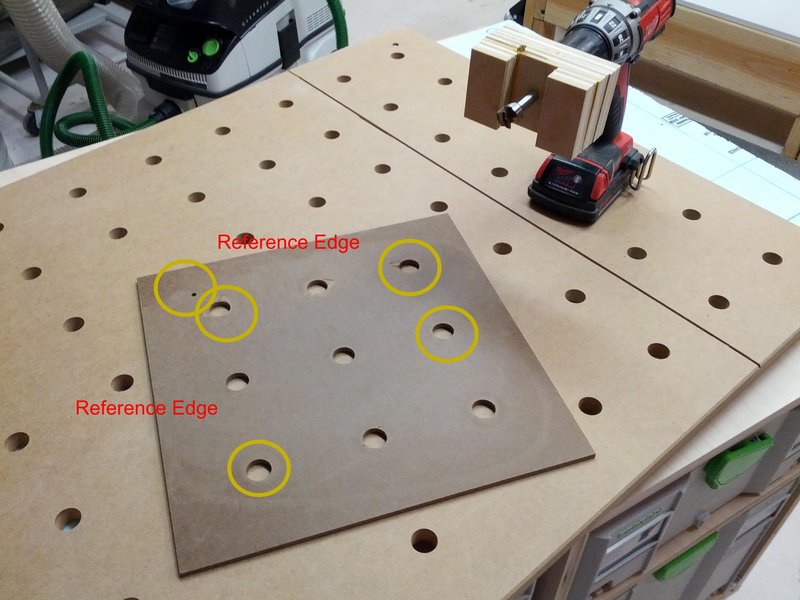
- Secure the template: Place your bore template on the workpiece, ensuring the reference edge is flush and it’s aligned at the right spot.
- Mark your holes: Use a pencil to mark the hole centers through the template if you prefer a test run.
- Check your drill bit: Make sure you’ve picked the correct size for your hardware. Set the bit tightly in your drill. If you’re worried about drilling too deep, use a stop collar or a bit of tape on the bit as a depth marker.
- Drill your holes: Place the drill bit into each guide hole (or your pencil marks) and drill straight in. Let the template keep you on track—you don’t need to muscle it or go too fast. If using a power drill, a steady, even pressure is best.
- Repeat as needed: Move the template along your work if you have more than one hole to drill. Double-check your alignment each time for accuracy. For big cabinet runs, make sure to reset the template between doors or panels to keep everything uniform.
The magic of a bore template is in that repetition—you can sync each new hole with the last, never worrying that you’ll end up with uneven results.
Common Problems & How To Troubleshoot Bore Template Use
Even the best templates don’t make you invincible—problems still come up. The good news is, most are easy to fix if you know what to look out for.
- Template slipping during use: If your template slides around, your holes end up in the wrong spot. Clamp it in place or use a non-slip pad underneath. On smooth cabinet doors, even a little drift can throw off your hardware code.
- Wrong hole spacing: If holes come out at the wrong distance, double-check the template’s settings before drilling. Adjustable templates can get nudged during setup, especially if you’re rushing.
- Drill bit “walking” or slipping: If your bit skates around, try making a small pilot indentation first or use a sharp bit. Some templates offer metal bushings to help reset your bit exactly where you want it.
- Holes too deep or shallow: Use a stop collar on your drill bit, or wrap a piece of tape at the right depth as a visual indicator.
Most of these are quick fixes. The key is to slow down and reset as needed. If you ever feel lost, check the instruction manual for your template brand or search for troubleshooting tips online—chances are, someone’s been there before!
Comparing Bore Template Methods and Alternatives
You might be wondering if you really need a bore template, or if old-school measuring and marking will do the trick. Let me explain the pros and cons.
- Manual measuring: This can work for a single hole or tiny projects, but accuracy goes out the window with repetition. Even the best tape measure or ruler can fall short when you need every hole to match.
- Paper or cardboard stencils: These are better than nothing, but they’ll wear out or lose their shape after a few uses.
- Bore templates: They code uniformity into your work. Whether you’re pairing with a universal jig like Kreg or a brand-specific one like Blum, you get hardware-ready results every time.
If total accuracy isn’t a must—say, on a backyard project—manual methods might be fine. But for cabinets, built-ins, or anything where the look and function matter, a proper bore template pays for itself in saved time and fewer mistakes.
Tips for Keeping Your Bore Template in Top Shape
Just like with any tool, treating your template with care helps it last and keeps your holes accurate.
- Clean after use: Wipe off sawdust or wood chips that can clog the guide holes or scratch the surface.
- Check for wear: Plastic templates can crack or flex after lots of use. If you notice your template won’t reset or hold its shape, consider a metal upgrade.
- Store flat: Don’t toss it in a drawer with heavy tools—it can warp or lose calibration. Hanging it on a pegboard or dedicated hook works wonders.
Keeping your template paired with its original code chart or instructions also makes future projects easier. That way, when you return for a second round, you’re ready to go.
When to Upgrade or Try Different Template Brands
After you’ve used a bore template a few times, you might notice your needs change. Here’s when to consider a switch:
- You’re drilling new hardware styles: If your go-to template can’t reset to a new configuration, look for a universal or adjustable model.
- Your projects grow in size: If you move from single drawers to full kitchens, investing in a pro-grade template will save you headaches.
- You want more features: Some brands, like Kreg, include built-in stops, deeper bushings, or even laser guides for extra accuracy. If your old template is missing features you now need, an upgrade is worth considering.
Don’t feel pressured to buy the fanciest option off the bat. The right template is the one that codes consistency into your project and syncs up with your actual workflow—nothing more, nothing less.
Wrapping Up: Why a Bore Template Makes Drilling Better
Using a bore template for hole drilling honestly takes your work from “good enough” to something that *looks* like you called in a pro. It’s one of those little investments—time, money, or effort—that pays off every single time your hardware slides into place perfectly. Whether you’re pairing up with an adjustable Kreg jig or a brand-specific template like Blum, you’re building accuracy into your process with every hole drilled.
No matter your skill level, a bore template keeps frustration out of the picture and makes troubleshooting simple. Take your time setting up, check your settings, and let the template do its thing. The result? Uniform holes, smooth installations, and a final product that leaves you feeling confident—because when it comes to drilling holes, consistent isn’t just better, it’s everything.