Picture trying to install a lock where the latch or deadbolt is even a hair off. Suddenly the door doesn’t close right, the hardware wobbles, or you’re left with ugly gaps. That’s where the bore gage shines. It’s the difference between “It mostly fits” and a result that looks clean and professional (even if you’re totally new to door hardware or DIY projects). Many pros reach for something like the Starrett telescoping bore gage—but the basics work the same whether you’re holding a fancy model or a budget-friendly one from your local store.
What Is a Bore Gage and Why Use It For Door Hardware?
Let me explain what a bore gage actually is before we get into the nitty-gritty. A bore gage is a tool that measures the inside diameter of holes, such as those drilled through doors for locks, handles, or smart hardware. Unlike a ruler or tape, which can be tough to line up correctly inside a small, round space, a bore gage fits snugly into the hole and gives you a true reading of its width.
Here’s the thing: door hardware tolerances are surprisingly tight. Even a tiny difference—say, 1/32 of an inch—can mean the difference between hardware that slips right in and hardware that gets stuck or sits crooked. When you buy a lock or handle kit, the manufacturer gives you a recommended bore size. If your door’s hole is off by a bit, you risk improper fit or even having to buy new hardware. Using a bore gage takes out the guesswork and makes sure every component, from the latch plate to the main lock body, will align as intended.
You might be wondering if you really need this tool if you’re only hanging a single handle. Honestly, if you want that “factory” finish or you’re installing something expensive (like a smart deadbolt or code-entry keypad), a bore gage is worth having. With exterior doors—especially solid-core or weather-sealed types—making a mistake can be costly. And if you’re working with multiple doors, or regularly help friends and family with projects, you’ll use it more than you’d expect.
Types of Bore Gages You’ll Find in Hardware Projects
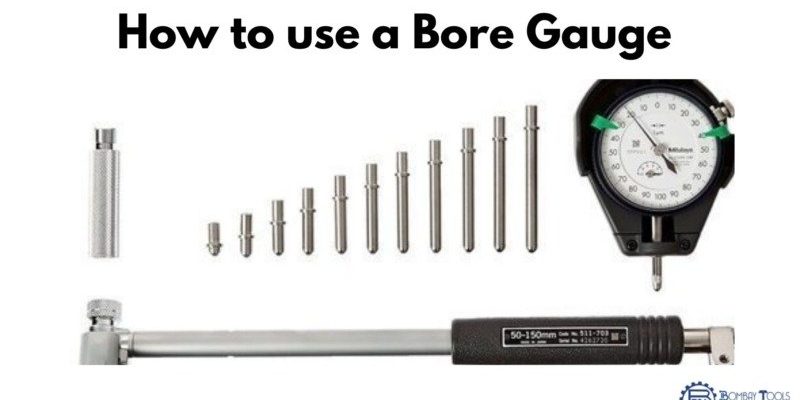
Not all bore gages are created equal. The most common type for our purpose is the telescoping bore gage. This tool uses spring-loaded plungers that expand to touch the inside walls of the hole. After you snug them up, you lock the handle, remove the tool, and then measure across the tips with a micrometer or caliper to get your reading. Starrett, General Tools, and Mitutoyo all make solid versions—if you’re browsing online or at a hardware store, you’ll likely run into one of these brands.
There are also split-ball (or split-sphere) bore gages. These have a ball that splits apart, pressing out to the wall of the bore. They’re a bit more specialized and costly, but they can give extremely high precision for those who need it. Honestly, for most door hardware, the telescoping type is more than accurate enough.
Digital bore gages exist too, but you’ll often see those in machining shops instead of a DIYer’s toolbox. If you’re new to all this, stick with the classic telescoping or simple inside calipers. They’re mechanical, require no batteries (so no sync or reset drama), and let you develop a feel for the work.
How To Prepare Your Door For Precise Measurement
Before you even touch the bore gage, you’ll want to make sure your door is prepped. This step gets skipped a lot, but trust me, it matters. Sawdust, paint, and chipped wood can all throw off your measurement. If you’re installing hardware on a freshly drilled door, use a round wooden dowel or a scrap of sandpaper to gently smooth the inside of the hole. This gives the bore gage a clean, even surface to touch.
Next, check for any obstructions. Sometimes old hardware leaves bits of metal or a ridge inside the bore—pop those out with a screwdriver or file. If the door has weatherstripping or a plastic liner, remove it just for the measurement. You want bare wood (or metal, if it’s a steel-clad door) for the most accurate read.
It’s also a good idea to mark which holes you’re measuring, especially if you’re working with multiple bores (like a deadbolt and a latch below it). Use a pencil or painter’s tape. This saves confusion later and prevents you from accidentally remeasuring the wrong spot.
Step-by-Step: How To Use a Bore Gage on an Exterior Door
Alright, now for the actual process. Using a bore gage isn’t complicated, but there’s a technique to getting a truly accurate measurement. Here’s what you do:
- Loosen the bore gage handle so the plungers can move freely. Hold it straight—perpendicular to the door surface—for best results.
- Insert the gage into the bore, gently expanding the plungers so they lightly touch both sides of the hole. Don’t force it—too much pressure will give a false reading.
- Wiggle the gage slightly side to side and up/down. This centers the tool inside the bore and lets the plungers find the true diameter.
- Tighten the handle to lock the measurement, then carefully remove the gage from the hole. Keep the plungers at their exact position!
- Use a micrometer or caliper to measure across the tips. This number is your bore diameter—match it against your hardware’s specs.
Tip: If you’re new, measure a few times to be sure you’re getting a repeatable number. If they’re all within a few thousandths of an inch, you’re good. If not, check your technique or make sure the bore is clean.
Common Exterior Door Hardware Measurements (And Why Precision Matters)
Let’s get specific. Most U.S. exterior door hardware uses a standard bore size—usually 2-1/8 inches (54mm) for main locks and deadbolts. But here’s where a bore gage proves its worth: not all doors are created equal. Older homes, custom jobs, or “universal” hardware sometimes need slightly different bore diameters.
If your measurement is off, several problems can crop up:
- Loose locks or handles: If the hole’s too big, the hardware can shift or even spin inside the door.
- Tight or stuck installation: If the bore’s too small, components won’t fit properly, or the door itself can split under pressure.
- Security issues: Gaps around the lock weaken the door and can make forced entry easier.
For smart hardware (like keypad locks), measuring is even more crucial. These devices often have tight tolerances for battery compartments, reset switches, and mounting screws. Using a bore gage means the digital remote, code entry, or wireless features won’t get thrown off by a misaligned install.
Bore Gage Measurement vs. Tape Measure: Why Upgrade?
You might be thinking, “Can’t I just measure with a tape or ruler?” I get it. For rough carpentry or DIY, that works sometimes. But for exterior door hardware measurement, a bore gage gives way more accuracy than a tape. Here’s why:
- Tape measures bend and flex, especially in small spaces. You’ll always be guessing the true diameter.
- Bore gages measure the widest point inside the hole—not just a single axis. This helps with slightly out-of-round or imperfect bores.
- It’s fast and repeatable. Once you get the hang of it, you’ll get consistent results every time, instead of “almost” results you have to fudge.
If you’re doing multiple doors—say, for a remodel or as a building pro—a bore gage saves time and headaches. You can even use it to double-check old doors before picking hardware, so you don’t end up with a pile of handles that don’t fit.
Tips for Accurate Bore Gage Use (And Troubleshooting Mistakes)
Even though bore gages are straightforward, a few common mistakes can trip up beginners. First, avoid measuring a dirty, splintered, or freshly painted hole. Small bits of debris throw off your measurement. Always clean the bore first.
Second, don’t overtighten the plungers. The urge to really clamp down is strong, but you’ll end up compressing the hole or warping the gage. A snug, gentle fit is all you need.
Third, watch your angle when inserting the gage. If you come in crooked, the tool will register a smaller diameter than the actual bore. Hold it straight and make sure the gage is perpendicular to the door surface.
Finally, if your measurements vary a lot (off by more than 1/64 inch each time), take a step back. Reseat the plungers, clean the bore again, and measure slowly. Sometimes uneven pressure or an out-of-square hole is to blame. If you keep running into trouble, try measuring a known, round hole (like a spare piece of pipe) to make sure your tool isn’t damaged or out of calibration.
Alternatives to Bore Gages: Should You Ever Skip This Tool?
You might be tempted to skip a bore gage if you’re only working on one door, or if you have “universal” hardware that claims to fit any bore. While it’s possible, I don’t recommend it for anything where a perfect fit truly matters—like smart locks, keyless entry, or security-focused deadbolts.
There are a few alternatives, though:
- Inside calipers: These look a bit like tweezers, and can measure inside diameters—though they take some practice for accuracy.
- Templates or hole saw guides: Some lock kits come with paper or plastic templates for marking and checking bore sizes. Not as exact, but handy for rough layout.
- Specialty sizing plugs: Some hardware stores sell known-size plugs you fit into the bore to quickly check if it matches standard hardware sizes.
If you go one of these routes, double-check your work. For anything involving expensive or high-tech hardware, using a bore gage is the gold standard.
Wrapping Up: Reliable Measurements Mean Better Results
Measuring your door’s bore with a bore gage may seem like a tiny step, but it’s the foundation for an exterior door install that looks clean, functions perfectly, and lasts for years. Instead of second-guessing your tape measure or hoping the hardware fits, you get peace of mind knowing every handle, lock, or smart remote will sit flush and secure.
Once you get comfortable with a bore gage, it’ll become one of those tools you reach for again and again—whether you’re doing a quick battery swap in a keypad lock, syncing a new smart deadbolt, or just helping a neighbor who’s having door troubles. It’s a small investment for a big boost in confidence and professionalism. And honestly, when your door hardware fits right the first time, you’ll never go back to guesswork.