Here’s the thing. Fixing loose screws on your outside door is simpler than you might think. Whether you’re working with a classic wood door or a modern steel entry, those little screws hold more weight than you’d guess. If they’re even a little loose, your whole door starts acting up. Let me walk you through the basics, step by step, so you can get that solid “thunk” and snug fit every time you close your door—no matter if it’s a well-loved wooden Craftsman or a newer Therma-Tru fiberglass model.
Why Exterior Door Hinge Screws Come Loose
You might be wondering: why do these screws back out in the first place? It’s not always just a sign of old hardware. Doors—especially exterior ones—deal with a lot of movement and stress. Every time you open and close that door, especially if you’re carrying groceries or have a pet pushing behind you, the hinges get a tiny workout.
Here’s the science: *wood expands and contracts* with humidity and temperature changes. Steel or composite doors have their own quirks, but the principle’s the same. Over time, this movement can loosen hinge screws, especially if the original installer didn’t use long enough ones or skipped using quality hardware. Sometimes, the screw holes—the “pilot holes”—were already a bit worn out or became stripped after years of use.
One more thing: if you’ve ever tried to reset or adjust a door by shoving it, you might’ve made the problem worse. Those hard yanks can stress the hinges and make screws start backing out—sometimes just on the top, sometimes all the way down. That’s why it’s worth understanding *how* to tighten them properly, so you don’t have to keep troubleshooting this every few months.
Warning Signs Your Door Hinge Screws Are Loose
The first clue is usually subtle: a little extra “play” in the door as you open or close it. But if you know what to look for, you can spot loose exterior door hinge screws early—before you end up with a sagging, jammed, or even stuck door.
- Door drags or sticks: Suddenly the bottom scrapes the threshold or floor.
- Hinge wiggle: If you grab the door near the hinges and it moves back and forth, that’s a classic sign.
- Visible gap: The gap along the latch side or top of the door looks uneven or lets in cold air.
- Screws backing out: Sometimes, you’ll actually see screw heads pulling away from the hinge plate.
Honestly, if you notice any of these issues, take a close look at the hinges before trying more complicated fixes or resets. Loose screws are often the real culprit, not a code issue or a faulty door frame.
What You’ll Need to Tighten Door Hinge Screws
Before you start, gather a few tools. You don’t need a full-blown repair kit or a universal hinge replacement set—just the basics. Here’s what works best for most brands and door types:
- Screwdriver: A
- Longer screws: If the originals are short or stripped, grab 2.5 to 3-inch wood screws (match the finish if you care about looks). For modern metal doors, check your brand’s recommended length.
- Wood glue or toothpicks (optional): These help fill out stripped holes.
- Drill (optional): For especially stubborn or damaged holes, a powered drill can help set new screws deeper into the frame.
Let me explain: you don’t need to sync up a bunch of fancy hardware or hunt down the exact OEM part number for a “reset.” Almost any decent wood screw will hold up if installed correctly, but using the right length matters more than you’d think.
Step-By-Step Guide: How To Tighten Loose Hinge Screws
Ready to get hands-on? Here’s how to tighten those pesky exterior door hinge screws effectively, no matter your door’s make or model.
1. Open the door wide—you want full access to the hinges. If your door is heavy or the screws are extremely loose, you might want a friend to help support the door.
2. Inspect the hinge screws on both the door and frame (jamb) sides. Some may look tight but are actually stripped or barely gripping.
3. Use your screwdriver to tighten each screw clockwise. Start with the top hinge, as this one supports most of the door’s weight.
Don’t force a screw that just spins or feels loose in the hole. This means the hole is stripped, and you’ll need to repair it before tightening.
4. For stripped holes:
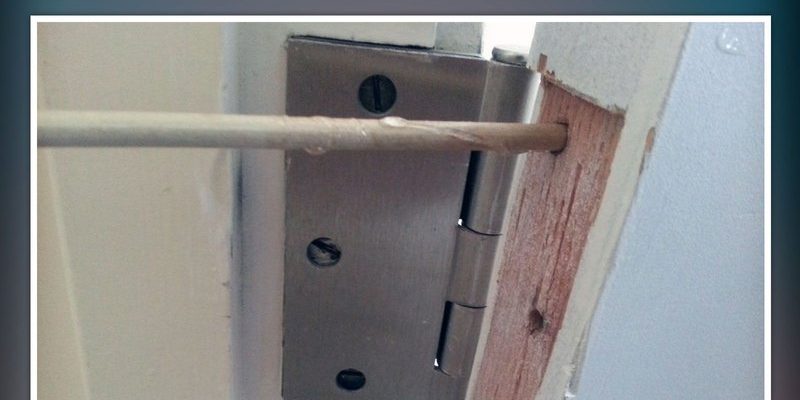
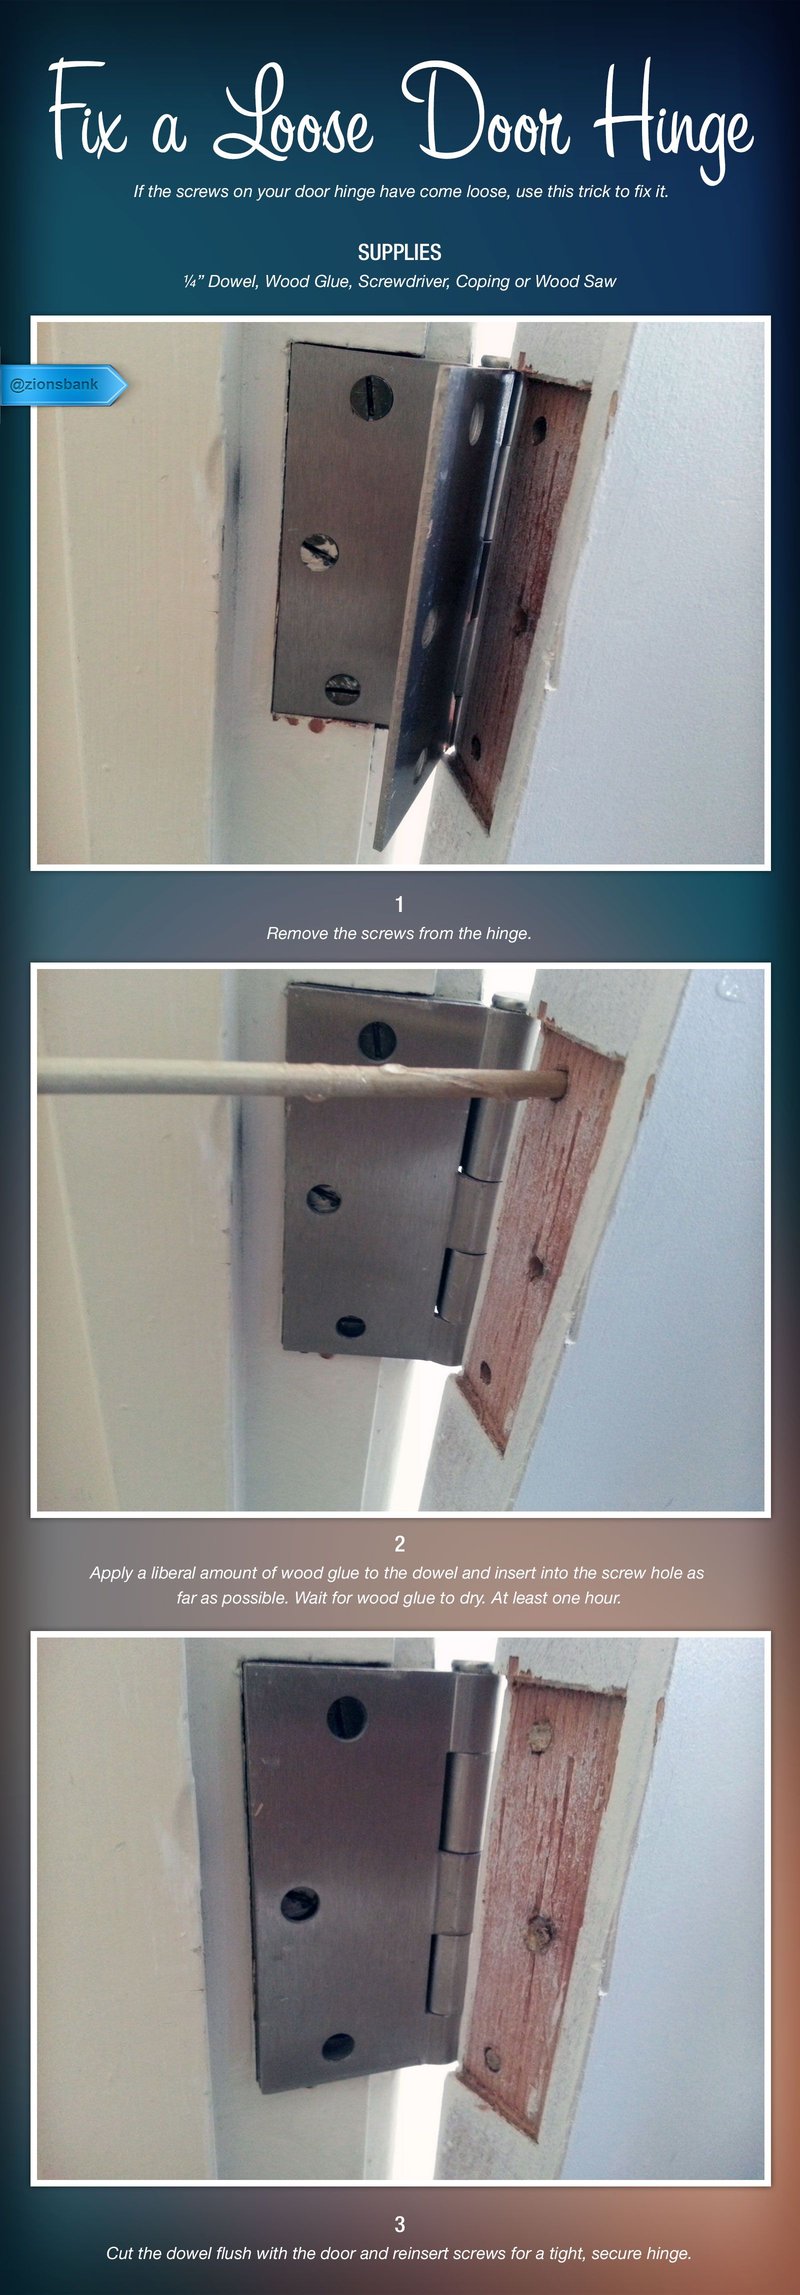
- Remove the screw and fill the hole with wooden toothpicks dipped in glue (or use a wood dowel for bigger holes).
- Break the filler flush with the door frame, let the glue dry, and then drive the screw back in.
5. Replace screws with longer ones if the originals are too short or refusing to tighten. This helps anchor the hinge to the framing, not just the decorative trim or thin wood of the jamb.
6. Check door operation. Open and close the door a few times to see if it swings smoothly, latches properly, and doesn’t sag or rub.
You might have to repeat the process for all hinges if the problem is widespread. And if the screw holes are really oversized (especially in old homes), you might want to use a slightly wider screw or even install a wood plug before resetting the screw.
How Long Should Hinge Screws Be For Exterior Doors?
This is where a lot of homeowners get tripped up. Most prehung exterior doors—like those from JELD-WEN or Masonite—come with short screws, sometimes less than 1.5 inches long. These barely reach into the solid part of the frame.
For a truly solid hold, use 2.5 to 3-inch wood screws. The longer length ensures the screw “bites” into the structural framing behind the decorative trim or casing.
Why does this matter? It’s the same idea as anchoring a TV mount into a stud, not just drywall. You want the screw to sync with something solid that actually supports weight—especially for heavy steel or fiberglass doors.
There’s one catch: make sure your longer screw head is the same style (flat or Phillips) and finish as the originals. Mixing brands or types isn’t a deal-breaker but can look messy or fail to reset flush against the hinge.
What If The Hinge Screws Still Won’t Tighten?
Sometimes, even after swapping in longer or new screws, you’ll find they just keep spinning in place. This usually means the hole is too wide or has been worn down after several “reset” attempts over the years.
Let me explain how to fix this:
- Toothpick method: As mentioned, jam the hole with wooden toothpicks and glue, then reset the screw once dry. This works best for minor stripping.
- Wood dowel plug: For larger holes, drill out the damaged area slightly and tap in a glued wood dowel. Trim it flush, then re-drill a small pilot hole for your screw.
- Wood filler or epoxy: As a last resort, pack the hole with wood filler or two-part epoxy, let it harden, then drill a new hole for the screw.
Honestly, these fixes sound more intimidating than they really are. You don’t need to pair a professional carpenter or use any fancy code—just a steady hand and a little patience.
Comparing Quick Fixes To Permanent Solutions
Here’s the honest truth: there are plenty of “quick fixes” out there. Some people stuff matchsticks into the hole, use a bigger screw, or rely on peel-and-stick hinge shims. These can work in a pinch, especially if you need to reset your door before guests arrive or you’re waiting on replacement hardware.
But if you want a real solution—one that lasts and doesn’t require constant troubleshooting—replace stripped or short screws with longer, properly anchored wood screws. Take an extra few minutes to fill out stripped holes, especially if your door is old or the frame is soft.
“A properly tightened door hinge screw—set deep into the framing—can last for years without a hint of wobble or sag. It’s one of those tiny jobs that makes your whole door work like new.”
If you’re comparing universal fixes (like larger screws or wood filler) to brand-specific repair kits, just know that most everyday doors don’t need anything special. As long as the screw anchors firmly, you’re good to go.
Tips To Prevent Loose Door Hinge Screws In The Future
Once you’ve fixed your loose exterior door hinge screws, you’ll want to keep things tight so you don’t end up right back here a few months later.
- Check screws every season: Give your door a quick inspection every few months, especially after big swings in weather.
- Don’t slam the door: Aside from the noise (and potential code of conduct with your neighbors), slamming puts extra stress on those hinges and screws.
- Avoid over-tightening: Cranking screws too hard can strip the wood, especially on older jambs.
- Consider hinge upgrades: If your door is heavy, swapping in a ball-bearing hinge or higher-grade hardware can help reduce wear and keep things paired up tight.
And remember: if you notice your door starting to sag, stick, or rub—don’t wait. Catching loose hinge screws early is the easiest troubleshooting you’ll ever do on an exterior door.
Wrapping Up: Getting That “Solid Door” Feeling Back
It’s amazing how those tiny exterior door hinge screws can make such a big difference in the way your home feels—safe, draft-free, and just *right*. If you take a little time to tighten them up and pair them with the right length and support, you’ll get years of smooth swinging doors (and probably avoid a few headaches down the road).
So next time your door starts to wobble, creak, or sag, you’ll know exactly where to look—and what to do. Keep your screwdriver handy, don’t be afraid to swap in longer screws or reset the holes, and trust that a few careful steps can reset everything back to sturdy and secure. Here’s to doors that close with a satisfying click, not a groan!