Here’s the thing: pollution and poor air quality act kind of like silent saboteurs. Over time, dust, car exhaust, and even indoor smoke settle on your hardware, causing tarnish, corrosion, or just plain grime. Suddenly, that shiny laptop hinge, remote, or light switch doesn’t just look ugly—it starts to feel sticky or stops working as smoothly. Restoring these things isn’t rocket science, but you do need the right approach, depending on the brand, material, and how bad the damage is.
Let me walk you through some hands-on, beginner-friendly ways to bring your hardware back to life—even if you’re not a pro at cleaning or troubleshooting electronics. Whether it’s a tarnished remote for your Samsung TV, a corroded battery compartment, or a favorite piece of kitchen gear, you can get it shining again with a little patience and the right know-how.
Why Air Quality Tarnishes Hardware in the First Place
It’s easy to blame fingerprints or clumsy spills for dirty gadgets, but the real culprit is often the air itself. Air pollution isn’t just an outdoor issue; tiny particles sneak indoors and cling to your electronics and hardware. Things like car exhaust, cigarette smoke, and even scented candles release chemicals that settle on surfaces.
Most people don’t realize that the metals in your remote, light switches, or even your laptop hinge react with these pollutants. Over time, the chemicals in polluted air can cause oxidation—think of it like a slow-motion rust. That’s why your once-shiny hardware might look foggy, yellowed, or blotchy now. The effect is even worse in humid places, where water in the air speeds up the process.
You might be wondering: does this actually affect how things work? In extreme cases, yes. Corrosion can mess with battery connections, make buttons sticky, or even cause electronics to short out. But more often, it’s an ugly cosmetic issue—or a stickiness that makes daily use a pain.
Honestly, nobody wants to replace their gear just because of a layer of pollution grime. With some patience and the right cleaning methods, you can restore most tarnished hardware to its former glory.
Spotting the Signs: Is Your Hardware Really Tarnished by Pollution?
Before you dive into cleaning or restoration, you need to figure out if pollution is actually to blame. It’s not always obvious—sometimes, what looks like regular dirt is actually the first sign of corrosion or tarnish.
Here’s what to look for on your hardware or remote:
- Discoloration: Metal parts turn yellow, greenish, or develop gray streaks—especially around buttons or battery compartments.
- Sticky residue: Buttons or surfaces feel tacky, even after wiping with a dry cloth.
- Rough texture: Smooth metal now feels bumpy or “sandy.”
- Faded logos or letters: Printed text or symbols wear away faster than normal.
- Strange smells: Mildew or chemical smells mean air quality might be taking its toll.
Remote controls are especially vulnerable. The tiny crevices around buttons collect dust and airborne gunk, which turns into sticky grime. Over time, this can even block signal transmission or mess with the code, making it harder to sync or reset your device.
If you notice any of these signs, it’s time to give your hardware some extra attention. Don’t wait until the problem gets worse—early cleanup can usually save the day.
Cleaning Supplies and Safety: What You Need (and What to Avoid)
Restoring tarnished hardware isn’t just about elbow grease; the right supplies make all the difference. But let’s be real—using harsh cleaners or the wrong tools can do more harm than good, especially on sensitive electronics or branded remotes.
For most beginner-friendly cleaning jobs, you’ll want:
- Microfiber cloths: Gentle enough for all surfaces, plus they won’t leave lint behind.
- Isopropyl alcohol (70% or 90%): Evaporates quickly, so it’s safe for electronics and battery contacts.
- Cotton swabs: Perfect for getting into tiny crevices around buttons or inside a remote.
- Mild dish soap: For plastic or metal parts, diluted in warm water.
- Baking soda paste: For stubborn tarnish on metal hardware (avoid on painted surfaces, though).
- Toothbrush (soft-bristled): Helps scrub away grime from textured areas without scratching.
You might be tempted to grab bleach, ammonia, or abrasive powders. Honestly, don’t. Those can strip the finish or damage logos, making things look worse. Also, avoid soaking electronics or remotes—liquid inside can fry the internal code, mess up sync or pairing, and leave you in full-on troubleshooting mode.
Always unplug or remove batteries before cleaning, especially if you’re working on a remote or anything with circuitry. Safety first, even for small jobs.
Step-by-Step: How To Restore Tarnished Hardware Safely
Let’s break it down, step by step, so you don’t miss anything. These methods work for most remote brands, hardware finishes, or everyday electronics.
1. Unplug and Disassemble (if possible)
- For a remote, remove the batteries. For hardware like light switches or handles, unscrew if you’re comfortable (not essential, but it helps).
- Lay out all parts on a soft towel; you don’t want tiny screws rolling away.
2. Dry Dust First
- Use a microfiber cloth to remove loose dust and debris. Get into corners and button edges with a dry toothbrush.
3. Tackle Sticky or Greasy Spots
- Dip a cotton swab in isopropyl alcohol and gently rub sticky residue or tarnished areas. Alcohol is safe for most plastics and metals, and it dries fast.
- For stubborn spots, use a diluted dish soap solution (just a drop of soap in a cup of warm water), and wipe with a cloth. Rinse with a damp cloth after.
4. Remove Deeper Tarnish on Metal
- Mix a tiny bit of baking soda with water to form a paste. Dab gently on tarnished metal parts—like remote battery contacts or hardware hinges. Let it sit for 1 minute, then scrub gently with a toothbrush.
- Wipe clean with a damp cloth and dry right away.
5. Reassemble and Test
- Put everything back together: batteries in, screws tightened, components snapped in place.
- Test your remote or hardware to make sure everything’s working. This is a good time to check battery freshness, test pairing, or reset if needed.
Here’s an insight:
Never rush air-drying. Allow all parts to dry fully before reassembly, or you’ll risk short-circuiting electronics or causing battery corrosion.
Tips for Different Hardware and Remote Types
Not all hardware is created equal, especially when you’re dealing with different brands or universal vs. original remotes. Each material has its quirks, and using the wrong cleaning method can spell trouble.
Plastic Remotes (Universal or Brand-Specific, e.g. Samsung, LG)
- Most plastics handle isopropyl alcohol and mild soap just fine.
- Watch out for labels or printed codes. Scrubbing too hard can fade letters, making troubleshooting or syncing a pain later.
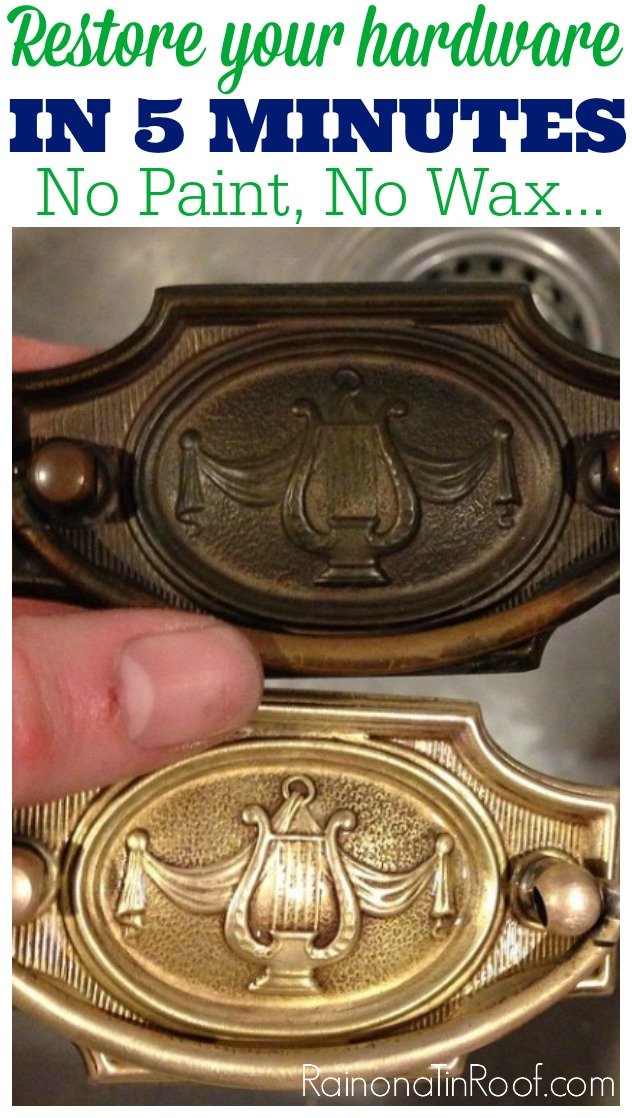
Metal Hardware (Knobs, Hinges, Handles)
- Brass and stainless steel react differently to pollution. Brass tarnishes (goes green or brown), while stainless steel just gets dull and streaky.
- Baking soda is usually safe for raw metal finishes but test in an out-of-sight spot first.
Chrome or Painted Finishes
- Use only very mild soap and water. Abrasives will scratch or peel the finish.
- Dry with a soft cloth to avoid water spots or rust.
Here’s a quick comparison:
| Plastic Remotes | Stainless/Brass Knobs | Chrome Finishes |
| Safe with alcohol and gentle scrubbing | Use baking soda paste, dry thoroughly | Mild soap, avoid abrasives, dry quickly |
In my experience, universal remotes tend to get grimier because they’re handled more often, while branded hardware (like Samsung or LG remotes) usually has better finishes but still needs gentle care. Either way, don’t skip the drying step!
How to Prevent Tarnish and Keep Hardware Looking New
Once you’ve restored your hardware, you probably want to keep it that way. The good news: a little prevention saves you lots of cleaning time down the road.
- Dust regularly: A quick wipe with a microfiber cloth every week stops gunk from building up.
- Use protective covers: Silicone covers or plastic sleeves can protect remotes from pollution and messy hands.
- Store away from windows and vents: This minimizes exposure to outside air and helps prevent new tarnish.
- Avoid harsh indoor pollutants: Limit indoor smoking, candles, or incense near your electronics.
- Dehumidifiers help: Lower humidity means less corrosion and fewer sticky surfaces.
You might be tempted to go wild with polishes or sprays, but stick to gentle cleaners and regular maintenance instead. If something does start to look dull again, a quick reset with the cleaning steps above usually does the trick.
When to Replace: Knowing When Restoration Isn’t Enough
Sometimes, sadly, hardware is simply too far gone. If you’ve tried cleaning and still have:
- Persistent corrosion: Metal parts are pitted or flaking, even after scrubbing.
- Electrical issues: Remote still won’t sync, code won’t reset, or battery contacts are totally rusted out.
- Physical damage: Cracks, missing pieces, or melted plastic from long-term exposure.
It might be time to consider a replacement. Universal remotes are a lifesaver in a pinch, but double-check compatibility for your devices. For things like knobs, handles, or switches, a quick trip to the hardware store will get you a matching replacement, often for less than you’d expect.
Restoration is amazing, but don’t feel guilty if you need to start fresh. Sometimes, a new remote or handle is the easiest fix—especially if troubleshooting has hit a dead end.
Final Thoughts: Breathe New Life Into Old Hardware
Restoring hardware that’s tarnished due to air quality or pollution isn’t magic—it’s about paying attention, using the right tools, and showing a little care for the items you use every day. Whether it’s a sticky remote, a foggy light switch, or anything in between, you don’t have to live with grime and gunk. Most of the time, a simple cleaning routine works wonders and saves you from needless replacements or complicated troubleshooting.
Remember, prevention is the secret weapon here. Keep things wiped down, avoid pollution-heavy areas, and deal with tarnish as soon as you spot it. Your hardware—and your sanity—will thank you for it.