Most common adjustable thresholds—the kinds made by brands like Pemko, M-D Building Products, and Frost King—are designed with replaceable weatherstrips. It’s almost like they expected these things to wear out after a few years of slammed doors and shifting seasons. Thankfully, the process is way less intimidating than it sounds. You’ll just need a few simple tools, a new weatherstrip insert (sometimes called a “door sweep gasket” or “threshold seal”), and a little patience.
What Is an Adjustable Threshold and Why Does Its Weatherstrip Matter?
Let’s start from the top: an adjustable threshold is the metal or composite strip that sits beneath your exterior door, designed to seal the gap at the bottom and keep out air, water, and, frankly, creepy crawlies. The “adjustable” part just means the threshold height can be raised or lowered, usually with a few screws, to perfectly match your door for a tight seal.
The weatherstrip insert is the flexible strip (usually rubber or vinyl) that sits in a channel along the threshold. This is the real MVP when it comes to blocking out drafts, dust, and rain. When it wears down, cracks, or comes loose, you’ll notice the difference—higher energy bills, cold toes, maybe even a wet foyer after a storm.
You might be wondering why simply tightening the threshold won’t fix it. Here’s the thing: the adjustable threshold can only do so much. If the insert is chewed up or missing, no amount of fiddling with screws will stop the air leaks. Replacing just the weatherstrip is usually much cheaper (and easier) than a full threshold swap, especially for common brands that often sell replacement inserts separately.
Signs Your Weatherstrip Insert Needs Replacing
Sometimes it’s obvious your weatherstrip is done for—like when you can see light under the door. But there are sneakier signs too. If you’re troubleshooting mysterious drafts or a sudden spike in heating or cooling bills, don’t forget to look here.
- Visible Gaps: Stand inside during daylight and look at the bottom of the door. If you see light, that’s a sure sign the insert isn’t sealing anymore.
- Cracked or Flattened Rubber: Open the door and check the insert. If it feels brittle, has chunks missing, or is flattened out of shape, it’s not doing its job.
- Difficulty Adjusting the Threshold: If the screws can no longer raise the seal high enough to touch the door, the insert is likely compressed or worn out.
- Water or Dirt Inside: After a heavy rain or wind storm, check for water, sand, or leaves just inside the door. A good weatherstrip insert keeps all of that out.
It’s easy to forget about this strip until there’s a problem. Honestly, that’s why many people end up putting towels or draft stoppers at the bottom of their doors—not realizing a quick weatherstrip replacement would solve it for good.
Choosing the Right Weatherstrip Insert for Your Adjustable Threshold
Not all weatherstrip inserts are created equal—and grabbing the wrong size or type can turn a simple job into a daylong headache. Before you run out and buy anything, you need a good look at your current setup.
First, pop open the door and kneel down to check the threshold. Most adjustable thresholds, especially from brands like M-D Building Products and Frost King, have a slot or channel running the length where the insert slides or snaps in. Some inserts look like a “T” or “U” shape when viewed from the end; others might have fins or extra ridges for sealing.
Measure the length of your threshold and the width and depth of the insert channel. Write those numbers down. If your original insert is still there, pull out a small section for comparison at the hardware store. Many replacement inserts are labeled “universal,” but check the details—especially with older or less common brands.
If you’re having trouble matching the exact style, you can often find replacement threshold seals online by searching the threshold brand and model (look for small letters stamped on the metal). Some brands even color-code their inserts, which makes things easier.
Tip: If you absolutely can’t find a direct match, there are trim-to-fit universal inserts that work for most adjustable thresholds. Just make sure the shape and material are similar to your original.
What Tools and Supplies You’ll Need
You don’t need a whole workshop to do this job—just a few tools and the right replacement part. Here’s what you’ll want on hand:
- Replacement weatherstrip insert: Make sure it matches the length and style of your old one.
- Flathead screwdriver or putty knife: Helpful for prying out the old insert without damaging the channel.
- Scissors or utility knife: For trimming the new insert to the right length.
- Measuring tape: Double-check the size before you cut anything.
- Vacuum or rag: To clean out dust and debris from the channel before installing the new insert.
Honestly, it feels a little like replacing windshield wipers or a vacuum belt—just a few quick swaps and you’re back in business. No special weatherstrip code, battery, syncing, or pairing like with remotes or gadgets. Just pure old-school home maintenance.
How To Remove the Old Weatherstrip Insert
Here’s where things get hands-on. Removing the old insert usually takes five minutes, unless it’s really stubborn.
Step-by-step:
- Open the door wide. Get comfortable—kneel or sit so you’re not rushing.
- Check both ends of the threshold. Most inserts have an exposed edge at one end.
- Use a flathead screwdriver or putty knife to gently pry up the end of the insert. If it doesn’t budge, try wiggling from the other end or the middle. Go slow—if it rips, you’ll still be able to pull the rest out piece by piece.
- Slide or pull out the insert. Some come out smoothly; others might need a little coaxing. Don’t be afraid to use pliers for tough spots.
- Clean the channel. Wipe out dirt, dust, or old rubber. A vacuum helps if you’ve got crumbs jammed in there.
If the insert is really brittle or glued in place (less common with adjustable thresholds, but it happens with old models), you might have to scrape a bit more aggressively. But don’t go nuts with metal tools—scratching the channel can make it harder to install the new one.
Installing the New Weatherstrip Insert (Step-by-Step)
Once the old insert is out and the channel is clear, you’re ready to install the new weatherstrip. This is where you can take your time for a perfect fit.
Step-by-step:
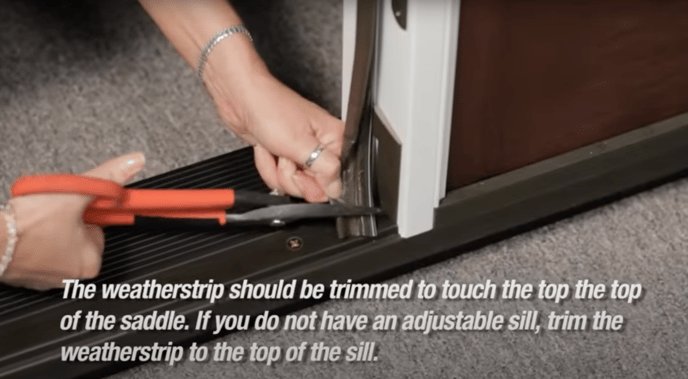
- Lay the new insert next to the old one. If you still have the old piece, compare lengths and shapes. Trim the new insert with scissors or a utility knife if needed.
- Line up the new insert at one end of the threshold. Check that the “T” or “U” shape matches the channel’s groove.
- Slowly press or slide the insert into the channel. Some snap in; others slide with a gentle push. Work your way from one end to the other, making sure it seats evenly.
- If the insert is too tight or loose: Double-check that you have the right style. Sometimes a dab of dish soap helps it slide in. If it’s loose, trim a tiny wedge off each end and try again.
- Check for gaps or bunching. The insert should sit flat, with no bulges or dips. If it’s too long after installation, trim a little more from one end for a snug fit.
Here’s the thing: this part can feel fiddly, especially with rubber inserts that want to curl or kink. But once it’s seated, you’ll know. Run your hand along the threshold—the new weatherstrip should feel even, and the door should close snugly against it.
Adjusting the Threshold Height for a Tight Seal
After the new weatherstrip insert is installed, you might notice the door doesn’t close quite like before. That’s normal. Adjustable thresholds have screws—usually hidden under small caps or covers—that let you raise or lower the height for a perfect seal.
To adjust:
- Find the adjustment screws. They’re usually spaced along the top surface of the threshold. Look for holes or plugs you can pop out with a screwdriver.
- Turn the screws slowly. Clockwise usually raises the threshold, and counterclockwise lowers it. Small turns make a big difference!
- Close the door after each adjustment. You want the door to compress the insert slightly—but not so much that it’s hard to close or drags on the threshold.
- Test for a proper seal. Run your hand along the inside edge for drafts. If you feel air movement, tweak the screws a bit more.
Insight: The goal is a gentle “kiss” between the door and the new weatherstrip—not a heavy squeeze. Too much pressure will wear it out faster (and make the door tough to open).
What to Expect After Replacing the Weatherstrip Insert
You might be surprised how big a difference a fresh weatherstrip insert makes. That draft you barely noticed? Gone. The door closes with a pleasant, firm thunk. And your feet stay warmer in the winter. It’s one of those repairs where you don’t realize how much you needed it until it’s done.
If you notice the door feels a bit snug for the first few days, don’t worry—new rubber inserts soften with use. If it’s really hard to close, try lowering the threshold a smidge or double-check that the insert isn’t too thick for your channel. These small tweaks make all the difference.
Some people add a tiny bead of silicone caulk along the ends to keep the insert from shifting, but with most adjustable thresholds, a snug fit alone does the trick. And unlike electronic gadgets—no code, battery, or troubleshooting needed. Just check every couple of years for wear, and you’ll be set.
Alternatives: When a New Insert Isn’t Enough
Sometimes you’ll find that even after replacing the weatherstrip insert, you’re still battling drafts, leaks, or other threshold woes. Here’s when it might be time to consider alternatives:
- Threshold is warped or damaged: If the metal frame is bent, corroded, or loose, a new insert won’t solve the underlying problem. In that case, replacing the whole adjustable threshold is the way to go.
- Door sweep is missing or worn out: Some doors use a bottom-mounted sweep in addition to a threshold insert. Replacing both can double your protection.
- Universal weatherstrip kits: These are handy if you can’t find a match for your threshold brand. They’re usually cut-to-fit and include adhesive backing for easy DIY installation.
- Professional weatherproofing: If you’ve got major gaps or an uneven floor, a professional might need to re-set the threshold or recommend a specialty gasket.
Pro tip: If you’re troubleshooting constant drafts even after repairs, check the door alignment. Sometimes the issue is with the door itself, not the threshold or insert.
Wrapping Up: Enjoy a Draft-Free Entryway
Replacing the weatherstrip insert in your adjustable threshold is one of those home fixes that pays off right away. It’s simple, affordable, and—let’s be honest—a lot less hassle than you might expect. You don’t need fancy skills or special codes; just a steady hand and a bit of patience. Once you’ve restored that tight seal, you’ll notice your entryway feels cozier and your heating or cooling system doesn’t have to work so hard. So next time you spot light or feel a chilly draft by the door, remember: a fresh weatherstrip insert could be all you need to solve the problem—no full replacement or pro help required. Here’s to warmer toes and lower energy bills!