
In this article, we’ll walk through the process of replacing a spring cartridge in an interior door knob. We’ll focus on popular brands like Schlage and Kwikset, which many homeowners have. Just like tuning up your bike for a smooth ride, a little maintenance on your door knob can keep it working seamlessly. Ready? Let’s dive in!
Understanding the Spring Cartridge
Before we jump into the replacement process, it’s helpful to understand what a spring cartridge actually is. Picture it as the heart of your door knob; it contains the components that allow it to turn smoothly and operate the latch. Over time, these parts can wear out due to frequent use, leading to issues like sticking, slipping, or not latching properly.
The spring cartridge typically includes the spring mechanism, the latch, and sometimes a trim ring. When these components age, you might notice that your knob feels loose or doesn’t turn properly. It can be frustrating, but thankfully, fixing it is simpler than it sounds!
Tools You’ll Need
Before you embark on this simple DIY project, gather the necessary tools. Having everything in place will make the job smoother. Here’s what you need:
- A flathead screwdriver
- A Phillips screwdriver
- A replacement spring cartridge (specific to your door knob brand)
- A flashlight (for those tricky spots)
- Optional: a pair of pliers can help if things get stubborn
With these tools ready, you’re setting yourself up for success. Just like any cooking recipe, having your ingredients prepped makes the process easier and more enjoyable!
Removing the Door Knob
Now that you have your tools, let’s get started on removing the knob. First, look for the screws on the side of the door knob. Depending on the manufacturer, these may be visible or hidden behind a decorative plate. If they’re hidden, gently use your flathead screwdriver to pry off the plate.
Here’s how to remove your door knob:
1. Unscrew the knob: Use your Phillips screwdriver to remove the screws holding the knob in place. Be sure to keep these screws in a safe spot – you’ll need them later.
2. Detach the knob from the door: Gently pull the knob away from the door. If you feel resistance, check for any additional screws.
At this point, you should be able to see the inner workings of the door knob. It might seem a little intimidating, but don’t worry – we’re almost there!
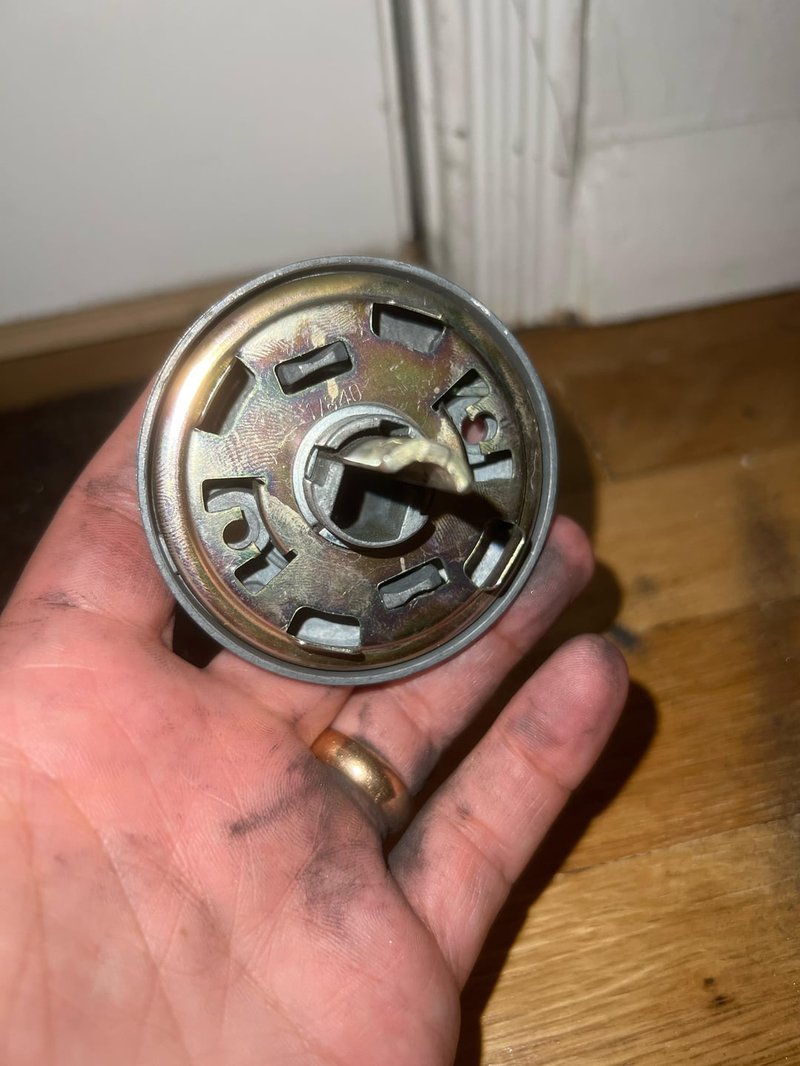
Locating the Spring Cartridge
With the door knob off, it’s time to locate the spring cartridge. This component sits inside the door knob, often snugly encased in a protective sleeve. You’ll usually notice it at the back of the knob.
Look closely – you might see a small retaining clip or cover holding the cartridge in position. If it’s there, gently pry it off with your flathead screwdriver. If you don’t see one, then it’s simply secured by the knob assembly.
Once you’ve located the spring cartridge, it’s time to detach it:
1. Pull the cartridge out: Contact the interior knob and pull the cartridge out carefully. If it doesn’t budge, check for any screws or clips holding it in place.
2. Inspect the old cartridge: Take a moment to compare it with your new replacement cartridge to ensure they match. You wouldn’t want to bake cookies with salt instead of sugar, right?
Installing the New Spring Cartridge
Now comes the fun part – installing your new spring cartridge! This is similar to putting the batteries in a remote control. Just as you wouldn’t force the batteries in the wrong way, make sure your new cartridge fits seamlessly.
Here’s how to install it:
1. Align the cartridge: Position the new spring cartridge in the same orientation as the old one. You’ll want to feel it slide into place.
2. Secure the cartridge: If your knob has a retaining clip or cover, make sure to snap or screw it back on.
This step is crucial. Just like cooking a meal, every detail counts, and you want everything to fit just right.
Reassembling the Door Knob
With the new spring cartridge in place, it’s time to put the door knob back together. This is where your previous work pays off.
1. Reattach the knob: Slide the knob back onto the door, ensuring it’s aligned with the spring cartridge.
2. Insert and tighten screws: Use your Phillips screwdriver to secure the knob in place. Be careful not to overtighten, as this could strip the screws.
Once the knob feels snug, don’t forget to replace any decorative plates you removed earlier. The small details make a big difference in appearance and functionality.
Testing Your Door Knob
Congratulations! You’ve successfully replaced the spring cartridge. Before you call it a day, you’ll want to test your handiwork to ensure everything’s working smoothly.
1. Turn the knob: Give it a gentle turn and listen for a satisfying click. If it feels smooth and secure, you’re in great shape.
2. Check the latch: Open and close the door a few times to ensure the latch engages properly. If you notice any resistance, double-check your installation.
This part is like taking the first bite of that recipe you just made. You want to make sure all your efforts have paid off!
Replacing a worn-out spring cartridge in your interior door knob isn’t just about fixing a problem; it’s about reclaiming that effortless access to your home. A smooth door knob means less frustration and a sense of accomplishment. Plus, you’ve just saved yourself a trip to the hardware store or a call to the handyman!
Every time you turn that knob now, you’ll remember the little bit of DIY magic you created. So go ahead, give your door a turn and enjoy the newly restored function. Remember, even the smallest repairs can have a big impact on your day-to-day life. Happy fixing!