Let me explain how it works. Whether your handleset lever is jammed, wobbly, or simply clashing with a new paint job, most big-name brands design their hardware for homeowners to maintain themselves. That means the process is actually way more straightforward than it seems. We’ll walk through replacing a specific brand’s exterior handleset lever, covering all the beginner needs, small details, and common spots where things get tricky.
What Tools and Supplies Do You Need?
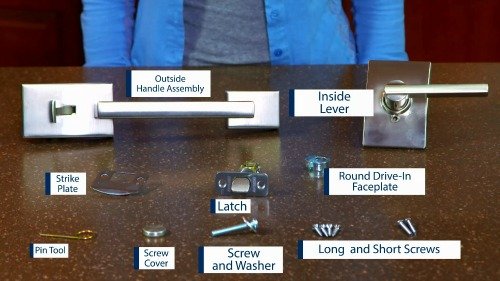
Before you take anything apart, it’s smart to gather your tools and parts. Most exterior handleset levers (especially from trusted brands like Schlage or Kwikset) are designed with the DIY homeowner in mind, but you’ll want the right stuff on hand to avoid frustration. Think of it like prepping ingredients before you start cooking—you don’t want to be halfway through and realize you’re missing a critical screwdriver.
Here’s what you’ll typically need:
- Phillips screwdriver (almost always required)
- Flathead screwdriver (for prying or alignment)
- Allen wrench set (some brands use tiny set screws)
- Replacement lever—make sure it matches your brand and model
- New screws or hardware (these usually come in the box with your replacement, but check before starting)
Some folks like to keep a small dish for screws (so they don’t run off on you) and a flashlight, especially if your front porch lighting isn’t super bright. If you’re ever in doubt about which handleset or lever fits your door, it helps to snap a photo of your current setup and check the brand’s website for compatible models.
Getting Started: Removing the Old Handleset Lever
Alright, so you’re ready to get hands-on. The good news is, most brand-name exterior handleset levers come off in a few straightforward steps. Honestly, the trickiest part is usually just finding the right screws—they can be a little hidden or disguised for aesthetics. If you’ve never done this before, go slow and keep track of everything you remove. Here’s a step-by-step for the typical process:
- Locate the mounting screws: Open your door and look along the edge and the interior side. Most brands tuck the screws under decorative plates or behind the lever.
- Unscrew the handle: Using your Phillips screwdriver, remove the screws that attach the interior lever or plate. Some handles have a small set screw underneath—this is where your Allen wrench comes in handy.
- Detach the lever or knob: Once the screws are out, gently pull off the interior lever or knob. Give it a wiggle if it feels stuck, but don’t use brute force.
- Remove the exterior lever: The outside part should now slide out, but you might need to coax it a bit if it’s been there a while.
Pro tip: Lay out all parts in the order you removed them. If you ever need to sync or reset the new handle’s alignment, you’ll know exactly which piece goes where.
Prepping for the New Exterior Handleset Lever
Here’s where a little patience pays off. Old hardware can leave behind dust, marks, or even a bit of grime. Before you pop in the new lever, it’s worth giving the area a quick cleanup. Wipe away any dirt around the hole, check for leftover screws, and make sure the latch and deadbolt are still working smoothly.
If your new lever came with an installation guide (brands like Schlage and Kwikset are pretty good about this), keep it handy. Some brands use a unique code on their packaging or a QR code you can scan for troubleshooting videos—don’t overlook this, especially if you hit a snag. Check that your replacement lever matches up with the latch, hole placement, and screw holes. If it doesn’t line up perfectly, double-check the part number or sync up with the brand’s customer support to confirm you’ve got the right replacement.
Installing the Replacement Handleset Lever
Ready to install the new exterior lever? This part’s actually pretty satisfying. Most brands use a system where you insert the exterior lever first, then secure it from the inside. Here’s a quick rundown:
- Slide the new exterior lever into place through the holes in the door. Align the tailpiece (the long, flat bar) with the latch and lock mechanism.
- Attach the interior lever or trim plate, lining up the screw holes with those on the new lever.
- Hand-tighten the screws to hold everything in place, then use your screwdriver to snug them up. Don’t overtighten—just enough so there’s no wobble.
- Check the alignment by testing the latch. Make sure the lever moves freely and the lock still works. If the action feels stiff, double-check the orientation or consider resetting the assembly according to the brand’s troubleshooting guide.
Honestly, the key here is to go slow and stay organized. Occasionally, a set screw might need extra tightening with an Allen wrench, or you’ll need to gently pair the inside and outside levers until everything clicks into place.
Syncing With Deadbolt and Key Mechanisms
Most exterior handleset levers from brands like Schlage or Baldwin are designed to work alongside a deadbolt—either stand-alone or as a full set. If your new lever includes a keyed cylinder or touchpad, you might need to sync or code it with your existing lock system. Here’s what that usually involves:
- Align the tailpiece and spindle between your lever and the deadbolt; this is what triggers the locking mechanism.
- If your set includes a smart lock, follow the brand’s reset or pair instructions. This could involve pressing a code button inside the battery housing or syncing via an app.
- Test both the lever and deadbolt several times before considering the job done. Make sure the door opens, closes, and locks as expected.
Here’s the thing: some folks run into battery issues with electronic levers or get tripped up on aligning the tailpiece. If the lock doesn’t work right after your install, don’t panic—take everything apart, double-check how the mechanical pieces fit together, and consult the troubleshooting steps in your install guide.
Common Problems You Might Hit—and How to Troubleshoot
Let’s be honest, even with the best instructions, things can go sideways. Maybe your brand of handleset lever doesn’t want to sit flush against the door, or the latch suddenly won’t retract. Maybe you drop a screw and it vanishes into the porch abyss. Here are some common issues and fixes:
- Handle feels loose or wobbly? Usually, you just need to tighten the mounting screws a bit more. If that doesn’t solve it, double-check that all the hardware is lined up right—sometimes the inside and outside levers aren’t paired perfectly.
- Latch won’t retract? This is often caused by a misaligned tailpiece or spindle. Remove the lever, reset everything, and try again. Some brands have a small “reset” switch or code button hidden under the trim—don’t be afraid to use it.
- Key won’t turn? You might have installed the cylinder upside down, or the code on a smart lock needs to be reset. If it’s a battery-powered model, try swapping in a fresh battery.
- Still stuck? Sometimes hardware just doesn’t play nice with older doors. Take a photo and reach out to the brand’s customer service, or check their online troubleshooting guides. Many have detailed step-by-step walkthroughs by model code or problem.
Take your time. Frustration is the enemy of good results, and there’s no shame in pausing for a breather or calling in backup if things get tangled.
Comparing Universal vs Brand-Specific Handleset Levers
When you’re picking a replacement, you might wonder if it’s worth trying a universal lever instead of sticking with your brand’s model. Honestly, here’s the real difference:
- Brand-specific levers (like Schlage, Kwikset, Baldwin) are guaranteed to fit your existing holes, latch, and code mechanisms. Installation is almost always smoother, and you won’t lose out on warranty or support. The instructions are clearer, and you’ll get a finish that matches the rest of your hardware.
- Universal levers can be tempting (often cheaper and easy to find), but they sometimes require re-drilling holes, extra alignment steps, or creative troubleshooting with the lock, battery, or reset process. Not all doors are the same, and universal kits usually aren’t a perfect match for higher-end brands.
If security, a smooth install, and a perfect look matter to you, my advice is to go with the brand-specific lever. It’s a bit like grabbing the original charger for your phone instead of a generic one—it just works better and lasts longer.
Caring for Your New Exterior Handleset Lever
You’ve got your new lever installed and working like a charm. What now? Taking care of that fresh hardware will keep your entryway looking sharp and your lock system working smoothly for years. Here’s what I suggest:
- Wipe down the lever with a damp cloth every once in a while—especially in wet or dusty weather. Avoid harsh cleaners that can strip the finish.
- Check for loose screws every couple of months. High-traffic doors can loosen up hardware over time. A quick tighten keeps things safe.
- For smart or battery-powered locks, replace batteries regularly and keep track of any error codes or sync reminders the brand app sends you. Don’t wait for a dead battery before taking action.
- Troubleshoot early if you notice sticking, misalignment, or a “soft” feel in the lever. Catching issues before they get worse saves repair headaches later on.
Little bits of care now spare you bigger hassles down the road, and there’s real satisfaction in a door that feels rock-solid every time you use it.
Wrapping Up: Enjoying a Fresh, Secure Entryway
Replacing a specific brand’s exterior handleset lever isn’t as intimidating as it might seem. With some basic tools, a bit of patience, and the right replacement part, you can give your door a second life—no locksmith or fancy skills required. Plus, there’s something pretty satisfying about fixing up the hardware that greets you at the end of a long day.
Just remember: work slow, keep track of your parts, and don’t hesitate to double-check the brand’s instructions if you hit a snag with a code, battery, or alignment. A brand-specific lever will almost always give you the easiest install, the best fit, and a style that feels like it was made just for your door. Enjoy your upgraded handleset lever—and the peace of mind that comes with it.