
Here’s the thing: not all hinge pins are created equal. If you’re dealing with a Schlage, Baldwin, or another specific brand, there are often unique quirks in their design—especially with *non-removable* pins made for extra security. They’re meant to keep troublemakers out, but they can also leave regular folks scratching their heads when repair time rolls around. Don’t let the “non-removable” label scare you off. With the right tools and a clear step-by-step plan, you’ll have that hinge working like new.
What Makes a Non-Removable Hinge Pin Different?
You might be wondering, “Why would anyone design a pin you can’t just pop out?” Honestly, it’s all about security. Exterior doors, especially the ones on homes or commercial buildings, need protection against forced entry. With a regular hinge, someone can sometimes knock the pin out from the outside and take the whole door off—bad news for security. So, brands like Schlage and Baldwin created *non-removable hinge pins*. These have little set screws, staked ends, or caps that keep the pin locked in place unless you know the trick to getting it out.
Let me explain what this looks like in action. On some models, there’s a tiny Allen screw hiding on the inside of the hinge leaf. Others have a headless pin, so you can’t tap it out from the bottom. The exact design varies, but the idea is always the same: make it tough for anyone to mess with that pin if they’re standing outside. It’s clever, but it also means you can’t just grab a hammer and go wild like you would with older, removable types.
For folks new to this: *Non-removable* doesn’t mean *impossible*. It just means you might need to look closer or use an extra tool to get the job done.
How to Identify Your Hinge and Pin Style
Before you reach for your toolbox, stop and take a good look at your door hinge. Brands love to add their own twists, so knowing exactly what you’re working with saves a ton of headache. Most door hinges will have a brand name either stamped on the leaf (the flat part attached to the door or frame) or printed near the knuckle (the round pivot where the pin sits). Grab a light and check—sometimes it’s faint.
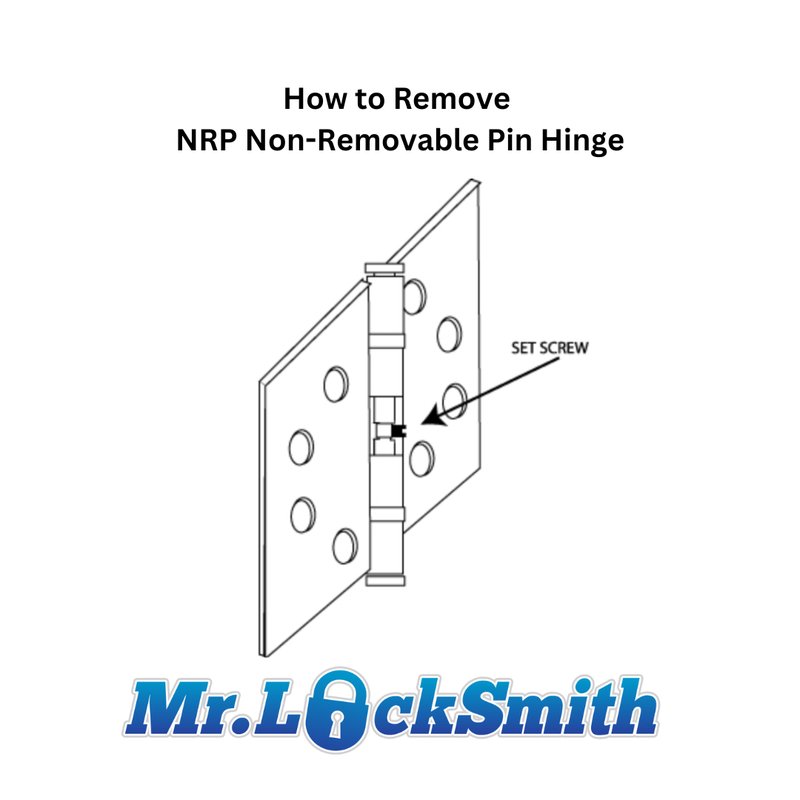
Once you’ve found the brand, check the *hinge pin*. Is there a little screw on one side, or does the bottom of the pin look peened over (flattened)? Common non-removable types include:
- Set Screw Lock: Look for a tiny screw on the inside part of the hinge. You’ll need a small Allen wrench to loosen it.
- Staked Pin: The tip of the pin might have a metal dimple hammered into it. This stops it from sliding out unless you remove the whole hinge.
- Security Tab or Cap: Some brands use a little tab that locks into a notch in the leaf, blocking the pin from moving unless the door is open.
Why does this matter? If you know your hinge’s secrets, you won’t waste time with the wrong tools or, worse, accidentally damage the door. Write down the brand and take a snapshot if you’re heading to the hardware store—having the exact model on hand makes finding replacement pins (or even a whole new hinge kit) much easier.
Gathering Tools and Replacement Parts
Ready to get started? If you’ve never done any door hardware work before, don’t stress. You won’t need a full-blown workshop—just a few basics. Here’s what most people use for replacing a non-removable hinge pin on a typical exterior door (like Schlage or Baldwin):
- Screwdrivers: Both Phillips and flat-head, just in case.
- Allen wrenches: Especially if there’s a set screw.
- Hammer and punch: For gently tapping pins if needed.
- Pliers: Helpful for gripping stubborn pins.
- Replacement hinge pin: Make sure it matches your brand and size. Some brands sell pins separately, while others require a full hinge swap.
- WD-40 or similar lubricant: Older hinges love to seize up.
If you’re not sure which pin to buy, check your brand’s website or bring the old pin to the store for a match. Some exterior hinges have pins that are a hair wider or longer, and that tiny difference can mess up your door’s swing or security. Don’t guess—measure!
Pro tip: Always have a friend help you steady the door, especially if you’re removing more than one hinge at a time. Doors are heavier than they look, and a falling door can scratch your floor or pinch your fingers in a hurry.
Step-by-Step: Removing a Non-Removable Hinge Pin
Honestly, this is where people get nervous—no shame in that. Non-removable pins are tricky by design, but there’s almost always a workaround. Here’s how you can handle the three most common types found on Schlage, Baldwin, or similar exterior doors:
- For Set Screw Lock Pins:
- Open the door wide so you’re working from the inside (where the set screw is accessible).
- Use the correct size Allen wrench to loosen the set screw a few turns—don’t strip it.
- Once it’s loose, tap the hinge pin out gently from the bottom with a punch and hammer.
- For Staked Pins:
- These can’t be removed unless you take the whole hinge off the door.
- Unscrew the hinge from both the door and frame. Watch out—the door might shift!
- With the hinge on your workbench, use a punch and hammer to drive the pin out. Replace it, reassemble, and re-mount the hinge.
- For Security Tabs/Caps:
- Open the door. Look for the tab or cap blocking the pin.
- Use a flat-head screwdriver to carefully lift or slide the tab out of the way.
- Push the pin out from the bottom. Some brands will require you to tap it out gently.
Don’t forget to keep screws organized—you don’t want extras left over when you’re putting everything back together. If the pin or hinge is rusty or coated in old paint, spray a little WD-40 and let it soak for a few minutes before trying again.
Installing the New Pin: Best Practices
You’ve got the old pin out, and now it’s time for the easy part—right? Almost. Getting the *replacement hinge pin* installed takes care and patience, especially with exterior doors where alignment really matters. If your new pin is a brand-specific model, double-check that it matches the old one for length and thickness. If it feels tight or loose, stop and compare.
Start by lining up the hinge leaves perfectly; they should be flush. Insert the new pin from the top (or bottom, if that’s how your model works). Use gentle taps from a hammer if needed. For set screw hinges, don’t forget to tighten the screw once the pin is in—this locks it in place and keeps it “non-removable.”
With staked pin designs, you might need to gently peen the tip of the new pin with your hammer to mushroom it—basically, widen it so it can’t fall out. If your brand’s instructions call for this, a few firm taps should do the trick. For security tabs, slide the tab or cap back into place before you call it done.
Getting alignment right is key. If the door binds, squeaks, or doesn’t close smoothly, try loosening the hinge screws, shifting the door slightly, and re-tightening. Little adjustments make a big difference.
Reassembling and Testing the Door
Here’s where troubleshooting comes into play. Once your new hinge pin is in, gently close and open the door a few times. Listen for odd noises and feel for resistance. The door should swing smoothly, with no scraping at the threshold or frame. If it’s sticking, try loosening and re-tightening the screws one at a time to let the hinge settle.
Let me tell you, sometimes a door that’s been sagging for months feels brand new after a hinge pin swap. If something feels off, check that the pin is seated correctly and that any set screws or tabs are re-engaged. Don’t ignore weird sounds—those usually mean something isn’t lined up just right.
Keep an eye on the screws and hinge leaf—over-tightening can strip the wood or metal, especially on older doors. Always go for firm but not Hulk-level tightness. And if you notice a little wiggle or sag, shim the hinge slightly with a thin piece of cardboard until things look straight.
Alternatives: When to Replace the Whole Hinge
Sometimes, replacing just the pin isn’t enough. If your hinge leaves are bent, deeply rusted, or the screw holes are stripped, it might make more sense to swap out the entire hinge instead of fighting with a stubborn pin. Most hardware stores stock *universal* and brand-specific exterior hinges. Here’s how to compare:
- Brand-Specific Hinges: Designed for a perfect match. Best for newer doors or when you want everything to look factory-original.
- Universal Hinges: Slightly more forgiving if your brand isn’t made anymore or you’re not picky about finish.
If you go this route, bring your old hinge (or a photo with measurements) to the store for a perfect match. Swapping a whole hinge is only a little more work—just unscrew, match holes, and re-mount. Don’t forget to check if the universal hinge offers the same security features as your old non-removable pin; not all of them do.
Upgrading hinges is a good time to check your door’s weatherstripping, threshold, and locks. It’s amazing how much smoother everything works when the hardware is all in sync.
Common Problems and Troubleshooting Tips
So, what if things don’t go as planned? Exterior door hinge pin swaps can throw a few curveballs, especially with older doors or rare brands. Here’s what I see most often:
- Pin Won’t Budge: Spray penetrating oil, wait, and gently tap with a punch and hammer. Rushing can damage the hinge or scratch the door.
- Allen Screw Stripped: Try a slightly larger Allen key, or carefully grip the screw head with pliers. Replacement set screws are cheap if you damage one.
- Door Won’t Close Right: Check your alignment. Loosen the hinge, wiggle the door, and re-tighten with the door held perfectly level. A helper is worth their weight in gold here.
- Replacement Pin Doesn’t Fit: Double-check lengths and diameter. Don’t force it; the right pin should slide in firmly but smoothly.
Don’t get discouraged if the first try takes a while. With each step, you’re getting more hands-on experience with your home’s hardware—and honestly, that knowledge comes in handy way more than you’d think.
Wrapping It Up: Keeping Your Exterior Door Secure and Smooth
Replacing a specific brand’s non-removable exterior door hinge pin looks tricky at first glance, but it’s nothing you can’t handle with a little patience and the right know-how. Whether you’re dealing with a stubborn set screw, a staked pin, or a clever security tab, there’s always a way in—and a way to put it back together so your door is better than ever.
The biggest tip? Don’t rush. Take time to check your brand, use the right tools, and line things up carefully when you install the new pin. With fresh hardware, your door will swing quietly, line up securely, and give you that peace of mind only a solid front door can deliver. And if you ever run into trouble, just remember: there’s always another approach—or a friendly expert at the hardware store—waiting to help you get things back on track.