Honestly, a stripped deadbolt screw hole in a solid wood door (whether it’s a classic Schlage, Kwikset, Yale, or some generic model) can make you worry about jams, failed codes, or even a door that won’t lock properly. But here’s the good news: fixing this problem isn’t as intimidating as it might seem. If you’ve got a bit of patience, a few basic tools, and a willingness to slow down and do it right, you can get your deadbolt back to working like new.
Let me walk you through how to repair a stripped screw hole for a deadbolt on a solid wood door. We’ll use everyday materials, no expensive specialty kits required, and I’ll explain each step in plain language—zero jargon, zero confusion.
Why Deadbolt Screw Holes Get Stripped (And Why It Matters)
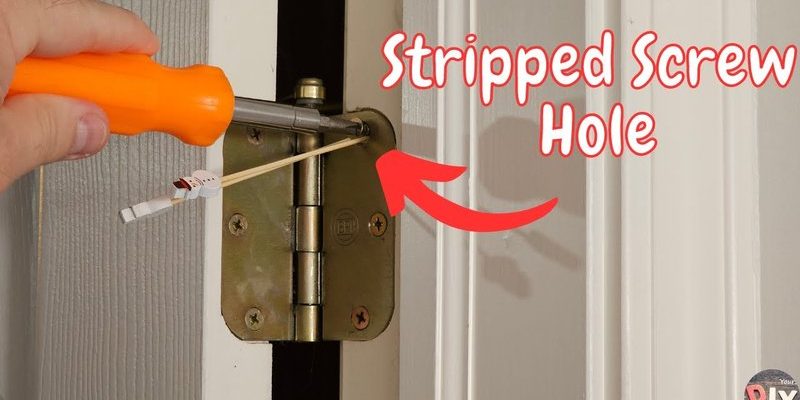
Deadbolt screws are supposed to anchor the lock solidly into your door, but over time, things can go sideways. The most common reason these holes get stripped is repeated tightening and loosening. Each time a screw moves, it wears away a bit more of the wood. Eventually, the threads that used to grip the screw turn into dust, so the screw just spins instead of locking tight.
Sometimes, an installer overtightens screws during installation, crushing the wood fibers. Or maybe someone tried to force a slightly too-large screw, thinking it’d “hold better,” but all it does is ruin the hole. Even humidity can play a role: as wood expands and contracts with changing seasons, those holes can get looser.
Here’s the thing—when a deadbolt screw hole gets stripped, you don’t just lose a bit of tightness. The whole deadbolt can shift, making your lock unreliable. If you use a smart deadbolt with codes or a remote, a loose fit can mess up alignment, causing battery issues or failed locks. It’s not just about rattling; it’s about security, convenience, and peace of mind.
What You’ll Need for This Repair
Before you get elbow-deep in sawdust, it pays to gather your tools and materials first. You don’t need a contractor’s arsenal, but a few everyday items make the job smoother. Here’s what you should set out on your workspace:
- Wood glue – The regular stuff for carpentry works fine.
- Wooden toothpicks or matchsticks – These fill out the stripped hole.
- Screwdriver – Preferably both flathead and Phillips types, since deadbolt screws vary.
- Utility knife or scissors – To trim toothpicks or matches flush with the surface.
- Drill and small drill bits (optional) – If the hole is severely damaged or you want to use a dowel.
- Sandpaper – Just a scrap to smooth out the repair area if needed.
- Masking tape (optional) – Helps keep glue from running all over your hardware.
You might be wondering if you can just use bigger screws or a wall anchor. Honestly, that can work for a temporary fix, but it’ll likely cause more problems down the road, especially on solid wood doors where the integrity of the original hole matters for long-term strength.
How To Repair A Stripped Screw Hole With Toothpicks Or Matches
Filling the stripped hole with toothpicks or matches is a classic trick because it’s simple, cheap, and surprisingly durable. Here’s what to do, step by step:
- Remove the deadbolt screws and hardware. Don’t force anything—just unscrew gently so you don’t strip things further.
- Take a look inside the stripped hole. If you see loose dust or splinters, tap them out. You want a clean base to work with.
- Squirt a little wood glue into the hole. Not too much—a drop or two goes a long way.
- Insert plain wooden toothpicks or matchsticks (without the heads) into the hole. Pack them tightly until the hole feels snug. Usually 3–6 will do.
- Let the glue set for at least 30 minutes. If you can, wait a full hour to be sure it’s hard. You want the glue to bond everything into a solid chunk.
- Once dry, use your utility knife or scissors to snip off the sticks flush with the door’s surface.
- Screw the deadbolt hardware back in. The new “wood” should grip your screw tightly, making it feel like a brand new hole.
If the screw still doesn’t bite, take a couple more toothpicks and repeat the process until it’s a tight fit. You’ll know it’s right when the screw requires a little effort to turn and seats firmly without spinning.
Expert Tip: Sometimes people try to repair a stripped deadbolt hole by just cramming in glue or using metal shims. These might seem sturdy at first, but they don’t hold up to repeated stresses like a proper wood fill does—especially on a busy door.
Using Wooden Dowels For A Heavy-Duty Fix
If you’ve tried the toothpick trick but your deadbolt still feels loose, or if the hole is so big that toothpicks just rattle around inside, using a wooden dowel is your next move. This method is a bit more involved, but it creates a super strong anchor point—almost like pressing “reset” on your door’s wood.
- Drill out the stripped hole to match the size of a wooden dowel (usually 1/4″ or 3/8″ in diameter).
- Cut a piece of dowel to fit the depth of the hole. A snug, precise fit is key—you want it to fill the space tightly, with no wiggling.
- Coat the dowel with wood glue and tap it into the hole until it’s flush with the door surface.
- Wipe away any excess glue and wait at least an hour for it to cure. Overnight is even better.
- Once dry, use a small drill bit to carefully drill a fresh pilot hole in the center of the dowel. Go slow—let the drill do the work.
- Reinstall your deadbolt hardware using the original screws.
You might be tempted to grab longer or fatter screws at this stage, but if you’ve filled the hole right, you shouldn’t have to. This dowel method is especially good for heavy smart deadbolts from brands like Schlage or Yale, where weight and battery connections matter.
Comparing Toothpicks, Dowels, And Wood Filler
You might be wondering—why not just use wood filler out of a tub, or even those repair epoxy kits you see online? Here’s the rundown on the three main options:
- Toothpicks/matchsticks: Perfect for minor to medium stripping. Cheap, easy, and reliable if you follow the steps. Works best on standard doors and locks.
- Wooden dowel: Best for badly damaged holes or high-traffic doors. Takes more time and tools, but gives a like-new anchor point. Strongest option for security.
- Wood filler/epoxy: Can work for small gaps or cosmetic fixes, but tends to crumble under repeated stress. Not ideal for deadbolts or anything under frequent use.
I’ve tried all three, and, honestly, dowels are my go-to for a “set it and forget it” fix on solid wood doors. Toothpicks work in a pinch, but for a deadbolt you use daily? Dowel, every time.
How To Prevent Screw Holes From Stripping Again
Once you’ve fixed the hole, it’s worth taking a few precautions to avoid repeating this whole DIY adventure. Prevention is easier than repair, and it’ll save you time down the line.
- Don’t overtighten. When screwing in the deadbolt hardware, stop as soon as the screw is snug. Going “just a little tighter” is how most holes get stripped in the first place.
- Use the right size screw. If the original screw is worn or seems too short, replace it with a new one of the exact same length and diameter. Random hardware-store screws might not seat properly.
- Check for alignment. If your deadbolt doesn’t line up with the strike plate, it’ll put extra pressure on the screws every time you lock up. Adjust the strike plate if needed.
- Inspect periodically. Every time you do a door battery change or code reset on your smart deadbolt, give the screws a quick check. A little wiggle now can prevent a big hassle later.
Pro Insight: If your door is old, warped, or swells with humidity, consider sealing the repair area with a bit of clear finish or paint. It’ll help keep water out and prevent future screw hole damage.
What To Do If The Repair Doesn’t Work
Sometimes, even after a careful repair, your deadbolt might still feel loose—or maybe the wood around the screw hole is just too soft or damaged. If that’s the case, don’t panic. There are a couple of options before you start shopping for a new door.
- Try repairing with a bigger dowel. If the hole is massive, step up to the next dowel size (1/2″ or even 5/8″). Just be sure you have a drill bit to match.
- Move the deadbolt hardware slightly. Shift it up or down a bit on the door, drill new pilot holes, and use fresh wood for the screws. You’ll need to patch and refinish the old holes, but it’s often easier than a full door replacement.
- Call a pro. If your solid wood door is cracked, splitting, or just not holding any repair, it might be time to consult a locksmith or carpenter. They can reinforce the area or suggest a more permanent fix.
Remember: deadbolts aren’t just about convenience. If your lock can’t hold steady, it’s a safety risk—not just a DIY annoyance.
Wrapping Up: Secure, Solid, And Ready For Anything
Fixing a stripped screw hole for a deadbolt on a solid wood door isn’t something you need to dread. With a little patience, the right materials, and a methodical approach, you can restore your lock’s reliability—and peace of mind—without calling in a professional. From the humble toothpick to the sturdy wood dowel, these classic fixes have stood the test of time for good reason.
Whether you’re dealing with a Schlage smart lock, an old-school Yale with a manual key, or anything in between, the principles are the same: fill the hole with solid wood, let it cure, and reinstall carefully. Take your time, and you (and your door) will be back to working like new.
After all, no one wants their “secure” front door held by a screw that’s just spinning in sawdust. With a few simple steps, you’ll have your deadbolt tight, solid, and ready for whatever life throws at it—whether that’s a heavy freeze, a battery change, or just another day of coming home safe.