
Whether you’re trying to repaint, replace, or simply remove a door, knowing how to get those pesky hinge pins out is essential. In this guide, we’ll walk through the whole process step by step. Let’s dive in and tackle that door together!
Gather Your Tools
Before starting, you need to gather a few tools for the job. Here’s what you should have on hand:
- Hammer: A regular hammer is sufficient, but a rubber mallet can help to avoid damaging the hinge.
- Screwdriver: A flathead screwdriver works best for prying the hinge pins out.
- Pliers: A pair of pliers can help grip and pull the pins if they’re stuck.
- Towel or Cloth: To catch any fallen pins and avoid scratches on the floor.
- Lubricant (Optional): Something like WD-40 can be handy if the pins are really rusted or stuck.
Having these tools ready will make the process smoother, so you won’t have to run back and forth looking for what you need. Honestly, the right tools can save you a lot of frustration.
Assess the Hinge Pins
Now, take a close look at the hinges on your door. There are typically two types of hinge pins: those that can be removed easily and those that seem to be permanently attached. Here’s how to tell the difference:
- Visible Pinhead: If the top of the pin has a head, you can usually pull it straight out.
- Pin Without a Head: In some cases, the pins may be flush or even recessed into the hinge—these are trickier.
Understanding your hinges makes a world of difference in knowing how to proceed. If the pins are old or rusty, they might require a little extra love. Let me explain: sometimes, a few taps with a hammer or a squirt of lubricant can work wonders.
Prepare the Door for Removal
To prevent any damage, it’s important to prepare your door before starting. Here’s how to do it:
1. Support the Door: Use a doorstop or wedge to keep the door steady while you work. If it swings open or closed, it can make the task harder.
2. Protect the Area: Lay down a towel or cloth under the hinge to catch any debris or falling pins. This will help your floor stay scratch-free.
3. Check the Surroundings: Ensure there’s enough space to work comfortably. Clear any obstacles that might get in your way.
Taking these simple steps will make the job easier and protect your door and floors from scratches or stains. You might be wondering why this matters—well, keeping everything tidy helps prevent any accidental damage while you’re focused on removing those pins.
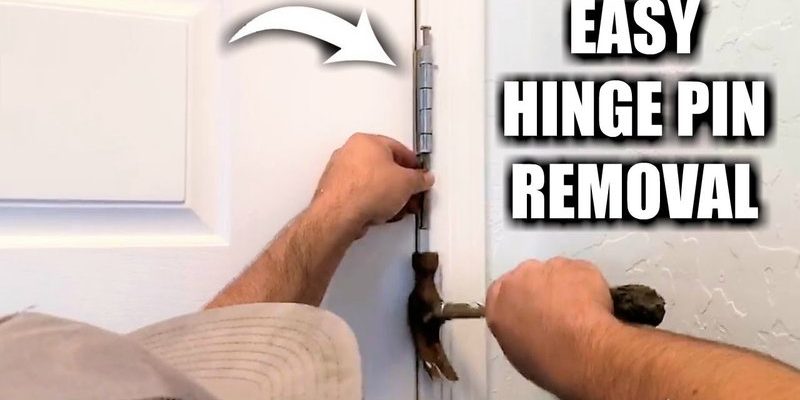
Remove Hinge Pins Methodically
Here’s where the fun begins! Now that you’re prepared, it’s time to remove the hinge pins. Follow these steps carefully:
1. Tap the Pin: Using the screwdriver, gently push the pin up from the bottom. If it won’t budge, a few light taps with the hammer can help loosen it.
2. Grip and Pull: Once you’ve made some progress, use the pliers to grip the pin. Pull it straight out with steady force—don’t twist it, as that could lead to breakage.
3. Repeat: If your door has multiple hinges, repeat the process for each one. Sometimes, the middle or bottom hinge can be a bit more stubborn, so don’t lose your cool.
Taking your time with this step pays off. If you find yourself struggling, step back, reassess, and maybe add a bit of lubricant. Patience is key!
Dealing with Stubborn Pins
What do you do if the pins seem impossible to remove? Sometimes, stubborn hinge pins need a little extra love. Here are some methods to try:
– Lubrication: A squirt of WD-40 or another penetrating oil can work wonders. Let it sit for at least 10 minutes before trying again.
– Heat: If you’re comfortable with it, a heat gun or hairdryer can expand the metal slightly, making the pins easier to pull out. Just be careful not to overheat anything.
– Tapping Around the Hinges: If the pins are rusted or swollen, tap around the hinge with a hammer to create small vibrations that might loosen it up.
These methods are especially helpful for older doors or ones exposed to moisture. If you use heat or lubrication, always follow up with a good clean to avoid sticky residues later on.
Reinstalling the Door
Once you’ve successfully removed the pins, you might think your job is done. If you’re replacing the door or hinges, follow these steps to reinstall:
1. Align the Hinges: Hold the door in place, ensuring the hinges line up with their original locations.
2. Insert the Pins: Start with the top pin and gently tap it in place using a hammer. Repeat for the others. Don’t forget to ensure it’s flush.
3. Test Functionality: Swing the door open and closed to ensure everything works smoothly. If it’s sticking, you might need to make small adjustments.
It’s important to reinstall carefully, as misalignment can cause the door to stick or not close properly. You want a smoothly functioning door, just like your favorite book that opens easily to reveal a new world.
Final Thoughts
Removing hinge pins on stubborn interior doors doesn’t have to be a huge ordeal. With the right tools, techniques, and a bit of patience, you can tackle this task like a pro. Remember to prepare your workspace, assess your pins, and apply the right methods for removal.
Whether you’re looking to repaint, replace, or simply give your door a little TLC, knowing how to handle those hinge pins is essential. So roll up your sleeves and get ready to transform your door with confidence!