You might be wondering how hard it really is to measure for new weatherstripping. Maybe you’ve stared at that worn-out rubber edge, ruler in hand, and thought, “What exactly am I supposed to measure?” Here’s the thing: it’s not tricky, but it *does* matter. Measuring for weatherstripping is a bit like finding the right size shoe—too big, and you’ll trip; too small, and you’ll get blisters (or in this case, cold drafts). The good news is that with a few tips, a measuring tape, and a little patience, you can do this without breaking a sweat.
Why Measuring Weatherstripping Size Correctly Matters
Let me explain why it’s so important to get this step right. If you rush the measurements or “eyeball it,” your new weatherstripping might not work as it should. When the length, width, or thickness is off, you could end up with gaps, sticky doors, or seals that fall out after a week. Not only can this mess with your comfort, but it can also drive up energy bills, allow pests inside, or even let rainwater sneak through on stormy days.
Even if you’re buying a universal weatherstripping kit at the hardware store, you’ll need to double-check that it matches your door or window’s exact needs. In my experience, no two entryways are quite the same, especially in older homes. Some doors warp, others swell during humid seasons, and windows come in all shapes thanks to past repairs or creative architecture. That’s why the measuring process is more than a quick “guesstimate.” Taking your time now will save you hours of frustration later.
Here’s another reason: manufacturers like Frost King, M-D Building Products, or 3M offer a dizzying variety of weatherstripping materials and profiles. Some work better for doors, others for windows, and each brand has slightly different sizing. Armed with the right measurements, you can skip the guesswork (and that dreaded second trip to the store).
Tools You’ll Need Before You Start Measuring
You don’t need a toolbox full of fancy gadgets, but a few basics go a long way. Here’s what you should grab before you get started:
- A steel measuring tape (not a cloth one)—for precise length and width.
- A ruler or a caliper—important for measuring thickness accurately.
- Notepad and pen—so you can jot down each measurement and avoid mix-ups.
- Old weatherstripping (if it’s still there)—keep a small piece for comparison later.
- Good lighting—crucial for checking edges and seeing the true size of gaps.
You might also want a camera or phone. Take a quick photo of the existing weatherstripping and the area you’re measuring. Trust me, this can help when you’re at the hardware store trying to remember what the gap looked like or which type of seal your window needs.
How To Measure the Length for Weatherstripping
Measuring the length is usually the easiest part—but don’t rush it. You want the seal to cover the entire door or window edge, with maybe a little extra for a snug fit.
- For doors: Open the door wide and measure the top, both sides, and bottom edges separately. Doors aren’t always perfectly square, so check each side individually. Add all four sides up if you’re sealing the entire perimeter.
- For windows: Decide if you’re sealing just the moving sash or the entire frame. Measure each section one at a time, making note of any areas that are longer or shorter than the rest.
Here’s a tip: Always add an inch or two to your total length just in case. Weatherstripping can compress or stretch a bit, so having extra is better than coming up short.
If you’re removing old weatherstripping, you can measure that directly. Lay it flat and measure end to end. If it’s cracked or broken, measure the frame instead. This approach works well for universal replacement kits, which often come in rolls you can cut to size.
How To Measure the Width for Weatherstripping
Let’s talk about width. This is the distance *across* the surface where the weatherstripping will stick or press against. Measuring incorrectly here is like putting on a belt two sizes too wide—it just won’t fit well.
- On doors: Measure the width of the jamb or the surface the seal will attach to. If your door has a groove or channel for the weatherstripping, measure inside that space.
- On windows: Measure the area where the sash meets the frame, paying attention to tight spots or odd angles.
If you have the original weatherstripping handy, measure its width (the part that actually touches the frame or glass) and match that. But if you’re starting from scratch, position your tape so you get the *usable* width—the part that will actually block air and water.
Make sure your measurements are straight and level, especially on older wood frames that might be warped. A width that’s even a quarter inch off can mean a loose fit or a door that won’t close right.
How To Measure the Thickness of Weatherstripping
Thickness might be the trickiest part, but it’s also the most important. The thickness (sometimes called compression or “bulb” size) is what actually creates the seal when your door or window shuts.
- If you have the old weatherstripping: Use a ruler or a caliper to measure the height from the base to the top of the squishy part. Don’t measure while it’s compressed—find a spot that’s still in good shape and measure while it’s resting.
- If you don’t have the old weatherstripping: Close the door or window until it’s snug. Use a piece of modeling clay or a folded piece of paper to measure the gap between the door and frame. Remove it and measure the compressed thickness. This tells you how thick your new weatherstripping should be to form a tight seal without making the door or window too hard to shut.
Here’s the thing: if your weatherstripping is *too thick*, your door or window won’t close easily, and you’ll wear out the seal fast. If it’s *too thin*, you’ll still feel drafts. Take your time here, and don’t be afraid to double-check with your measurement again.
Some brands list thickness in millimeters, others in inches. Always match your replacement as closely as possible to the gap size, and if you’re between sizes, go a touch thinner rather than thicker—you can always add an extra thin layer if needed.
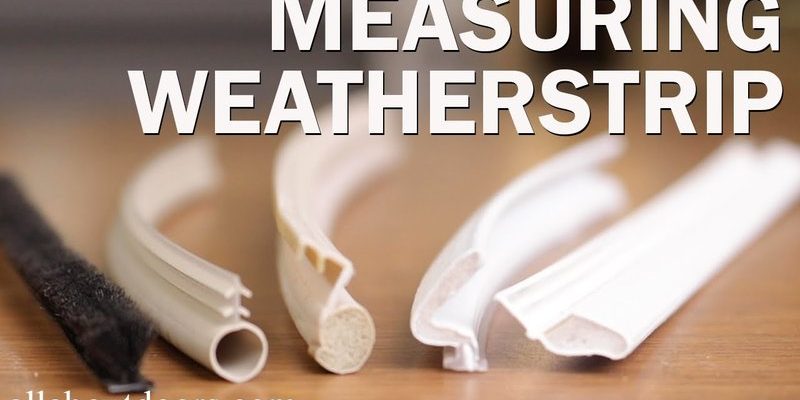
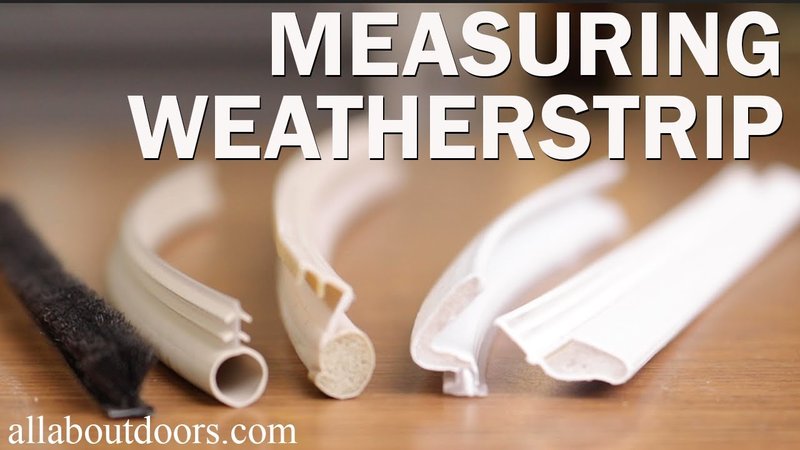
Comparing Weatherstripping Types and Their Fit
Not all weatherstripping is created equal. Honestly, you’ll see more choices than you ever wanted: foam tape, rubber bulb, V-strip, felt, and more. Each type works best in certain situations, and the right fit depends on both your measurements and the door or window itself.
- Foam tape: Great for irregular gaps, easy to cut to length and thickness, but it can wear out faster.
- Rubber or vinyl bulb: Ideal for doors that get frequent use. These come in different bulb sizes—getting the thickness right here is key for a tight seal.
- V-strip (tension seal): Perfect for double-hung windows or sliding doors with narrow gaps. The width must match the groove or mounting surface for proper code and fit.
- Felt or pile: Often used in older wooden frames. Not as durable, but it will fit where modern seals won’t.
If you’re working with a brand-specific replacement, like a 3M self-adhesive strip or M-D Building Products snap-in seal, check their packaging for sizing codes and recommended use. Universal weatherstripping is more forgiving, but matching your measured length, width, and thickness is still essential for a trouble-free install.
Insight: Sometimes, mixing types gives the best result. For example, a thin foam strip for a small window gap plus a rubber bulb at the bottom of a drafty door can provide a better overall seal than one material alone.
Common Mistakes and How To Avoid Them
Even the handiest folks make mistakes the first time they replace weatherstripping. Here are a few to look out for:
- Measuring while the old weatherstripping is compressed—You’ll end up buying something too thin. Always measure when uncompressed, or remove it before measuring.
- Assuming all sides need the same size—Some doors and windows have slightly different gaps on each side. Check every edge before you buy.
- Ignoring brand differences—Some brands use their own size codes. If you’re replacing a remote-brand seal, match both the measurements and the product code if possible.
- Not allowing for material compression—Foam and rubber compress differently. A foam strip might look perfect, but if it squishes down too much, you’ll lose your seal. Always check how much the material will compress before buying.
Take your time, double-check when in doubt, and don’t hesitate to bring your old strip or a photo to the hardware store. Staff can often suggest better alternatives or help you match up brands like Frost King, 3M, or M-D.
What To Do with Your Measurements: Shopping and Installation Prep
Armed with your measurements, it’s time to shop confidently. Here’s how to make your next steps smoother:
- Double-check each number. Make sure you didn’t flip length and width, or mix up inches and millimeters. Write everything down clearly.
- Know your type. Decide which kind of weatherstripping you need for each door or window. Universal kits are forgiving, but brand-specific replacements may require a code or model number.
- Bring a sample if you have one. It’s easy to get lost in the aisle (there are dozens of options). Having a piece in your hand or a photo on your phone can help hardware staff point you in the right direction.
- Don’t forget installation supplies. You may need scissors, adhesive, finishing nails, or even a screwdriver for certain types. Check your kit before leaving the store.
Once you’re ready to install, wipe down the surface so the adhesive sticks, and don’t forget to check for any old residue or nails sticking out. Lining everything up *before* you peel and stick (or snap or nail) is the key to a pro-level result.
Final Thoughts: Getting the Weatherstripping Fit Just Right
Mismeasuring weatherstripping isn’t the end of the world—honestly, even pros get it wrong once in a while. But the closer you match the length, width, and thickness to your actual door or window, the better your results will be. Think of it as tailoring a suit—little adjustments make a world of difference.
Once you’ve got your new weatherstripping cut to size and installed, enjoy the silence, coziness, and even the lower heating and cooling bills. And if you ever get stuck, remember you can always bring your numbers (and maybe a piece of your old weatherstripping) to the store. Someone there has definitely been through the same troubleshooting process.
Measuring for correct weatherstripping replacement takes a little time, but it’s totally worth it. With patience and attention to detail, you’ll have a snug, energy-efficient home—no drafts, no pests, and no more whistling doors. Doesn’t that sound like a breath of fresh air?