Lubrication keeps everything running smoothly, and it’s often needed more often than you would think. Whether you’ve got a classic Schlage knob or a fancy Kwikset model, taking care of that knob will pay off. In this guide, I’ll walk you through the steps to properly lubricate your interior door knob mechanism. By the end, you’ll have a better understanding of how it works and be equipped with the skills to keep your doors functioning like new.
Understanding the Anatomy of Your Door Knob
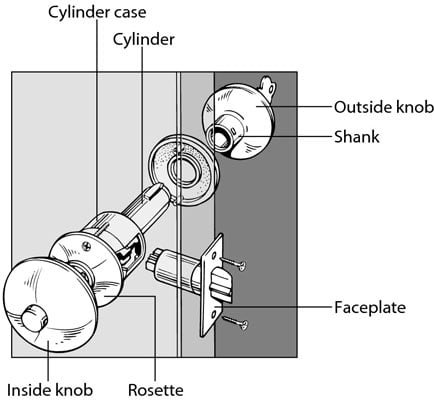
Before diving into lubrication, it’s helpful to know what you’re working with. Most interior door knobs consist of a few key components: the knob itself, the spindle, and the latch. The knob is what you turn to open the door; the spindle connects the two knobs and engages the latch mechanism. If any part of this assembly gets sticky or dry, it can lead to a rough experience.
Here’s the thing: over time, dust and grime can accumulate in these areas, causing resistance when you turn the knob. Just like you wouldn’t ignore a rusty bicycle chain, you shouldn’t overlook your door knob. Regular maintenance can greatly extend its life, keeping it functional for years.
Gathering Your Supplies
You won’t need much to get the job done. Here’s what you’ll want to have on hand:
- Screwdriver: You’ll likely need a Phillips or flathead screwdriver, depending on your door knob.
- Lubricant: A silicone spray or graphite lubricant is generally best for door knobs.
- Clean cloth: This will help you wipe any excess lubricant and clean the area.
- Optional: lubricant spray straw: This can help you apply the lubricant precisely where it’s needed.
You might wonder, “Why can’t I just use any oil?” Well, while oils can work, they often attract dirt and dust over time. That’s why using specialized lubricants is your best bet for a long-lasting solution.
Preparing Your Door Knob for Lubrication
Getting ready to lubricate your door knob isn’t complicated, but it does require a bit of care. Start by ensuring that the door is open and the knob is accessible. Next, check for any visible screws that hold the knob in place. For many models, you’ll find these on the interior side of the door.
Once identified, use your screwdriver to remove these screws. It’s a good idea to keep them in a small dish so you don’t lose them. Gently pull the knob off, taking care to avoid damaging any internal components. If it feels stuck, a little wiggle can often help. Just be patient; forcing it can lead to breakage.
Cleaning the Door Knob Mechanism
Now that you’ve removed the knob, it’s time to inspect and clean the mechanism. Use a clean cloth to wipe away any dust, dirt, or old lubricant. This is crucial because applying new lubricant over grime will only trap it, creating potential future problems.
If your door knob has a connecting spindle, clean that too. If you’ve got some stubborn grime that won’t budge, a bit of mild soap and water can help—just make sure to completely dry it afterward. This prevents moisture from causing rust or damage.
Applying the Lubricant
With a clean mechanism in hand, it’s time for lubrication. Using your lubricant of choice, apply a small amount to the spindle and inner workings of the knob. If you have a spray with a straw attachment, it’s perfect for getting into tight spaces.
When applying, a little goes a long way. You want to coat the parts without overdoing it, as excess lubricant can create a mess. After applying, rotate the knob a few times to spread the lubricant evenly throughout the mechanism. This will help ensure that every moving part is well-lubricated.
Reassembling the Door Knob
Once you’ve lubricated the mechanism, it’s time to put everything back together. Carefully align the knob with the spindle and push it back onto the door. Make sure everything fits snugly without excessive force.
Next, take the screws you set aside earlier and reattach them. Make sure they’re tight, but be cautious not to overtighten; you don’t want to strip the screws or damage the knob. After everything is back in place, test the knob a few times to ensure it turns smoothly.
Regular Maintenance for Longevity
Now that you’ve taken the time to lubricate your door knob, it’s a good idea to keep that maintenance mindset going forward. Aim to check and lubricate your door knobs every six months. This simple step can prevent the buildup of grime and prolong the life of your knobs.
Additionally, if you notice any resistance or stiffness before the six-month mark, don’t hesitate to check and lubricate again. It’s much easier to maintain than to fix. Also, if you’re moving into a new place, it’s wise to inspect all door knobs to ensure they’re in good shape.
Properly lubricating your interior door knob mechanism isn’t just about making it easier to turn—it’s about ensuring the longevity and functionality of your doors. Think of it as a small investment of time that pays off by keeping your doors hassle-free. With just a few tools and some simple steps, you can keep your home well-maintained and avoid all the little annoyances that come from neglecting those often-overlooked door knobs.
Taking the time to understand the workings of your interior door knobs will make your life easier and your home more welcoming. So next time you hear that squeak, grab your lubricant and get to work. Your door knobs—and your sanity—will thank you!