Installing barn door hardware isn’t just about aesthetics; it’s about creating a comfortable and functional space. Imagine sliding your door open and closed without the creaking noise of traditional hinges. With the right tools and methods, you can make your bathroom feel open yet still private. In this guide, I’ll walk you through the steps needed to install specific hardware, focusing particularly on how to maintain that much-needed privacy.
Choosing the Right Hardware for Your Barn Door
Before diving into installation, you need to select the right hardware. Barn door hardware generally comes in two main types: track systems and hardware kits. Track systems include the rail, rollers, and other components needed for installation. Hardware kits often come with everything you need but might not fit every door type perfectly.
Here are a few considerations to keep in mind when choosing hardware:
- Weight Capacity: Ensure your hardware can support the weight of your specific door.
- Style: Choose a style that matches your bathroom decor—rustic, modern, or farmhouse.
- Privacy Features: Look for locking mechanisms or sliding options that can secure the door when closed.
- Durability: Materials like stainless steel or solid wood will last longer and withstand moisture better.
By selecting the right hardware, you set the foundation for a successful installation that meets your privacy and aesthetic needs.
Gathering Your Tools and Materials
Once you’ve chosen your hardware, it’s time to gather the necessary tools and materials for installation. You don’t need to be a DIY expert; most of these items are likely already in your toolbox.
Here’s a quick list of what you’ll need:
- Drill: For making pilot holes in the wall and door.
- Screwdriver: For securing the hardware in place.
- Level: To ensure your track is straight.
- Measuring Tape: To measure the distance between the wall and the door.
- Stud Finder: To locate wall studs for secure mounting.
Having the right tools will not only help you install the hardware correctly but also make the process smoother. Think of it this way: trying to fix something without the right tools is like trying to bake a cake without measuring cups—you might end up with a mess!
Preparing Your Bathroom Door and Frame
Now that your tools are ready, it’s time to prepare your bathroom door and frame. Start by removing any old hardware from the door. This includes hinges, doorknobs, and latches. If your barn door isn’t pre-drilled for hardware, you’ll need to drill holes where the rollers and track will attach.
Next, measure your door. Here’s the thing: measurements are critical. If your door is too wide or narrow for the track, you could encounter issues during installation. Measure the height, width, and thickness of your door. Ensure you also account for any trim or molding on your door frame.
If you want optimal privacy, consider installing a door that has a solid core rather than hollow. This type will provide better sound insulation and a sturdier feel.
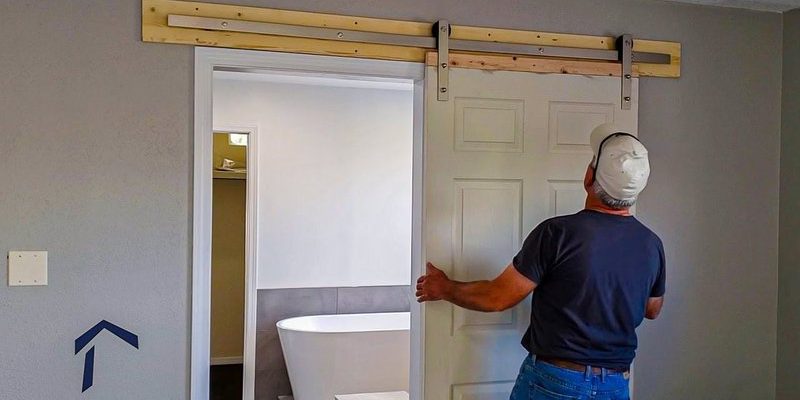
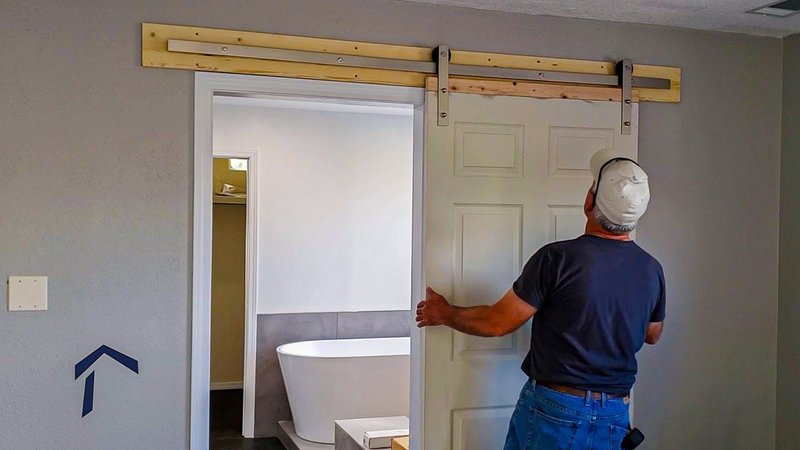
Installing the Track for Your Barn Door
With the door set up, it’s time to install the track. Here’s a step-by-step guide:
1. Mark the Position: Use your measuring tape to determine where you want the track to be mounted. Generally, it should be aligned with the top of your door.
2. Find the Studs: Use your stud finder to locate where you’ll be drilling into the wall. You want to ensure the track is secure.
3. Drill Pilot Holes: With a drill, make pilot holes in the wall where you’ve marked the track. Make sure they align with the studs for added support.
4. Attach the Track: Hold the track in place and secure it with screws. Double-check with a level to ensure it’s straight.
5. Secure It: Once installed, give the track a little wiggle. If it doesn’t budge, you’re all set!
Letting the track dry or “set” for a short period can help ensure everything is secure before you move on to the door.
Attaching Rollers and Mounting the Door
Once your track is ready, it’s time to attach the rollers to your door. This part can feel a bit like solving a puzzle, but it’s actually pretty straightforward. Here’s how to do it:
1. Attach Rollers to the Door: Follow the manufacturer’s instructions to attach the rollers. Each type will have specific fittings, so make sure you’re using the right screws.
2. Lift the Door onto the Track: This is where a friend or family member can help! Carefully lift the door into place on the track.
3. Test the Movement: Slide the door back and forth to ensure it moves smoothly. If it gets stuck, double-check that the rollers are properly aligned on the track.
4. Add Stops: Many barn door kits come with stops that prevent the door from sliding off the track. Make sure you secure these in place.
This step is crucial for maintaining both function and safety. You wouldn’t want your newly installed barn door to go rogue!
Ensuring Privacy Features and Final Adjustments
Now that your door is installed, let’s talk about privacy. One of the best features of interior barn doors is that they can be fitted with privacy mechanisms.
Here are a few options to consider:
- Sliding Locks: These are simple to install and can provide a quick solution for privacy.
- Magnetic Locks: An unobtrusive way to keep your door secure without adding clutter.
- Brass Bolts: For a rustic touch, a brass bolt can be an attractive option.
After installing your privacy feature, test the door once more. Slide it open and closed to ensure everything works smoothly. You want to make sure it doesn’t just look good; it needs to work well, too!
Maintenance Tips for Your Barn Door Hardware
After all that hard work, don’t forget about maintenance. Just like your car, your barn door hardware needs a little TLC to keep it running smoothly.
Here are a few quick maintenance tips:
1. Regularly Check for Loose Screws: Over time, screws may loosen due to regular use. Tighten them up as needed to ensure your door remains secure.
2. Clean the Track: Dust and debris can accumulate over time. Regularly wipe down the track with a damp cloth to keep it clean.
3. Lubricate the Rollers: Every few months, apply a few drops of lubricant to the rollers. This will keep everything sliding smoothly.
4. Watch for Wear and Tear: If you notice any damage, address it right away. This will prolong the life of your barn door and prevent larger issues.
Maintaining your barn door will not only keep it functioning well but also preserve its beauty over time.
Closing thoughts: Installing hardware for interior barn doors in bathrooms can enhance both privacy and design. With the right tools, a bit of patience, and these steps, you can create a stylish and functional space that feels both cozy and private. Enjoy your new barn door experience!