Here’s the thing: standard exterior entry doors usually come with pretty generic hinges. Most folks don’t even notice them. But if you look closer, you’ll often find they have exposed pins that anyone with a screwdriver (or sometimes just a curious hand) can pop out. If someone removes those pins, your locked door turns into just another swinging piece of wood. That’s where brands like Schlage and Defiant step in with security hinges—these have non-removable pins, security studs, or other clever designs to keep your door solidly in place, even if someone tries to tamper with the hardware. It might sound complicated, but honestly, the process isn’t hard—and you don’t need to be a pro to swap them out.
What Are Security Hinges, and Why Should You Upgrade?
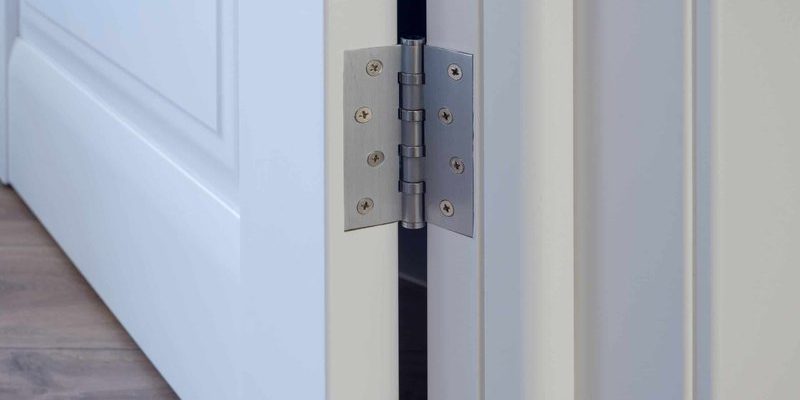
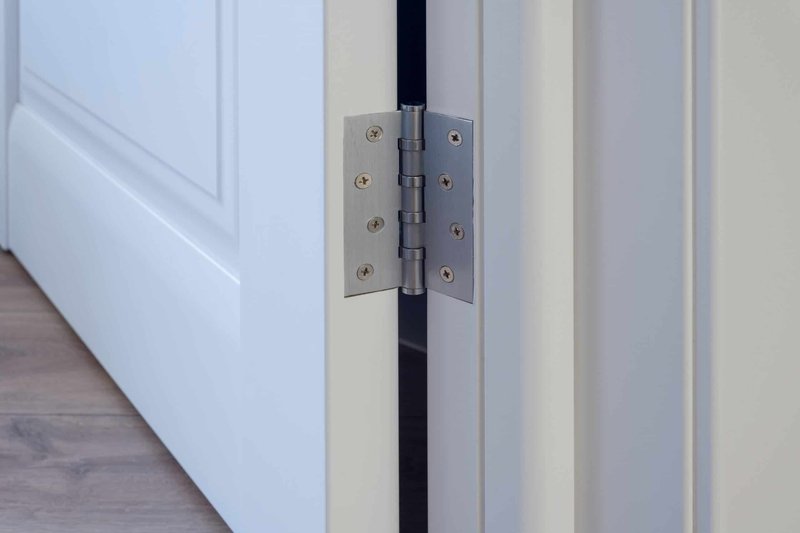
Let me explain how security hinges work. While a regular door hinge just holds your door in place and lets it swing, a *security hinge* comes with features that block thieves from popping out the hinge pins and removing the whole door. There are a few different styles—like hinges with set screws, locking tabs, or a little bump called a security stud that slots into the frame when the door is closed.
You might be wondering, “If I already have a good deadbolt and a beefy lock, do I really need to worry about hinges?” Honestly, yes—especially if your door swings outward (so the hinges are exposed to the outside). But even inward-swinging doors can benefit, because burglars often look for any weak point. Security hinges basically patch a big gap in your door’s armor.
The cool part? Brands like Schlage and Defiant have made these a lot easier and more affordable to install. Many security hinges are a drop-in replacement, meaning you just take off the old ones, pop the new ones in, and you’re good to go. There’s no need to cut, drill, or mess with the structure of your door. It’s the kind of DIY project that can be done in under an hour—but pays for itself in peace of mind.
Choosing the Right Security Hinges for Your Door
Before you grab your screwdriver, it’s smart to pick the right type of hinge for your entry door. Doors aren’t all the same, and neither are security hinges. For most exterior entry doors, you’ll want to look for *butt hinges* with security features like non-removable pins or interlocking tabs. These work well for both wood and metal doors, which are common for entryways.
Here’s the thing: hinge sizes matter. Most residential exterior doors use hinges that are either 3.5 or 4 inches tall. To check, just measure the height of your existing hinges. Also, look at how your door is mounted. If you can see the hinge pins when the door is closed, you’ll for sure want a type with a non-removable pin or a security stud. Brands like Schlage offer models with a little set screw on the inside—this keeps the pin secure, so even if someone tries to tamper with it, they’re out of luck.
If you’re not sure what to buy, take one of your old hinges to a hardware store for comparison. Or, browse online for “Schlage security door hinge” or “Defiant security hinge” and check the product specs. Universal options exist, but sticking to a well-known brand usually means fewer headaches, better instructions, and a smooth fit.
What Tools and Materials Will You Need?
You don’t need a big toolbox for this project, but having the right tools will make things easier and safer. Here’s a simple list of what you’ll need to install security hinges on your entry door:
- Screwdriver (Phillips or flathead, depending on your hinges)
- Power drill (optional, but speeds things up)
- Replacement security hinges (like Schlage or Defiant, matched to your door’s size and finish)
- Short screws (usually included with the new hinges)
- Long security screws (for extra holding power, optional but recommended for exterior doors)
- Wood filler or toothpicks (if your screw holes are stripped)
- Pencil or marker
- Level (to make sure your door doesn’t sag)
Don’t forget to check the packaging—sometimes brands include extra screws or a mini-tool just for their specific hinge model. Having everything ready ahead of time means you won’t be scrambling mid-install.
Step-by-Step: How To Remove Old Door Hinges
All right, let’s get into the nitty-gritty. Removing your old hinges is honestly the messiest part, but with a bit of patience, it’s a breeze. Start by swinging the door open until it’s stable. You don’t want it to slam shut while you’re working, so you might want to wedge something under the door to keep it steady.
Next, grab your screwdriver and unscrew the bottom hinge first. I always start at the bottom—trust me, it keeps the door from suddenly shifting on you. Once the screws are out, gently wiggle the hinge leaf off the door. Move to the top hinge and do the same, and then finally tackle the middle (if your door has three hinges). If the hinges are painted over or stuck, a little tap with a rubber mallet or the heel of your hand usually does the trick.
Keep an eye on the order of the screws and hinges. Sometimes longer screws are used for the top hinge for extra strength. You can reuse these with your new security hinges if they’re in good condition, or switch to fresh ones for added peace of mind. If you notice the screw holes are stripped or loose, now’s the time to fill them using wood filler or jam in some toothpicks with a dab of wood glue. This will give the replacement screws a firm grip.
How To Install Security Hinges On An Exterior Entry Door
Here comes the satisfying part—putting the new security hinges in place. If your replacement hinges have the same size and hole spacing as your old ones (which is usually the case with Schlage or Defiant), installation should be straightforward.
Line up the new hinge leaf where the old one sat, using your pencil or marker to line up the screw holes if you need. Start with the hinge attached to the door frame, and loosely screw it in with a couple of screws—don’t tighten them all the way yet. Once the frame side is attached, do the same with the hinge leaf on the door itself. This is where a second set of hands helps, but if you’re flying solo, using a wedge or door stop under the door keeps things lined up.
Now, go back and add the rest of the screws, tightening each one in a crisscross pattern. This keeps the hinge (and the door) snug and square. If you’re using *security screws*—those extra-long ones that reach deep into the frame—install one or two per hinge for even more break-in resistance. These are especially useful at the top and bottom hinges, since those spots take the most stress.
Finally, close and open the door a few times to make sure everything swings freely and lines up evenly. If it sticks or rubs, loosen the screws slightly, adjust the hinge, and retighten. A level is handy here to catch any small sagging before it becomes a big problem.
How Security Hinges Work: Features That Make a Difference
Here’s why security hinges do their job so well. Unlike regular hinges, these come packed with extra features to block common break-in tricks. Let’s break down a few of the main security features you’ll see:
- Non-removable pins: These pins are either sealed in or secured with a set screw on the inside so they can’t be tapped out from outside your house.
- Security studs: Small metal bumps or tabs on one hinge leaf slot into holes on the other leaf, locking the door in place even if the hinge pins are removed.
- Reinforced leaf design: Some brands include extra-thick metal or hidden reinforcements, so the hinge holds up better if someone tries to force the door open.
You might see terms like “anti-pry,” “tamper-resistant,” or “heavy-duty” on the product box or listing—that’s all code for added security you won’t get with a standard hinge. If you ever code locks or home automation gear, it’s the same idea: layering up your security so one weak point doesn’t bring the whole system down.
Also, most *security hinges* are designed to work with universal doors and can be paired, reset, or swapped just like any standard hinge—no special troubleshooting needed unless your door is seriously custom.
Common Problems When Installing Security Hinges (And How To Fix Them)
Every DIY project has a few curveballs. Installing security hinges isn’t hard, but a couple of things can trip up beginners. Don’t worry—these are easy to fix.
- Old screw holes don’t line up: Sometimes, your new security hinge has holes that are just a hair off from your old ones. In that case, plug the existing holes with wood filler or matchsticks and drill new starter holes with a small bit. Take your time—rushing can split the wood or strip a screw.
- Door sagging or misaligned: If your door won’t close properly after installing the hinges, check your screw sequence. Start with the top hinge, then the bottom, then the middle for a three-hinge setup. Adjust each hinge as needed and use a level to help get things square.
- Screws won’t hold: Stripped or oversized screw holes are super common in older doors. The wood filler or toothpick trick usually fixes this right up, but in stubborn cases, switching to slightly longer or fatter screws (as long as they don’t poke through!) can help.
- Security features not engaging: If your security stud or non-removable pin isn’t lining up, make sure the hinge is oriented the right way—security features usually face outward, but follow the brand’s instructions for proper install.
If you hit a roadblock, most brands like Schlage and Defiant have troubleshooting guides on their websites, or you can call their support line. Sometimes a small tip—like resetting the pin position or swapping out a screw—can save you an hour of head-scratching.
Comparing Security Hinges to Standard Hinges: Is the Upgrade Worth It?
You might still be debating whether it’s worth swapping out your existing hinges for security ones. Here’s my honest take: If you care about home security, especially for an exterior entry door, security hinges are one of the easiest upgrades you can make. It’s like moving from a regular remote to a universal remote that won’t let anyone mess with your settings without your say-so.
Standard hinges do the basics—hold your door in place, let it swing, and that’s about it. But as soon as you look at *security hinges*, you get peace of mind that even if someone tries to code, reset, or pair their way into your house (literally or metaphorically), they’re going to hit a much stronger roadblock.
The real kicker is that this extra security doesn’t come with a steep learning curve or a giant price tag. Both universal and brand-specific security hinges are easy to find in hardware stores or online in all the common finishes (brass, nickel, black, etc.), so your door won’t stick out like a sore thumb. Upgrading gives you a serious security boost for not much effort—just a screwdriver, a little patience, and it’s done.
Final Thoughts: Lock In Your Security With a Simple Upgrade
Swapping out old hinges for security hinges is one of those home fixes that’s surprisingly satisfying. It’s quick, doesn’t need fancy tools, and actually makes your entry door a lot tougher to break through. Whether you go with a universal hinge or stick to brands like Schlage or Defiant, the steps are super approachable—even for someone who doesn’t do a lot of DIY. Just take it slow, use the right screws, and pay attention to how everything lines up. Your front door’s security isn’t just about the lock or the code on the keypad—it’s about every piece working together, right down to those simple metal hinges.
So next time you close your entry door, you’ll know it’s not just locked—it’s genuinely secure. And honestly? That’s one upgrade you’ll appreciate every single day.