Whether you’re swapping out a worn piece on your trusty old Andersen door or you’re dealing with a generic entryway, the process is more hands-on than high-tech. Still, it’s easy to run into little hiccups—like figuring out which way the weatherstrip installs, or why it keeps popping out when you close the door. The good news? Once you grasp the basics, you’ll be sealing up drafts like a pro, whether you’re working with a classic foam bulb or a slick, vinyl fin type.
What Is a Kerf-Mount Weatherstrip—and Why Does Profile Matter?
So, let’s break it down: a *kerf-mount weatherstrip* is designed to fit into a tiny groove (the “kerf”) cut into your door frame. Think of the kerf as a little slot that holds the weatherstrip in place without nails, glue, or screws. The beauty is how clean and simple it looks when it’s done right.
But here’s the thing—there are *different profiles* of kerf-mount weatherstrip. Profile is just a fancy way of describing the shape and size of the strip’s cross-section. Some are tall and round like a soft sponge, others are flatter, stiffer, or even T-shaped at the base. The profile you need depends on how wide your kerf slot is, and how the door seals when closed. If you choose the wrong profile—maybe it’s too thick or too loose—you could end up with a door that won’t close, or one that still lets in air and bugs. That’s why matching the original shape is *really* important.
Manufacturers like Pemko and Frost King offer guides with actual-size diagrams, but you can always bring your old strip to a hardware store for a side-by-side match. Don’t just guess—getting the specific profile right saves you a ton of frustration later.
Tools and Materials You’ll Need
Honestly, you don’t need a whole toolkit for this job, but having the right stuff on hand makes everything smoother. Here’s what you’ll want before you start:
- Replacement kerf-mount weatherstrip — exact profile and length for your door
- Utility knife or sharp scissors
- Flathead screwdriver (sometimes helps pry out stubborn old weatherstrip)
- Measuring tape
- Optional: mild soap and cloth for cleaning the kerf slot
If you’re trying to sync up your replacement to an *exact* length, a tape measure is a must. Some people use a small block of wood to help seat the new strip more evenly, but fingers often work just fine.
How To Remove the Old Kerf-Mount Weatherstrip
Let me explain: removing the old weatherstrip is usually the trickiest part if it’s been in there for years—or painted over. But don’t worry, here’s how you do it without damaging your door:
- Start at the top corner of the door frame. Look for the end of the weatherstrip and gently pull.
- If it’s stubborn, slide a flathead screwdriver underneath the strip (but be careful not to gouge the kerf slot).
- Once you’ve loosened an edge, pull steadily down the length of the weatherstrip. If it tears, just keep going—it’ll come out in sections if needed.
Sometimes, the weatherstrip is stuck with old paint or debris inside the groove. Use your screwdriver or even a credit card to clean out the kerf as best you can. A little soap and water can help clean the slot, too. Just make sure it’s dry before installing the new strip.
Measuring and Cutting the New Weatherstrip
Now comes a step that’s easy to rush, but if you want a snug, pro-level fit, take your time here. Lay the new kerf-mount weatherstrip alongside the old piece you pulled out. Use it as a reference for both length and profile.
- Measure twice, cut once. If you’re missing the old strip, measure the height of each door side and the top separately.
- Mark the weatherstrip lightly with a pencil or finger pinch—don’t cut yet!
- Trim slowly with a utility knife or sharp scissors. It’s better to leave it a smidge long and trim more later.
You might be wondering: should the weatherstrip meet tightly at the corners? Yes, but don’t overlap the ends—just butt them together as closely as you can. Too much overlap will make the door hard to close.
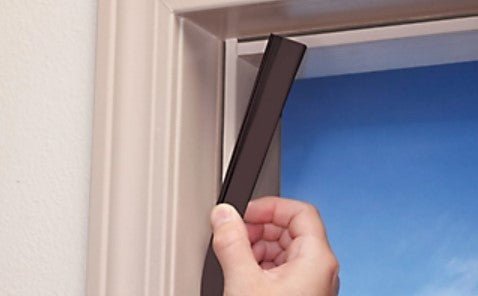
How To Install the New Profile of Kerf-Mount Weatherstrip
Here’s where the magic happens. The new strip slides right into the groove if you have the right profile—but technique matters too, especially with a stiff brand like Pemko.
- Start at a corner—usually the top hinge side. Press the T-shaped or finned base of the weatherstrip into the kerf slot.
- Work your way down gently, pressing in small sections with your thumb or a blunt tool. Don’t stretch the strip as you go—let it sit naturally.
- Repeat for each side, then do the top last so everything lines up neatly at the corners.
Pro tip: If the weatherstrip wants to pop out, check if the kerf slot is too wide, if the strip is too loose, or if there’s old debris getting in the way. Fixing those makes all the difference.
Some people ask if you should glue the strip in place. Honestly? If you’ve got the right profile and the slot is clean, *no glue needed*. The kerf design is meant to hold firm all on its own.
Troubleshooting Common Kerf-Mount Weatherstrip Problems
So what if the new weatherstrip isn’t working as expected? Sometimes, even if you did everything right, you’ll run into a few hiccups. Here’s how to handle the most common issues:
- Weatherstrip pops out: Usually, the slot is too wide or you bought the wrong base profile. Try a slightly thicker or stiffer strip.
- Door won’t close: The strip is too thick, or you overlapped corners. Swap for a thinner profile or trim ends again.
- Light coming through: Check for gaps at the corners or spots where the strip isn’t fully seated. Push it in, or try a slightly taller/tighter profile for a better seal.
- Moisture still leaking: Sometimes, the kerf slot itself is warped or damaged. If that’s the case, you might need a universal surface-mount strip as a backup fix.
Here’s the thing: these little adjustments are totally normal, and even the pros have to tweak things on older doors.
Comparing Kerf-Mount Profiles to Surface-Mount Alternatives
You might be wondering—why bother with a specific kerf-mount profile when surface-mount weatherstrips exist? Good question. Their main advantage is how *invisible* and *secure* they are when installed right; the kerf-mount sits perfectly flush in its groove.
But sometimes, the kerf slot is damaged, or you just can’t find the right profile for your old door. In that case, a surface-mount strip (like Frost King’s sticky-back foam) or even a nail-on vinyl seal is a good backup. They’re easier to install—just peel, stick, or tack them on—but they don’t usually last as long or look as tidy.
If you love a clean finish and a tight seal, getting the right kerf-mount profile is totally worth the extra effort. But don’t sweat it if you need to go universal in a pinch—the world won’t end.
How To Maintain and Check Your Weatherstrip Over Time
So you’ve installed the new profile of kerf-mount weatherstrip—what now? Maintaining that snug seal is simple but often overlooked. Every few months, take a minute to check for:
- Loose or shifting strips—especially after lots of door slams or weather changes
- Cracks or flattening in the foam or vinyl
- Mold, dirt, or buildup that could prevent a good seal
If you spot problems, it’s almost always easier to *replace* the weatherstrip again than to try and patch it. That said, cleaning the kerf slot as part of your routine door cleaning is a quick fix for many minor issues.
Wrapping Up: Sealing the Deal With Your Kerf-Mount Weatherstrip
Honestly, installing a specific profile of kerf-mount weatherstrip isn’t rocket science, but it does reward a little patience. The key is matching the exact profile, taking your time with measurement and cutting, and seating each section firmly in the kerf groove. The payoff? A door that seals as tightly as it did when it was new—maybe even better.
If you ever get stuck, remember: most problems with kerf-mount weatherstrips boil down to profile mismatch or a dirty slot. Check those first, and don’t be afraid to ask your local hardware store for help with matching. In the end, you’ll enjoy a cozier, quieter, and more weatherproof home—all thanks to a tiny strip of foam or vinyl, perfectly installed.