Installing a hinge mortise involves cutting a slot into your door to house the new hinge. This process can seem tricky—especially if you’ve never done it before. But don’t worry; with step-by-step guidance, you’ll be able to handle it like a pro. Let me guide you through the steps so you can achieve that seamless look and function for your door.
Tools and Materials You’ll Need
Before we dive into the installation process, it’s crucial to gather everything you’ll need. Having the right tools on hand makes the job much smoother, kind of like having a well-assembled puzzle before starting to put it together. Here are the essentials:
- Chisel: A sharp chisel will help you create precise mortises in the door.
- Hammer: You’ll need this for tapping the chisel.
- Measuring tape: Accurate measurements are key to a good fit.
- Square: This will ensure your cuts are straight and true.
- Pencil: For marking your measurements clearly.
- Drill: If your hinges have screw holes, a drill will help you install them easily.
- Screwdriver: To tighten the screws once the hinges are in place.
Having all these tools at your fingertips can save you time and frustration. Imagine running back and forth to find a tool; it’s like trying to bake a cake without all the ingredients—frustrating, right?
Measuring for the Hinges
Once you have your tools ready, the next step is all about measurements. Think of this as planning out a road trip—if you don’t have a map (or in this case, precise measurements), you might end up lost!
Start by deciding where the new hinges will go. Typically, doors have two hinges: one near the top and one closer to the bottom. You can use the existing hinge locations as a guide, but if you’re installing new hinges, consider their placement carefully.
1. Height Measurement: From the top of the door, measure down about 7 inches to mark where the top hinge will go. For the bottom hinge, measure up from the bottom 11 inches.
2. Clarity is Key: Use your pencil to mark these spots clearly on the edge of the door. These marks will guide your cuts, so make them bold!
It’s smart to double-check your measurements. Remember, “measure twice, cut once” is more than just a saying—it can save you a lot of rework!
Marking the Mortise Depth
Now that you have the hinge locations marked, it’s time to prepare for cutting the mortise. This step is akin to outlining a scene in a play before you dive into the acting.
1. Decide on Mortise Depth: Most hinges come with a standard thickness, usually around 1/16 inch. Use your measuring tape to measure this depth starting from the edge of the door.
2. Draw the Mortise Outline: Using a square, draw a rectangle around the hinge mark that matches the size of the hinge (usually around 3 inches long and 1 inch wide, but check your specific hinge).
Be precise with this step! A well-defined outline makes the following cuts easier and cleaner.
Cutting the Mortise
With your marks in place, it’s time to cut out the mortise. Picture this step like carving a piece of wood—steady hands and focus are your best friends here.
1. Start with the Chisel: Position your chisel on the outline, and using the hammer, gently tap the chisel to create a clean line along the edge of the rectangle. Make small cuts, as this helps prevent splintering and ensures accuracy.
2. Chisel Out the Mortise: After you’ve made your initial cuts, use the chisel to remove the wood within the rectangle. Work slowly and carefully, cleaning out the waste wood until you reach the desired depth.
If your mortise isn’t deep enough or the edges aren’t clean, it can affect how well the hinge fits. Trust me, you’ll want it to be snug and secure!
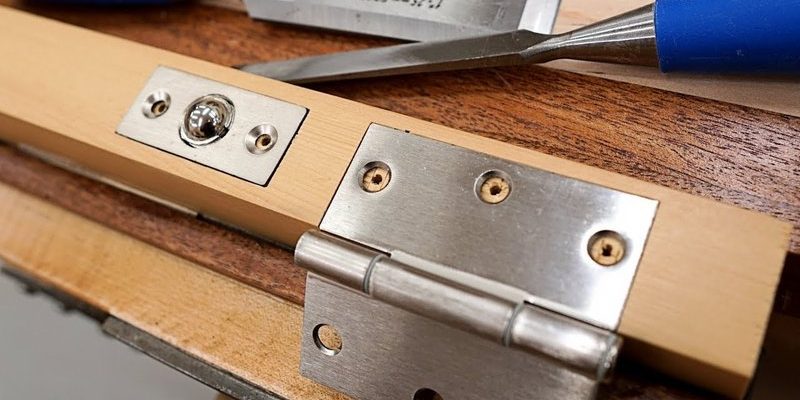
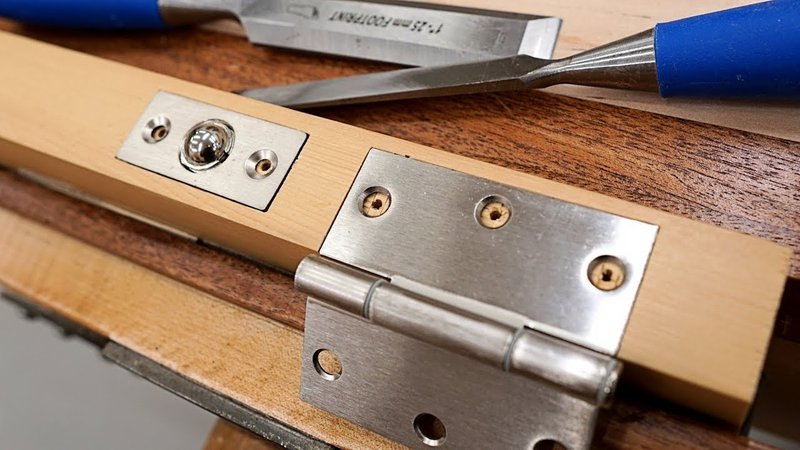
Fitting the Hinges
Once the mortise is cut, it’s time to fit the hinges. This step is like trying on a new outfit—everything needs to fit just right.
1. Position the Hinges: Place the hinge into the mortise and check the fit. It should sit flush with the door edge.
2. Mark Screw Holes: Once aligned, mark the screw holes using your pencil.
3. Drill Pilot Holes: Use a drill to create pilot holes for the screws. This step prevents the wood from splitting when you install the screws.
Make sure the hinges are level! Falling hinges can lead to misaligned doors, and nobody wants that headache.
Installing the Hinges
With the pilot holes ready, it’s time for the final installation. This is hardly the home stretch; rather, it’s like the finishing touches on a masterpiece!
1. Attach the Hinges: Line up the hinge holes with the pilot holes and screw them into place. A screwdriver is perfect for this; just be careful not to over-tighten, as that can strip the holes.
2. Double-Check Alignment: Open and close the door a couple of times to ensure everything operates smoothly.
If you notice any sticking or misalignment, it could be an indicator to adjust the mortise slightly or realign the hinge.
Finishing Touches and Maintenance
Congratulations! You’ve successfully installed a new hinge mortise. Now, it’s time for the icing on the cake.
1. Check for Smooth Operation: Make sure the door swings easily. If it sticks, consider sanding down the edges of the mortise slightly for better movement.
2. Lubricate the Hinges: A little lubricant can go a long way. It helps to keep the door operating quietly and smoothly.
Don’t forget to periodically check the screws and hinges over time. Just like a classic car, a little maintenance ensures everything runs smoothly for years to come.
Installing a new hinge mortise in an existing door is a straightforward process that can enhance both the function and appearance of your door. With the right tools, careful measurements, and a bit of patience, you can tackle this project with confidence. Remember, every successful DIY experience adds to your skillset, making you a more capable homeowner.
So, the next time you find yourself needing to replace a hinge or upgrade your door, you’ll be ready to take it on with ease. Happy DIY-ing!