Let me explain it this way: imagine your front door is the goalie of your house. The door sill pan is the goalie’s gloves—catching any stray drips, then flicking them out before they hit the net (your subfloor). Brands like SureSill or custom aluminum pans are designed for this exact job, and you don’t need to be a pro to get them fitted. With the right tools and a little patience, you can handle this install even if you’ve never tackled a door project before.
What Is a Door Sill Pan and Why Does It Matter?
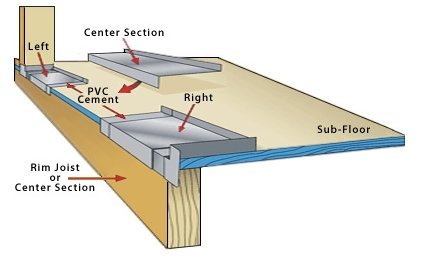
A *door sill pan* is basically a waterproof tray that sits directly under your door’s threshold. Its job? Catch water that sneaks past the weather stripping, then direct it safely outside. Think of it as a mini gutter system for your door frame—simple, but surprisingly effective.
Here’s the thing: water sneaking into your subfloor can cause rot, mold, and structural issues over time. You might not notice a problem right away, but that dampness builds up and can get expensive to fix. Most modern exterior doors, especially from major brands like Therma-Tru or JELD-WEN, *should* be paired with a sill pan for proper drainage. Unfortunately, many older homes skipped this step.
You might be wondering, why not just rely on caulk or sealant? While those help, they aren’t foolproof. Sill pans add a crucial layer of protection. They create a fail-safe—so if water gets past your seals (and it will, eventually), it doesn’t have a straight shot into your home. Instead, it’s collected and directed outside where it belongs.
Installing a sill pan isn’t only about keeping water out. It sets the foundation for a longer-lasting, sturdier door. If you’re replacing a door or noticing leaks, now’s the perfect time to add one. It’s a bit like updating your raincoat before the next storm hits.
Choosing the Right Sill Pan for Your Door
There are a few different types of *door sill pans* out there, and picking the right one is more important than you might think. Some pans are made from plastic, others from aluminum or PVC, and a handful are custom-shaped for specific door brands. For example, SureSill offers kits that are easy to size and snap together, while custom aluminum models might require cutting and shaping.
You might be torn between a universal sill pan and a custom one. Universal pans are great for standard doors and DIYers, since they’re flexible and can be trimmed to fit. Custom pans (the kind sometimes made by pros or specialty shops) offer a more tailored fit, but can be pricier and take a bit more effort to install. If you’re dealing with an unusually wide or narrow door opening, custom might be your best bet.
Let me break it down further:
- Plastic/PVC pans: Affordable, easy to trim, and ideal for most standard installs.
- Aluminum pans: Extremely durable, good for heavy-duty or commercial use, but might need tools for cutting.
- Brand-specific kits: Sometimes these are required to maintain your door’s warranty, especially for fancy composite or fiberglass doors.
Before you get started, measure the width and depth of your door opening. Double-check if your pan should extend up the side jambs (many do for better protection). The goal is a tight, leak-free fit—no gaps for water to sneak through. Always check your door manufacturer’s guidelines, especially if you’re worried about voiding a warranty.
Tools and Materials You’ll Need
Getting prepped is half the battle. If you’ve never done a project like this, don’t stress—it doesn’t call for a full-blown workshop or fancy gadgets. Just gather up these basics:
- Sill pan kit (pre-made or custom, sized for your door)
- Utility knife or tin snips (for trimming)
- Measuring tape and pencil
- Caulk gun with high-quality waterproof sealant (like silicone or polyurethane)
- Screwdriver or drill
- Construction adhesive (optional, for some installations)
- Level (to check evenness)
- Work gloves and safety glasses
You might be replacing an old or damaged door, or maybe you’re putting in a brand new one. Either way, make sure the subfloor or concrete under the door is clean and dry before you start. Debris or leftover caulk can mess with the fit and performance of your new sill pan. If you run into rotten wood, stop and repair that first. Installing over a bad base is like painting over rust—it won’t stick for long.
Some door sill pans come with side “end dams” or upturned edges for extra protection. Don’t skip these—they add a crucial barrier. And always have a few rags on hand for cleanup, because caulking can get messy fast.
How To Remove the Old Sill and Prep the Opening
Here’s where things can get a bit messy, but don’t let that slow you down. Think of this step as clearing the way before laying down train tracks—the smoother and cleaner your opening, the better your sill pan will sit and drain.
Start by removing the door itself and the old threshold or sill. Sometimes door thresholds are screwed or nailed in, while older ones might just pop out with a bit of coaxing. Use a pry bar carefully to avoid damaging the surrounding frame or floor. If you’re working with a pre-hung door, you may need to remove the whole unit.
Once the threshold is out, vacuum or brush away dirt, old sealant, or rotten wood. You want the subfloor to be flat, solid, and completely dry. Any soft or moldy spots should be cut out, then replaced with fresh wood or patching material. Failing to fix rot now is like building a sandcastle on a sinking beach—you’ll be right back at square one soon.
Check the fit of your new sill pan by dry-fitting it in the opening. It should lay flush, with its edges snug against the door jambs. Trim the pan as needed, using your tin snips or utility knife. Pay close attention to the upturned ends—these need to cover the corners so water can’t sneak out sideways.
Finally, double check that your opening is *level*. Water won’t drain properly if the pan is tilted toward your living room. Use shims to correct any tilt—don’t rely on wishful thinking.
Step-by-Step: Installing the Door Sill Pan for Water Drainage
Now for the main event: installing your *door sill pan* so it’s watertight and ready to do its job. Here’s a step-by-step walkthrough:
- Apply sealant: Run a thick bead of waterproof caulk along the subfloor where the pan will sit, especially at the corners and against the side jambs. This helps “glue down” the pan and blocks sneaky drips.
- Set the pan: Press the sill pan into place, making sure it sits snug and flat. If your pan has end dams, slide them tight against the frame. Wipe away any sealant that squeezes out—neatness counts here.
- Seal the edges: Run another bead of caulk along the back edge and both sides of the pan. This ensures no water can slip under or around the tray.
- Check for level: Before things set, use your level to make sure the sill pan slopes slightly outward (away from your house). If not, add a shim under the back edge—but don’t overdo it. Too much angle can mess with how your door operates.
- Secure if needed: Some pans may be tacked down with screws or adhesive for extra stability. Follow the instructions for your specific kit or model.
Once your sill pan is in, let the caulk cure fully before reinstalling the door. Rushing this step is like setting up a tent in the rain—things will get messy in a hurry. Your patience here pays off in a watertight seal, which is the whole point.
And here’s the thing: these steps are nearly the same whether you’re working with a SureSill pan or another brand. The main difference is in the fit and finishing details—so always double-check your manufacturer’s instructions, even if the process seems familiar.
Reinstalling and Sealing Your Door Over the New Sill Pan
The hard part’s done, but don’t lose focus. This stage is all about setting your door back in place for a perfect fit and a reliable water barrier.
Start by carefully setting your door (or pre-hung door unit) onto the new sill pan. Make sure the bottom of the door sits fully inside the pan’s edges, not hanging over. If you’re reinstalling an old door, check that it swings freely and doesn’t scrape against the new pan.
Next, use shims to adjust the door’s side-to-side and up-and-down position. You want even gaps all around the frame for smooth swinging and weather-sealing. Once the door is square, screw it back into the framing, checking your level as you go. If anything shifts, adjust the shims before tightening things up.
Here’s where a lot of folks go wrong: don’t forget to seal everything up. Run a bead of caulk along the seam where the door threshold meets the pan, as well as up the side jambs. This prevents water from sneaking through the cracks. If your threshold or pan came with foam or rubber gaskets, install them now for extra peace of mind.
Finish by reinstalling any trim or siding you removed earlier. Step back and admire your handiwork—your entryway is now guarded against sneaky leaks and rot.
Troubleshooting Common Issues With Door Sill Pans
You might be wondering, what if things don’t go perfectly? Installing a door sill pan for water drainage is straightforward, but here are a few snags people hit and how to solve them:
- Water still pools at the door: Double-check your pan’s slope—if it’s tilting in, water has nowhere to go. Re-adjust with shims or revisit step one.
- Caulk won’t stick: Make sure everything’s clean and dry. Old dust, oil, or moisture will keep even the best caulk from bonding.
- Door doesn’t open or close smoothly: The new sill pan may add height. Trim the bottom of the door (if needed) or adjust the threshold screws for smooth operation.
- Leaks after rain: Check every seam and corner for missed spots. Sometimes even a pinhole gap can let water sneak through. Reapply sealant as needed—it’s better to overdo it than risk a leak.
If you’re troubleshooting a stubborn problem, it often helps to gently pour a cup of water at the threshold’s outside edge and watch where it goes. This shows you if drainage is working or if water’s finding a backdoor route inside.
Some brands, like SureSill, offer troubleshooting tips and videos for their products. If you’re stuck, it’s not cheating to look them up or even call their helpline.
Comparing Door Sill Pans: Is a DIY Sill Pan Worth It?
You might be tempted to skip the store-bought option and fashion a door sill pan on your own. Some handy folks bend a piece of aluminum flashing or cut up a plastic tray. It’s a cost-saving move, but here’s the honest truth: DIY sill pans are hit and miss. If you get the angles and seams just right, it can work. But miss a spot, and water will find it.
Brand-name pans like SureSill or Endura are engineered for fit, slope, and weather resistance. A custom pan—especially if you have an odd-sized opening or need heavy-duty drainage—can be a worthwhile investment. In many cases, using the recommended sill pan is required to keep your door under warranty. If you’re installing a high-end fiberglass or steel door, it’s usually best to stick with the specified part.
Here’s my take: for most homeowners, pre-made pans are the way to go. They’re designed for standard door sizes, come with clear instructions, and don’t require you to bend metal in your driveway. If you love tinkering and are confident with sheet metal, a DIY solution *can* work—but know the risks.
Why Proper Water Drainage at Your Door Matters More Than You Think
It’s easy to treat the door sill pan as an afterthought—a box to check off during an install. But the payoff goes way beyond a dry entryway. Proper drainage keeps your subfloor strong, prevents mold, and protects your investment for years to come.
Here’s what often happens: someone notices soft or squeaky floorboards near the door, or sees water pooling after storms. By that point, fixing the damage means ripping out floors, replacing insulation, and maybe battling mold. That’s expensive and time-consuming. Adding a quality sill pan is preventative medicine—a small, one-time effort for long-term peace of mind.
A well-installed sill pan isn’t just for new construction, either. If you’re seeing any sign of water damage or draftiness around your door, tackling this project now can stop things from getting worse. It’s a project that rewards you twice: first when you see rain running harmlessly outside, and again when your home stays dry, warm, and solid year after year.
Even the best weatherstripping and sealants break down eventually—but a properly installed door sill pan for water drainage keeps working quietly in the background, protecting your home day after day.
Wrapping it up, installing a new door sill pan might seem like a tiny detail, but it makes a huge difference for any homeowner who wants to avoid leaks, rot, and costly repairs. Take your time, follow the steps, and your doorway will be ready for whatever the weather throws at it.