Here’s the thing: not all weatherstripping is created equal. For steel doors, a magnetic weatherstrip (like the popular MD Building Products model you’ll find at most hardware stores) works a lot like the seal on your fridge. The magnet hugs the steel tightly, keeping out air, dust, and moisture. The process isn’t complicated, but knowing exactly what to do saves a bunch of frustration. Let me break down exactly how to *install a magnetic weatherstrip on a steel exterior door*, step by step.
Why a Magnetic Weatherstrip Matters for Steel Doors
You might be wondering, “Do I really need a magnetic weatherstrip?” Honestly, if you have a steel exterior door, you’ll want to pay attention. Regular foam or rubber strips rely on pressure alone. They get crushed over time, gaps form, and your energy bill starts to climb—especially in winter. Magnetic weatherstrips, on the other hand, are designed to work *with* the steel. The magnet is attracted to the metal in the door itself, creating a much tighter seal.
Think of it like this: that soft “thunk” your fridge makes when it closes is thanks to a magnetic gasket. Your door works the same way! The seal keeps heat and cool air where they belong. It can also help with noise, dust, and even creepy crawlies looking for a way inside. If your current weatherstrip is cracked, loose, or missing altogether, upgrading to magnetic is like switching from an old windbreaker to a proper winter coat.
Beyond comfort, there’s the money factor. Stronger seals mean your AC and heater don’t have to run as hard, and *that* means real savings over time. So if you’re dealing with drafts, higher utility bills, or you just want your steel entryway to feel more secure, installing a magnetic weatherstrip is a smart move.
What You Need Before You Start
Before you grab your screwdriver, let’s talk prep. You’ll want to have all your supplies on hand. Trust me, having to pause and run out for a missing tool is nobody’s favorite part of DIY. Luckily, this project’s toolkit is pretty simple.
- Magnetic weatherstrip kit (sized for your door—MD Building Products is a popular choice)
- Measuring tape
- Utility knife or heavy scissors
- Phillips screwdriver
- Flat-head screwdriver (maybe, for stubborn old strips)
- Small nails or screws (usually included with the kit)
- Pencil for marking
- Safety glasses & gloves (if you like to play it safe)
Here’s a tip: Always double-check your door’s measurements before you buy the weatherstrip. Most kits are made for standard door sizes, but if your door is a bit taller or wider, you’ll want to make sure you have enough strip to go all the way around—with a little extra for mistakes. If you’re replacing an existing strip, note how it’s attached and what’s holding it in place. Sometimes the old screws or nails can be reused.
How Magnetic Weatherstrips Work on Steel Doors
You don’t have to be an engineer to get the basic idea. A magnetic weatherstrip uses a flexible *magnet*—usually embedded in a soft vinyl or rubber—lined up against the metal edge of your door. When the door swings shut, the magnet grabs on, creating a continuous seal all the way around. No pushing or slamming required.
It’s important to understand that magnetic weatherstrips only work on steel doors. They won’t stick to wood, fiberglass, or aluminum. That’s why checking your door type before buying is key. If a magnet from your fridge clings to your door, you’re in good shape.
Here’s a little story: I helped a friend install a magnetic weatherstrip on his front door last winter. Before, you could literally see daylight around the frame. Afterward, the living room felt instantly warmer—no more chilly breeze sneaking in. All because a magnetic strip could hug the door tighter than the old, flattened foam version.
Removing the Old Weatherstrip (If Needed)
Let’s say your door already has a weatherstrip—maybe one that’s seen better days. Step one is getting the old stuff out of the way. This might sound obvious, but rushing here can leave behind bits and pieces that mess up the new seal.
- First, carefully open your steel exterior door and take a good look at the old strip. Are there screws, nails, or just adhesive holding it on?
- Use the screwdriver to remove any fasteners. If it’s glued or stuck, gently pry it up with the flat-head screwdriver.
- Peel away the old strip, working slowly so you don’t damage the door frame or jamb.
- Check for leftover nails, bits of foam, or sticky residue. Scrape these off and wipe down the area. A smooth, clean surface helps the new weatherstrip seal perfectly.
Don’t skip the cleanup! Any leftover bumps or old nails can throw off your new magnetic strip. It’s a little like trying to stick a new screen protector on your phone without cleaning it first—frustrating, and not the kind of result you want.
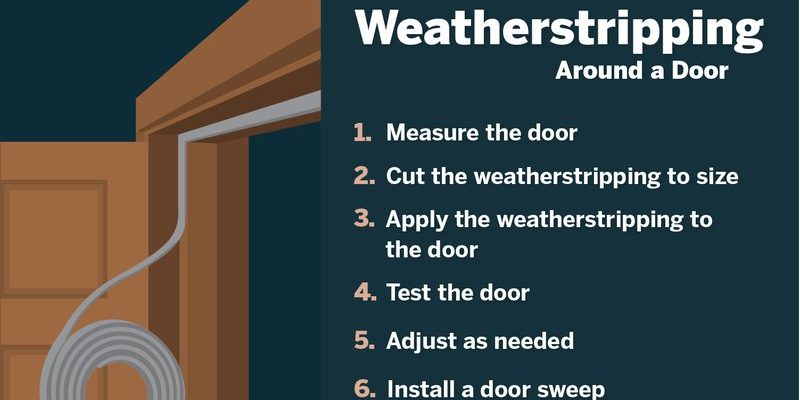
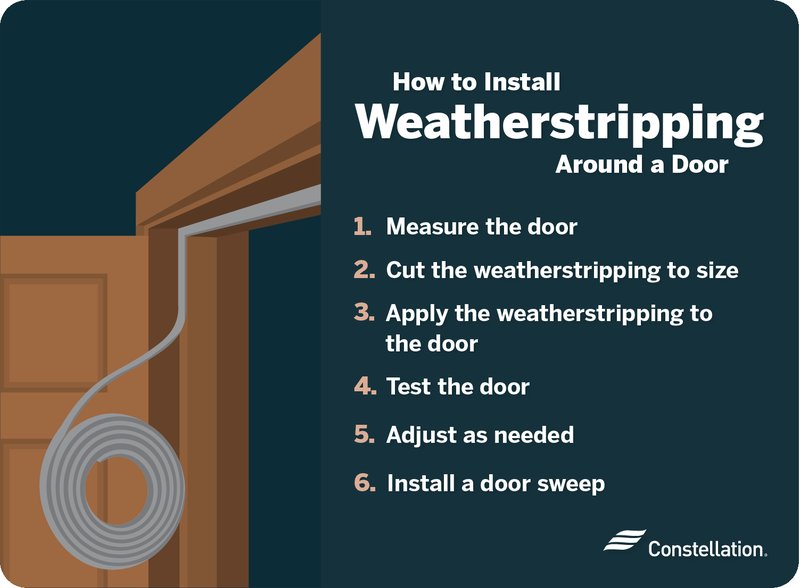
Measuring and Cutting the Magnetic Weatherstrip
Now for the part that makes or breaks a tight seal: measuring and cutting. Here’s where you’ll want to be a little fussy—precise measurements mean the weatherstrip fits perfectly, with no awkward gaps or bunching.
- Measure the vertical sides (the jambs) from top to bottom, and the top jamb from one side to the other. Write these down.
- Unroll the magnetic weatherstrip and hold it against each section of the frame. Mark the length with a pencil.
- Use a sharp utility knife or heavy scissors to cut each piece squarely. If the end is ragged or crooked, trim it neatly before installing.
Let me explain why cutting squarely matters: If the ends are angled or too short, you’ll end up with tiny gaps where cold air can sneak through. Take your time here, even if you’re itching to finish the project. It’s a small thing, but you’ll notice the difference every time the wind picks up.
Installing the Magnetic Weatherstrip on a Steel Exterior Door
Here comes the fun part—putting it all together. The exact steps may vary a bit, depending on the kit brand (like MD Building Products), but the basics are always the same. Here’s how to install a magnetic weatherstrip on a steel exterior door for the best possible seal:
- Start at the top. Fit the first strip onto the upper jamb, magnet-side facing the door. Press it tight against the stop (the little edge that meets the door when closed).
- Use the included screws or nails to secure it in place. Don’t overtighten! The weatherstrip needs to flex a little as the door closes.
- Repeat on both sides, making sure each piece fits snugly into the corners. If the kit comes with corner connectors, use them for an extra-tight seal.
- Check your work as you go. Close the door and feel for any resistance, gaps, or misalignment. The door should shut easily, but firmly—like a fridge door.
If you hit a snag (like the strip bunching up or not sticking), double-check your measurements and placement. Sometimes it’s just a matter of loosening a screw or shifting the strip slightly. Here’s a pro tip: Some folks like to add a dab of clear caulk along the edge for extra insurance, but that’s totally optional.
Troubleshooting Common Installation Issues
Honestly, even with careful prep, little hiccups can happen. Here are the most common problems I’ve seen (and fixed):
- Door won’t close properly: Try adjusting the strip slightly outward. If it’s too tight, the magnet’s pulling too hard, or the strip’s overlapping onto the door itself.
- Gaps around the corners: Check your cuts. If the strip’s too short, you might need to trim a fresh piece. Some kits include corner pieces for better sync between sections.
- Weatherstrip keeps coming loose: Make sure you’re screwing or nailing into solid wood, not just the frame finish. If not, a little construction adhesive can help reset the strip.
- Weak magnetic hold: If the magnet isn’t strong enough, check that the strip is facing the right way and that your door is actually steel. A quick test with a fridge magnet confirms it.
You might be tempted to “make it work” with what you’ve got, but I promise: taking a few extra minutes to reset things now saves way more trouble later. Think of it as pairing your weatherstrip exactly right—no code or reset needed, just a little patience.
Comparing Magnetic Weatherstrips to Other Options
You may have seen adhesive foam, V-strips, or rubber bulb seals on other doors. Those work, but they’re not a true substitute for a magnetic weatherstrip if you’ve got a steel door. Let me explain why.
- Magnetic weatherstrip: Best for steel doors, thanks to its automatic, tight seal. It lasts longer and doesn’t crush flat over time.
- Foam/rubber weatherstrip: Cheap and easy, but loses its bounce in a year or two. Not magnetic, so the seal isn’t as firm.
- V-strip: Good for windows but can be tricky to sync with the shape of a door. Not recommended for heavy use.
If you have a wooden or fiberglass door, you’ll want to stick to the foam or rubber types. For steel, magnetic is the clear winner. It’s the only universal fit designed to pair perfectly with the metal surface, much like matching a remote to a specific brand.
Caring for Your Magnetic Weatherstrip
Once your new seal is in place, there’s not much to do—just some easy maintenance now and then. If you want your weatherstrip to last (and keep working at full power), here’s what helps:
- Wipe down the weatherstrip a few times a year with a damp cloth. Dust and dirt can weaken the magnetic hold or even cause the strip to reset out of place.
- Check for cracks, tears, or any spots where the magnet seems weak. If you spot issues, replacing just that section is quick and keeps your seal strong.
- If your door is suddenly drafty again, check that the strip is still hugged tight to the steel. Sometimes a screw can work loose, or the strip shifts over time.
Taking these little steps keeps things running smoothly. The weatherstrip should last for years, but like any other part of your door, a quick look now and then is worth it—just like changing the battery in your favorite remote before it dies at the worst possible time.
Wrapping Up: Enjoy Your Draft-Free Steel Door
So there you have it—a clear path to installing a magnetic weatherstrip on your steel exterior door, no pro experience required. With the right tools, a little patience, and attention to detail, you’ll end up with a door that closes quietly and keeps the weather outside, where it belongs. The comfort boost is instant, and the savings add up quietly all year.
If you get stuck, don’t stress—it’s all part of learning. Whether your old strip was barely holding on or you’ve just upgraded to a new steel entryway, this upgrade pays off quickly. The magnetic weatherstrip hugs your door like a perfect handshake every single time. Here’s to a cozier, quieter home—and fewer chilly surprises by the front door.