Honestly, installing a kerf-style weatherstrip is one of those DIY jobs that sounds trickier than it is. If you’re new to this, picture kerf-style strips as those little rubber flaps you see in newer homes—except you’re adding them to an older door that didn’t come with them. Whether you’ve got a classic wood frame or a standard steel one, you don’t need to be a pro to make this work. With a little patience and the right steps, you’ll be shutting out wind, bugs, and dust like a charm.
Let’s take a look at how you can install a kerf-style weatherstrip, even if your current door frame wasn’t designed for it. I’ll walk you through everything, from the “wait—what’s a kerf?” stage to the moment you close your newly sealed door and notice the difference.
What Is Kerf-Style Weatherstripping and Why Does It Matter?
First off, you might be wondering what “kerf” even means. In the simplest terms, kerf-style weatherstripping uses a special groove—called a kerf—cut into the edge of your door frame. The weatherstrip snaps snugly into this slot, staying put over time and creating a flexible seal as the door opens and closes. Compared to older peel-and-stick foam strips or nailed-on felt, kerf-style is both tougher and more reliable.
Here’s the thing: kerf-style weatherstripping is the choice for most new doors, but that doesn’t mean older frames can’t get the same upgrade. Even if your frame isn’t factory-cut with a groove, you can add one with a few basic tools. The result? A tight seal that makes a real difference in keeping your house quiet and comfortable, while also saving on energy costs.
Why does this matter? Traditional weatherstripping sometimes loses shape, comes unglued, or interferes with how your door closes. Kerf-style virtually eliminates those issues. It won’t snag, peel off, or shift out of place. And because the rubber gasket flexes as needed, you still get a solid close every time. For anyone tired of wrestling with sticky foam or re-nailing felt every year, this is a serious upgrade.
Gathering the Right Tools and Materials
Let me explain what you’ll actually need before you get started. You don’t need a contractor’s toolbox—just some careful measuring and basic supplies. At the hardware store, you’ll usually find kerf-style weatherstrip kits from brands like Frost King or M-D Building Products. They fit most doors, but make sure to check the length and profile so it matches your needs.
- Kerf-style weatherstripping: Usually comes in 7–8 foot strips. Check for “replacement door weatherstrip” in the right size and color (white, brown, tan, etc.).
- Router or kerf saw: You’ll need this if your door frame doesn’t already have a slot.
- Measuring tape and pencil: For marking your grooves accurately.
- Scissors or utility knife: To trim the weatherstrip to length.
- Safety gear: Eye protection and a dust mask, especially if you’re cutting wood.
If you’re not sure about making a kerf yourself, most home centers do sell frames with the groove pre-cut, but honestly, adding a kerf to an existing frame isn’t as intimidating as it sounds. If you can handle a straight line with a saw, you can do this.
How To Measure and Cut the Kerf Slot in Your Door Frame
Here’s where the rubber meets the road—literally. If your door frame already has a kerf groove, you can skip this part and head straight to the next step. For everyone else, it’s time to do some measuring and cutting.
Grab your weatherstrip and check the part that pushes into the groove. Most kerf strips need a slot that’s about 1/8 inch wide and 3/8 inch deep. Use your measuring tape and a pencil to mark a straight, continuous line along the jamb, starting about 1/8 inch from the edge of the door stop. Make sure you go all the way from top to bottom on both sides and across the top.
Now, using a trim router or kerf saw, gently cut along your pencil line. Here’s a tip: practice on a scrap piece of wood if it’s your first time. You want the slot deep enough for the weatherstrip to “snap” in, but not so deep that it weakens the frame. Take your time and keep your hands steady. Once finished, brush out any sawdust and check that the slot is uniform the whole way.
If your frame is metal, this step gets more technical. Some people use a Dremel tool with a cutting wheel, but it’s easy to slip and scratch the paint. In that case, you might want to consider adhesive weatherstripping or even calling in a pro.
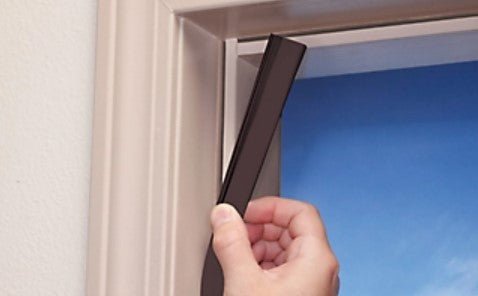
Installing the Kerf-Style Weatherstrip
Ready for the satisfying part? Now that you have the kerf slot in place, it’s time to actually install the weatherstrip. This part’s almost fun, and way less messy than gluing or nailing old-school strips.
Start by lining up the weatherstrip at the top corner of the door frame. Gently push the “barbed” edge—think of it like a little fin—into the kerf groove. You’ll feel a subtle snap as it locks in place. Don’t force it; just use consistent pressure with your thumb or a blunt tool, moving slowly down one side.
Once you reach the bottom, trim any excess weatherstrip with sharp scissors or a utility knife, making sure it sits flush with the frame. Now do the same for the other vertical side, and finally the top. You might notice you have to squeeze the corners a bit so everything fits snugly; that’s normal.
Pro tip: If the gasket seems bunched up or loose, pull it out and try again, making sure the groove is clean and free of debris. The finish should be even and firm, with no gaps or twists. You want the door to close easily but tightly, without extra resistance.
Troubleshooting Common Problems
So your weatherstrip is in—almost. But wait: your door won’t close, or there’s a gap in the corner. Don’t panic. Most issues are fixable with a little troubleshooting.
- Door won’t latch: Sometimes the new strip is a tight fit, especially on older frames. Try adjusting the strike plate, or let the gasket compress over a few days—it usually settles in.
- Gaps at the corners: This usually means the strips weren’t cut exactly to length or the groove isn’t deep enough. Double-check your cuts and trim for a perfect fit.
- Weatherstrip keeps coming loose: Make sure the kerf slot is deep and clean. If it’s still loose, you can use a dab of clear silicone adhesive to help it stay put, but you shouldn’t need much.
It’s normal to have to tweak things a bit with older door frames, since nothing is ever perfectly square. Take your time, and if something doesn’t look right, you can always adjust before calling the job done.
Comparing Kerf-Style to Other Weatherstripping Options
You may be wondering why go through the effort of adding a kerf-style strip in the first place. Can’t you just stick on some foam tape or nail up felt?
Here’s my take: kerf-style weatherstripping is far more durable and reliable than peel-and-stick or compression strips. It doesn’t lose shape, peel away, or attract dust. The seal is tighter and survives more “open-close” cycles—think years without fuss, not months. Is it more work up front? Sure, but you’ll spend less time “syncing” your door’s seal every season.
With foam or tape-style strips, most people end up redoing the job every spring or fall, especially if there’s a lot of humidity or temperature swings. The cost might be similar in the short term, but kerf weatherstrip wins big when it comes to peace of mind. The only real downside is that it does require a groove; if that’s a total dealbreaker, compression-style strips are the next best option.
Maintaining and Replacing Kerf-Style Weatherstripping
Even the best kerf-style weatherstrip isn’t a “set it and forget it” thing forever. Over the years, the rubber can stiffen, crack, or just lose its springiness. Luckily, replacement is as easy as pulling the old strip out and snapping in a new one—no tools or glue needed.
Check your weatherstrip once a season for signs of wear: cracks, tears, or gaps where air can sneak in. Clean the groove with a soft brush if you notice dirt or grime. If the strip starts to sag or pull loose, just remove it, inspect the kerf for damage, and install a fresh length. Some homeowners swap theirs out every 4–5 years, but high-traffic doors might need it sooner.
Don’t forget: if you ever paint your door frame, take out the weatherstrip first, let the paint cure fully, and then reinstall. Paint buildup inside the groove can make it hard for the new strip to seat properly.
When To Call a Pro (and When You Really Don’t Have To)
Here’s the reassuring part—you don’t need to be a master carpenter to handle this job. Most DIYers can add kerf-style weatherstrip to a wood door frame with a router and a steady hand. But if your frame is metal, badly warped, or you just can’t get a good seal no matter what, it’s okay to call in a pro. They can often cut a perfect kerf slot with specialized tools and have the job done in under an hour.
Still, even if something goes sideways, most mistakes are fixable. If your new weatherstrip doesn’t sit quite right, you can usually reset it, trim it, or swap it out without much fuss. The key is patience—don’t rush, and check your work after every step.
Honestly, the hardest part is starting. Once you install your first kerf-style weatherstrip, you’ll wonder why you waited so long. It’s one of those fixes that quietly pays you back every time you close the door.
Wrapping Up: Enjoying a Quieter, Cozier Home
There’s a certain satisfaction in feeling that solid “thunk” as your door closes perfectly, without a winter chill sneaking in or a cloud of pollen blowing through the gap. Upgrading to a kerf-style weatherstrip is a straightforward DIY project that can make a world of difference—both for your comfort and your wallet.
You don’t have to settle for drafty doors or clunky fixes. Whether you’re working with a classic wood frame or a newer steel door, a little time and effort now means less troubleshooting later. In the end, it’s about making your home feel the way it should: tight, quiet, and just the right kind of cozy. So grab those tools, take a deep breath, and give your door the upgrade it deserves.