Let’s talk about what we’re really dealing with: a modern front door handleset (think Schlage, Kwikset, or Yale—not those old, rattly knobs from the 70s). These come in kits, usually with a latch, deadbolt, escutcheon plates, and a shiny new handle and thumb latch. Maybe you’re replacing a beat-up old set, or maybe you’re starting fresh with a new door. Either way, I’ll walk you through every part, step by step, with plenty of extra details so you’re never left guessing—or cursing.
What You’ll Need Before Installing a Handleset
You might be wondering, “Do I need a whole toolbox for this?” Not quite, but there are a few essentials you’ll want to have on hand before you start. Grab your new handleset—let’s say it’s a Schlage or Kwikset model, since those are pretty common and user-friendly for beginners.
- Screwdriver (usually Phillips, sometimes flathead, depending on the brand)
- Drill (for new holes or enlarging the old ones—don’t panic, it’s just a power screwdriver with muscles)
- Measuring tape (to make sure everything lines up and you’re not eyeballing it halfway through)
- Level (even if you don’t care about slanted art, you’ll care about a crooked door handle)
- Pencil (for marking where to drill)
- Chisel and hammer (only if you need to tweak the mortise or latch pocket)
Some handlesets come with a quick-install template—use it! This isn’t a test of your freehand marking skills. Also, double-check if your door is pre-drilled. If it’s not, don’t sweat it; just take your time measuring and marking. Trust me, a little patience here saves a lot of swearing later.
Understanding Your Handleset Parts and How They Fit Together
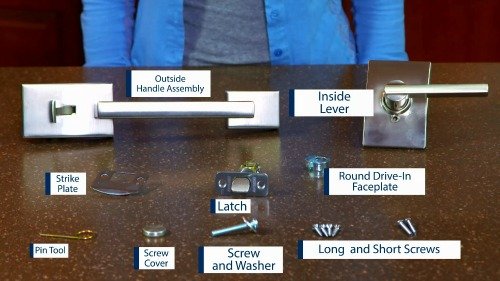
Before you even touch a screw, let’s lay out all the pieces. I can’t tell you how many times I’ve skipped this, only to discover halfway through that a spindle is hiding under the bubble wrap. Every handleset kit is a little different, but the good ones—Schlage, Kwikset, Yale—come with the basics:
- Exterior handle and thumb latch
- Interior lever or knob
- Deadbolt and thumb turn (inside)
- Latch bolt and strike plates
- Long screws, short screws, and sometimes odd little washers or spacers
Let me explain how these fit together. The exterior handle is the showpiece—you press down the thumb latch, which retracts the latch bolt, letting the door swing open. The deadbolt sits above (for most handlesets) and provides extra security—think of it as the main lock, where you use your key or a code (for smart models). On the inside, you get a simple lever or knob, and a thumb-turn for the deadbolt.
Here’s the thing: if you mix up the screws (long ones go through the door, short ones attach hardware), or if you try to fit parts from different brands, you could end up with a wobbly, unreliable door handle. Stick to the parts that came in your package. If a piece is missing, call the brand’s support or walk into a hardware store before you start cursing fate.
Step-By-Step Instructions: How To Install a Handleset On a Front Entry Door
Okay, breathe. Here’s the process broken into simple steps. Don’t rush—this is about steady progress, not speedrunning a video game.
1. Remove the Old Handleset (if Replacing)
First, unscrew the old hardware, starting from the inside. Usually, two screws hold the interior knob or lever in place. Remove the latch and deadbolt next (these come out with a couple of screws on the edge of the door). Set everything aside—you’d be surprised how often a backing plate needs to be reused.
2. Check and Prep Your Door
Now, look at your door. Is it pre-drilled with two holes—one for the deadbolt and one for the handle? Most modern doors are. If not, use the template that came with your handleset to mark where to drill. The industry standard is 2 3/8″ or 2 3/4″ backset, but always check the instructions.
If you need to tweak the mortise (the pocket for the latch), gently use your chisel and hammer. Try not to go full lumberjack—you want the fit snug but not super tight.
3. Install the Latch and Deadbolt Mechanism
Slide the latch bolt into the edge of the door, making sure the angled side faces the door jamb (the part that closes against the frame). Secure it with the provided screws.
Do the same for the deadbolt. Most deadbolts are labeled “this side up” (bless them for that). If not, make sure the keyed cylinder is facing outside.
4. Attach the Exterior Handle and Interior Hardware
Here’s where things get real. Feed the exterior handle’s spindle through the latch, lining up the holes. Hold it steady, then attach the interior lever or knob with the screws provided. For the deadbolt, line up the inside thumb turn so it connects with the exterior key cylinder, then secure it.
A trick I’ve picked up: loosely tighten all screws first, check that everything lines up and works smoothly, then tighten fully. If you crank down too soon, things can bind or go wonky.
5. Add the Strike Plates and Test Everything
Last step! Attach the strike plates to the door frame, right where the latch and deadbolt meet the jamb. If the holes don’t line up perfectly, you may need to adjust slightly—better now than after you slam the door for the first time.
With everything installed, close the door, test the handle and deadbolt several times. Make sure the latch retracts with the thumb press, and the deadbolt locks and unlocks with both the key (outside) and thumb turn (inside). If anything feels rough or sticky, loosen the screws a little and try again.
Common Issues and How To Troubleshoot Handleset Installation
You might run into a few hiccups. Here’s what to do if things don’t work as planned.
- Latch won’t retract or feels stiff? Double-check alignment, and make sure the spindle isn’t forcing things out of line. Sometimes the mortise needs a tiny adjustment.
- Deadbolt won’t turn easily? The bolt might be rubbing against the strike plate in the door frame. Try loosening the plate and adjusting it up or down.
- Handle feels loose? You probably used the wrong length screws or didn’t tighten things in the right order. Go back, re-seat the screws, and test again before tightening fully.
- Can’t get the key to work? Make sure you’ve installed the cylinder right side up. If it still won’t work, you might have a faulty lock or mismatched key. Contact the manufacturer—big names like Schlage and Kwikset have great support for this sort of thing.
Handlesets are surprisingly forgiving. If you mess up, you can almost always undo a step, tweak the alignment, and try again. Give yourself grace—it’s part of the process.
Choosing the Right Handleset: Mechanical vs. Smart Entry
Here’s a quick word on choosing the right style. Most folks go for a straightforward mechanical handleset—lock, key, thumb latch, done. But honestly, smart entry handlesets are everywhere now (think Yale Assure or Schlage Encode). These often look just as sharp, but include keypads, built-in Wi-Fi, or Bluetooth for pairing with your phone or smart home setup.
Mechanical sets:
- Usually cheaper
- Simple install, no batteries to replace
- Great if you want time-tested simplicity
Smart handlesets:
- Require batteries (add that to your “to check” list!)
- Can be reset, paired, or updated for different codes/users
- Perfect if you love tech and want extra convenience—code entry means no keys to lose
If you’re installing a smart handleset, you’ll follow the same mechanical steps, then spend a few minutes with the code, sync, and setup steps (usually guided by an app). Don’t forget to test remote access features, and keep backup batteries handy!
Can I Reuse Old Holes And Parts With a New Handleset?
Short answer: sometimes, but not always. Handlesets are fairly universal for modern doors, but older doors might have off-size holes or mortises. Before you toss out your old hardware, compare the new handleset’s template to your door. Are the holes in the same spots? Is the backset (distance from door edge to center of hole) right?
If things are off:
- Use a hole saw or chisel to adjust as needed—just go slow and check your measurements
- Don’t force a new lock into an old undersized hole; you’ll just end up with a wobbly, unreliable setup
- If you’re moving from a knob to a full handleset, you’ll likely need a new hole for the bottom mounting screw—no big deal, just follow the template
A lot of newer handlesets are “retrofit-friendly,” so check the box for that phrase. If you’re unsure, bring photos or the old hardware to the hardware store. Honestly, the staff there have seen it all and can help you match parts or suggest adapters.
Final Tips: Making Your Handleset Last
Once everything’s installed and working smoothly, you’re not quite done. Most people slap the handle on, then ignore it until it loosens up again. Here’s how to make sure your handleset stays sturdy and stylish:
- Tighten screws every six months. Doors get slammed, weather warps things, and screws back out over time.
- Lubricate the latch and deadbolt once a year. Use a dry graphite or lock-specific spray—skip the WD-40, trust me.
- If you have a smart handleset, check the battery level regularly. Most have a low-battery warning, but don’t wait until you’re locked out on a rainy night.
- Keep the key or code handy in case you ever need to reset, sync, or troubleshoot the lock.
If you ever notice sticking, sagging, or loose parts, deal with it early. Handlesets aren’t complicated, and a little TLC keeps your door working perfectly for years.
Wrapping Up: Enjoy Your New Front Door Handleset
So there it is. Installing a front entry door handleset is one of those hands-on upgrades that can transform your home’s look and security. Whether you’re rocking a classic Schlage knob, a modern Kwikset lever, or a Yale smart lock with all the bells and whistles, taking the time to get it right is worth every minute. Don’t rush, double-check your steps, and trust that every little adjustment brings you closer to that satisfying “click” when you turn the key. Now go admire your handiwork—you’ve earned it.