Here’s the thing about drive-in deadbolt latches: they’re slick, simple, and often faster to install—once you know the process. But if you’re new to the world of locks, or you’ve only dealt with those classic faceplate latches before, there are a few tricks to getting it right. Let me walk you through it, step by step, so your door goes from “fresh out of the box” to “safe and secure” without any frustrating detours.
What Makes Drive-In Deadbolt Latches Different?
Before you start hammering anything into your brand-new door, it’s worth understanding *why* drive-in latches even exist. Traditional deadbolt latches usually have a rectangular metal faceplate that sits on the edge of the door, secured with two small screws. They’re sturdy, but they also require a matching rectangle cutout, which not every new door has.
Drive-in deadbolt latches are designed for doors with a perfectly round bore (the hole where the latch goes) and no extra chisel work on the edge. Instead of screws, the latch literally drives right into the door and stays put with friction and a few small barbs.
You might be wondering, “Is this as strong as the old screw-in type?” Honestly, for most *standard interior or exterior doors*—especially pre-hung ones where the hole is already drilled perfectly round—a drive-in latch is more than strong enough. The Schlage drive-in deadbolt, for example, uses a cylindrical sleeve that hugs the wood tightly. It’s also a lifesaver if you want a clean, minimalist look without extra metal on display.
Gathering Tools and Materials: What You Need Before You Start
Let’s talk prep work. There’s nothing worse than getting halfway into a project and realizing you’re missing a tool. Installing a drive-in deadbolt latch doesn’t call for much, but there are a few essentials you’ll want ready:
- Drive-in deadbolt latch (make sure it matches your lock brand—Schlage, Kwikset, etc.)
- New door slab with properly sized holes (usually 2-1/8″ bore, 1″ crossbore on edge)
- Hammer or rubber mallet (for tapping the latch into place)
- Drill with appropriate bits (just in case the holes need a little adjustment)
- Measuring tape and pencil (to double-check hole locations)
- Philips screwdriver (for the rest of the deadbolt assembly)
Here’s my advice: check the packaging for your latch and deadbolt kit. Some brands include a drive-in sleeve you swap onto the latch. Double-check your door’s bore diameter, too. If it’s not the standard size, you might need to do a bit of sanding or drilling. And always, always wear eye protection. Even for “quick projects.” Trust me on that.
Preparing the New Door for Installation
Installing a drive-in deadbolt latch is usually smooth if your new door is “lockset prepped.” But let’s clear up what that actually means. Most new wood or composite doors come from the factory with a large round hole for the lock body (that’s the 2-1/8″ one) and a smaller hole through the edge (often 1″ diameter). With a drive-in latch, you’re looking for a *completely round* edge bore, no rectangular mortise or extra chisel marks.
First, do a dry fit. Take the latch, line it up with the edge hole, and see if it slides in easily. If it’s too tight, you might need to gently sand the hole or go at it with a wood file. Don’t force it—drive-in latches need *snug*, but not “jammed-in-with-a-sledgehammer” tight. If your door has a rectangular mortise instead, you’ll likely need to switch to a standard faceplate latch. Honestly, it’s easier to get the hardware to fit the door than to rework the whole slab.
If you’re installing on a metal or fiberglass door, be extra cautious about any burrs or sharp edges inside the bore. A little filing there goes a long way. Once everything lines up, you’re ready to move on.
How To Install a Drive-In Deadbolt Latch: Step-by-Step
Here’s where the rubber meets the road—or, more accurately, where the latch meets the door. Let’s break it down into easy-to-follow steps:
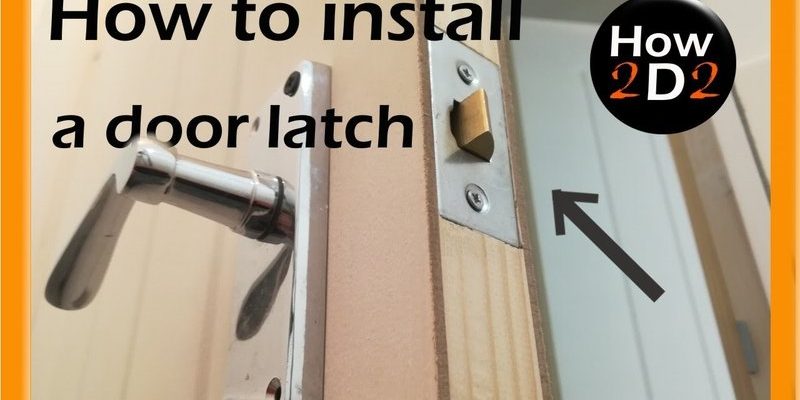
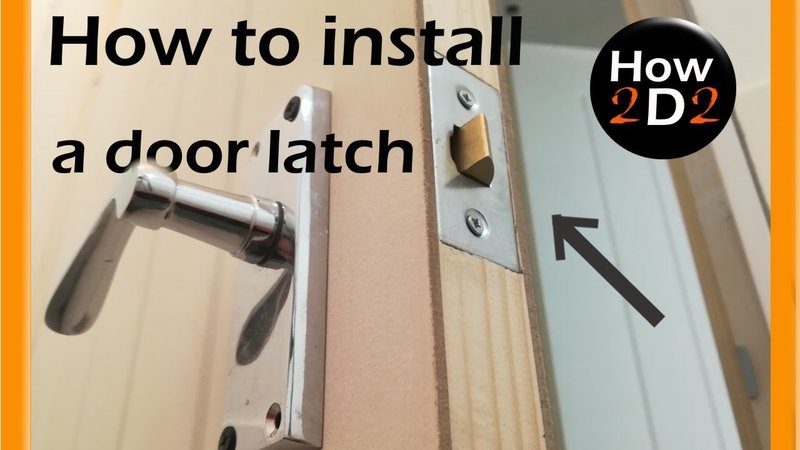
- Check latch orientation. Look for the word “top” or an arrow on the latch; this needs to point up when inserted.
- Attach the drive-in sleeve. If your deadbolt kit uses a removable sleeve, clip it onto the latch assembly. The sleeve should cover the sides of the latch but not block the bolt itself.
- Line up the latch with the edge hole. Slide it in gently. If it doesn’t start easily, realign and try again. You’re aiming for straight, smooth movement—never force a crooked latch.
- Tap the latch into place. Use a hammer or mallet and a scrap piece of wood to avoid damaging the finish. Tap gently until the sleeve is flush with the door edge. You’ll feel it “catch” as the barbs grip the wood.
- Double-check fit and function. From the side, peek through the main bore. The latch hole should line up right in the center. Push the latch bolt in and out by hand to make sure there’s no sticking.
Honestly, this part feels satisfying—like popping a perfectly fitted puzzle piece in place. If the latch is loose, that’s a problem; it means the hole’s too big, and you might need a wrap-around reinforcement plate. If it’s too tight, take it slow filing the edges.
Assembling the Rest of the Deadbolt Lock
Now that your drive-in latch is set, it’s time to build out the rest of the deadbolt. Even if you’ve never done this, it’s surprisingly straightforward. Most modern deadbolts, especially from brands like Schlage, have a two-part design: an exterior keypad (or key cylinder) and an interior thumb-turn assembly.
Start by holding the exterior lock in place, feeding the spindle (that square rod) through the latch assembly. On the inside, attach the thumb-turn plate using the provided screws. It should fit flush to the door surface. Don’t overtighten—firm, but not “stripped screws” tight.
Before you celebrate, check the action: turn the key (or rotate the thumb turn) and see if the bolt slides in and out smoothly. Does it line up with the strike plate on the frame? If not, you may need to tweak the latch position or adjust the strike.
Here’s a quick troubleshooting list:
- If the bolt won’t retract, the latch might be cocked or not fully seated.
- If the thumb turn feels stiff or grinds, check for wood shavings or debris inside the bore.
- If the key won’t budge, check that the spindle is inserted straight through the latch.
It’s better to find out now than after you’ve locked yourself out for the first time!
Why Drive-In Deadbolt Latches Are Useful (and When They’re Not)
Drive-in latches aren’t just a random invention; they solve a couple of real headaches—especially in newer homes or with pre-hung doors. If you hate chiseling or you’re anxious about getting that mortise shape just right, drive-in is a lifesaver. There are fewer steps, less guesswork, and a cleaner look when you’re done.
That said, they’re not perfect for every situation. If your door edge already has a rectangular mortise, a drive-in latch might fit loosely or not at all. Sometimes, especially on older or heavily used doors, the friction fit wears out. That’s when a traditional faceplate and screws offer more holding power.
Also, while Schlage and similar brands include sleeves that fit most standard bores, some “generic” or universal latches might be fiddly. If in doubt, always use hardware designed to match your lock set. And if your doors see heavy use or get slammed often, check the latch fit every year during routine maintenance.
Troubleshooting Common Problems After Installation
Maybe you’ve followed everything by the book—and the deadbolt still sticks, or the latch feels loose. Let’s run through a few quick fixes:
- Latch too loose in the door: Wrap the latch body with a single layer of masking tape or use a drive-in sleeve adapter. If the hole’s *way* too big, you’ll need a reinforcement plate.
- Deadbolt doesn’t extend fully: The latch may not be centered. Take it out and re-insert, making sure it’s straight. Double-check the position from both the edge and the face bore.
- Deadbolt jams or drags: Look for wood shavings or splinters in the bore. Use a round file to clean it up. Don’t use oil—just smooth things out.
- Lock doesn’t sync with latch: With electronic deadbolts, make sure the spindle is fully through the latch and batteries are fresh. Reset and re-pair the lock to the door if needed.
If things still aren’t lining up, don’t force it. Sometimes removing the latch, cleaning up the hole, and reinstalling solves 90% of issues. If your latch simply won’t stay put, consider switching to a traditional faceplate or using a latch reinforcement bracket.
Comparing Drive-In vs. Traditional Faceplate Deadbolt Latches
You might be deciding between a drive-in deadbolt latch and the good old faceplate style. Here’s my two cents after seeing both in action:
- Drive-In Latches: Sleek look, easy install for round bores, less visible hardware. Faster, especially on new or pre-hung doors. But can loosen over time on very soft wood.
- Faceplate Latches: Classic look, extra holding power with screws, better for older doors (especially if the original mortise is worn or damaged). Requires a little more skill and a chisel.
Some brands, like Schlage, let you swap between the two styles by popping off the sleeve or faceplate. If you’re on the fence or you’re working with a custom door, check for these so you get the most flexibility.
It all comes down to your door prep and how much effort you want to invest. For most DIYers with a fresh, round hole, drive-in latches are hard to beat for speed and simplicity.
Finishing Touches and Safety Checks
You’re almost done! But before you walk away and call it a day, take a minute (or five) to really test your work. Lock and unlock the deadbolt several times from both sides. Close the door and make sure the bolt lines up perfectly with the strike in the jamb. Sometimes, a tiny adjustment—moving the strike plate a hair, or sanding the edge of the latch hole—makes all the difference.
If you’ve installed a smart deadbolt, don’t forget to sync and pair the remote keypad or fob, and check the batteries. Give the manual key a try too, just in case the electronics go on the fritz. (Honestly, doing a “panic test” with the manual override is something everyone should try once.)
Finally, clean up any sawdust or debris, admire your handiwork, and breathe easy knowing your door is actually secure—not just “looks locked.”
Wrapping Up: Enjoy Your New, Secure Door
Installing a drive-in deadbolt latch on a new door might seem a little intimidating at first, but once you break it down, it’s really a straightforward job. The right tools, a bit of patience, and some attention to detail go a long way. Whether you picked a Schlage drive-in latch for its clean look or you’re just tired of chiseling mortises, you’ve now got a solid, reliable lock—fitted perfectly for your home.
A secure door isn’t just about keeping things out; it’s about feeling comfortable and confident inside your own space. So enjoy that fresh click of a new deadbolt—and know you did it right, from latch to lock to peace of mind.