These hinges are often used on kitchen cabinets, bathroom vanities, or any light-duty application inside your home. A popular choice is the Blum concealed hinge, well-regarded for its quality and ease of use. So, let’s roll up our sleeves and dive into the details of installing one of these hinges.
Gathering Your Tools and Materials
Before starting, you’ll want to gather your tools and materials. Here’s what you’ll need:
- Concealed hinges (like the Blum brand)
- Screwdriver (preferably a cordless drill)
- Wood screws (often included with your hinges)
- Measuring tape
- Pencil for marking
- Wood chisel (optional, depending on your cabinet)
- Level
Honestly, having everything ready before you begin makes the process smoother and more enjoyable. A good habit is to lay everything out in an organized manner. Picture a workspace where everything has its spot. You wouldn’t want to be halfway through installation only to realize you can’t find your screwdriver!
Understanding Your Hinges
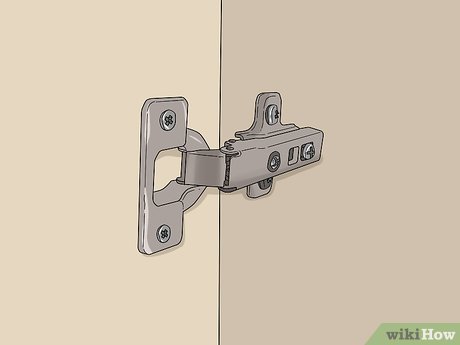
Now, you might be wondering how a concealed hinge works and why it’s essential. Basically, a concealed hinge allows the door to swing open while keeping the hinge hidden from view. This creates a streamlined, modern appearance that many people love.
Here’s the thing: concealed hinges are designed to be adjustable after installation, which is super helpful. If your door doesn’t sit perfectly flush or aligns just right, you can easily tweak it. Think of it like having the luxury of a tailor making adjustments to your favorite jacket—comfort and style in harmony!
When choosing your hinge type, you might come across different designs, such as self-closing or soft-close options. Self-closing hinges pull the door shut gently, while soft-close hinges prevent the door from slamming shut. Both offer benefits based on your needs, so it’s worth considering which feature you prefer.
Measuring and Marking the Hinge Placement
Once you’ve got your hinges, it’s time to measure and mark where they’ll go on the cabinet door. Here’s how to do it:
1. Determine hinge placement: For most applications, hinges should be placed about 2 to 3 inches from the top and bottom of the door.
2. Mark the hole positions: Using your pencil, mark where the hinge will attach to both the door and the cabinet frame.
When marking, take your time. You want everything to be precise. Remember, measure twice, cut once—this motto works for more than just carpentry. If your measurements are off, you might end up with misaligned doors that just won’t close properly.
Preparing the Door for the Hinges
Before you can install the hinges, you need to prepare the door. This typically involves chiseling out small recesses so the hinges sit flush. Here’s how to do it step-by-step:
1. Outline the hinge: Use your pencil to outline the hinge on the door where it will be placed.
2. Chisel out the recess: Carefully use a wood chisel to remove some material from the door, creating a shallow recess for the hinge. Typically, around 1/8 of an inch deep will do.
This step is crucial for a clean installation. If the hinge isn’t flush with the surface, it won’t operate correctly, and you might hear that awkward “squeak” the first time you try to open or close the door.
Attaching the Hinges to the Door
Now it’s time to attach the hinges to the door. Let’s break this part down:
1. Align the hinge: Position the hinge in the recess you created, ensuring it aligns with your pencil marks.
2. Secure with screws: Using your screwdriver or drill, insert the screws provided with the hinges.
Make sure the screws are snug but don’t overtighten—this can lead to damage. A loose hinge can cause the door to sag over time, which isn’t exactly what you want after all this effort.
Tip: When you’re securing the hinges, it’s okay to keep the door slightly open; this way, you can easily access the mounting plate on the cabinet frame later.
Installing the Hinge Plate on the Cabinet Frame
The next step is to install the hinge plate on the cabinet frame. Here’s how to make sure you get it right:
1. Mark the plate position: Position the hinge plate on the cabinet frame using the markings you made earlier.
2. Drill pilot holes: It’s a good idea to drill pilot holes for the screws here. This makes it easier to install them without splitting the wood.
After that, attach the hinge plate securely. Here’s the thing: if the door doesn’t seem to align perfectly, you can make slight adjustments later, thanks to the hinge’s design.
Testing and Adjusting the Door Alignment
After everything is installed, it’s time to test and adjust the door. Open and close it a few times to see how it operates. You’re looking for a smooth motion without any resistance. If everything looks good, that’s fantastic! But if your door seems off-kilter, don’t panic.
1. Adjust the hinges: Most concealed hinges have a few adjustment screws that allow you to fine-tune the door’s position.
2. Use the level: A level can help you ensure the door is plumb. Adjust as needed.
Sometimes, it can take a bit of tweaking to get it just right, but once you do, you’ll feel that satisfying “aha!” moment.
Final Thoughts
Installing a concealed hinge on a light-duty interior cabinet door might seem like a task meant for the pros, but as you’ve just seen, it’s a project anyone can tackle with a little patience and the right tools. Just remember to take your time, measure accurately, and adjust as necessary to ensure a perfect fit.
Now that you’ve got the skills, you can apply this knowledge to other cabinets or furniture around your home. Plus, there’s something incredibly satisfying about DIY projects—especially when they elevate the look of your space. Happy installing!