Now, this isn’t quite like swapping out a battery or tightening a handle. Brands like SOSS and Tectus specialize in these precision-engineered hinges, which means you’re working with some serious hardware—designed to sync perfectly with solid exterior doors. If you’ve ever tried to pair a universal remote to a stubborn TV, you know that even simple “hidden” tech has its own quirky steps. The same is true here, except your project involves chisels, measurements, and a healthy respect for wood splinters!
Let’s break it down, step by step, so you’ll know exactly what you’re getting into—and how to get that perfect, flush-fitted hinge without breaking a sweat or your door.
Why Choose a Concealed Exterior Door Hinge?
You might be wondering, “Why go through all this trouble for a door hinge?” Here’s the thing: concealed hinges aren’t just about looks. They offer real advantages. For starters, they boost your home’s security. Regular hinges are basically an engraved invitation for a determined intruder—you can see them, and with the right tools, they can sometimes pop them right off. But a concealed hinge hides all the working parts inside the door and frame. No visible hardware means nothing for unwanted visitors to tamper with.
Next up is weather resistance. Honestly, a hinge that’s hidden away leaves fewer gaps and crevices for wind, rain, or ice to sneak inside. This adds a layer of insulation, which can help keep your home warmer and your energy bills lower. Plus, it looks so much cleaner on both the inside and outside of your door. If you’re all about clean lines and minimal fuss, this hardware is the way to go.
Finally, there’s the cool factor. If you’ve ever seen a high-end home with seamless doors that seem to float open, you’ve probably admired concealed hinges without even realizing it. They’re a favorite trick of architects and designers who want every detail to sync seamlessly. Sure, the install is a bit more advanced, but the result pays you back every time you unlock your door.
What Tools and Materials Do You Need?
Let me explain what you’ll need—because prepping your workspace is half the battle. First off, you’ll need the concealed exterior door hinge kit itself. Popular options like SOSS or Tectus come with the hinge mechanism, mounting screws, and sometimes even a template for marking your cutouts. If your hinge didn’t come with a paper or plastic template, I strongly recommend making one from a bit of cardboard.
Here’s a list of must-have tools:
- Router (preferably with a plunge base) and sharp straight bit
- Chisels for fine-tuning the mortise
- Drill and drill bits
- Utility knife or marking knife
- Measuring tape and ruler
- Pencil or fine marker
- Safety gear: goggles, ear protection, and gloves
Don’t forget your door and frame. You’ll want a sturdy exterior-grade door—nothing hollow, since concealed hinges demand strong material for proper sync and support. Set up a workbench, good lighting, and maybe a shop vacuum for sawdust. If you’ve ever tried to reset a universal remote in dim lighting, you know how annoying it is to fumble for the right button; good prep saves that kind of frustration with door projects, too.
Measuring and Marking the Hinge Cutouts
Honestly, this step feels a bit like defusing a movie bomb—you want to go slow, double-check everything, and don’t cut until you’re 100% sure. Concealed hinges require a precise mortise (that’s the carved-out pocket where the hinge hides inside the wood). The measurements have to match your hinge’s code exactly, or your door won’t close right, or worse, could get stuck halfway.
Start by reading the instructions that came with your hinge kit. Some brands have their own quirks—maybe a slightly wider or deeper cutout, a different way to drill for the hinge pins, or unique mounting screws. Place the paper or cardboard template against your door edge at the correct height (usually about 10 inches from the top and bottom). Use a pencil to trace the outline and mark where you’ll need to drill.
If you want to get technical, use a combination square to make sure your lines are straight and square. If your lines are off by even a few millimeters, the hinge could end up crooked. The goal is to pair door and frame mortises perfectly, so the hinge can sync up and the movement feels effortless when you test it later.
Routing and Chiseling the Mortises
This step is where the magic—and the sawdust—happens. Grab your plunge router, set it to the exact depth your hinge requires (the manual will list this, usually in millimeters or inches). Honestly, if you’ve never used a router before, practice first on a scrap piece of wood before you go anywhere near your actual door or frame. One slip and it’s a pain to reset or patch up that mistake.
Fit the router bit right inside the tracing marks, then slowly guide it around the outline. Go slow, making shallow passes—never try to cut the full depth all at once. This keeps the router bit from burning up or leaving a rough edge. When you’ve cleared most of the material, use a chisel to square off the corners and fine-tune the pocket so the hinge body fits tight. You want the hinge to sit flush with the wood—no gaps, no wobbles.
After routing and chiseling, vacuum up all the dust and test-fit the hinge. If it’s snug but not forced, you’re doing it right. If it’s too loose, you’ll have to troubleshoot how much you’ve overcut and maybe use filler—never ideal, but fixable. Cutting the mortise is kind of like coding for perfection: every bit needs to line up so the result works smoothly.
Installing the Concealed Hinge: Step-by-Step
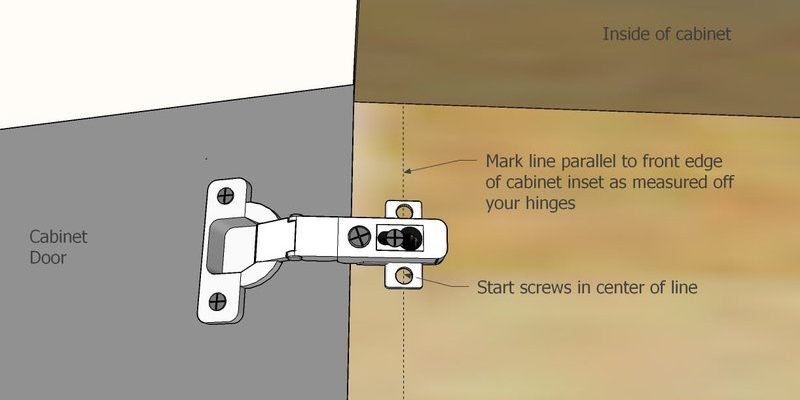
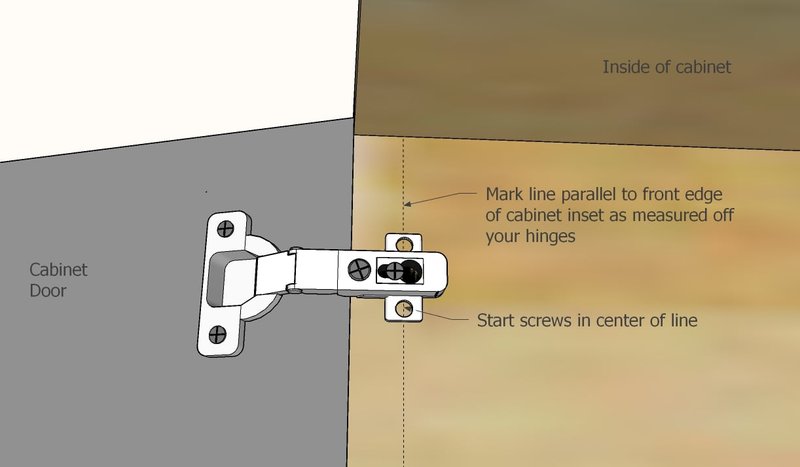
Now for the actual install. Take your hinge and line it up inside the mortise. Hold it in place and use a pencil to mark where the mounting screws will go. Pre-drill pilot holes for the screws—this helps keep the wood from splitting, especially near the thin edges of the mortise. Carefully screw the hinge into place. Don’t overtighten, or you risk stripping the wood.
Repeat the same steps for both the door and the frame. This is where you see if all your planning worked. Pair both mortises so the hinges sync perfectly. Once both sides are in, gently close the door, watching for any binding or scraping. If it doesn’t move smoothly, you may need to loosen the screws, nudge the hinge, and reset its position until it feels just right.
This is a good time to check for other issues. Does the door align flush with the frame? Are the gaps even around the edge? If not, you may need to adjust the hinge placement a bit. Getting that “just right” finish is all about those little tweaks—kind of like fine-tuning a remote’s code so every button works as intended.
Troubleshooting Common Installation Problems
Let me be honest: concealed exterior door hinges are advanced for a reason. Little mistakes can throw the whole project off, but most are easy to fix once you know what to look for. Here are a few issues you might run into:
- Door binds or doesn’t close all the way: Usually means the mortise is too shallow, or the hinge is a hair out of position. Try loosening the screws and resetting the hinge. If you need to, deepen the mortise slightly with a chisel.
- Hinge feels loose or rattles: This often happens when the mortise is too wide. You can shim the sides with thin wood veneer or fill the gaps with wood filler, then reset the hinge and screws.
- Visible gaps around the hinge: If the mortise was cut unevenly, you’ll see daylight around the hinge body. Use wood filler, sand smooth, and repaint. Perfection beats a quick fix here.
- Door doesn’t line up evenly with frame: Try adjusting the hinge position, checking with a level, and tightening the screws evenly. Sometimes a tiny nudge makes all the difference.
If you get really stuck, most hinge brands have solid customer support and troubleshooting guides on their websites. Sometimes, watching a step-by-step video or reading about someone else’s install is all it takes to reset your project and start fresh.
Comparing Concealed Hinges to Traditional Exterior Hinges
So, is all this effort really worth it? Here’s the thing: concealed hinges outshine traditional exterior hinges in a few key areas. For starters, they look miles better, especially if you care about clean architectural lines and modern style. They’re also harder for would-be thieves to tamper with—after all, there’s nothing for them to unscrew from outside.
Traditional hinges are cheaper and much easier to install—just screw them to the surface and you’re done. They’re still great for sheds, garages, or rental properties where quick repairs matter more than style. But if you want a flush, professional finish that syncs perfectly with a high-end door, go concealed. It’s a bit like choosing between wired earbuds and a pair of advanced wireless ones: both work fine, but only one delivers that top-tier experience.
If you’re dealing with an older home or a door that sees a lot of traffic, be honest about how much time you want to spend on maintenance. Concealed hinges are built to last, with sealed bearings and top-quality materials from brands like SOSS and Tectus. That means less time oiling, resetting screws, or dealing with saggy doors down the line.
Maintenance and Care for Concealed Exterior Door Hinges
Once your concealed hinges are in, you want them to last. Luckily, these hinges are low-maintenance, but a little routine care goes a long way. Here’s what I suggest:
- Check the screws every few months—tighten any that feel loose.
- If the hinge feels stiff, a drop of silicone spray or light machine oil inside the moving parts will help it reset to smooth operation.
- Give the hinge area a quick dust occasionally. Sawdust, pollen, or pet hair can build up and affect how the hinge syncs with the door movement.
- If you notice any squeaking or scraping, check for misalignment or stray debris in the mortise.
It’s also smart to keep your installation manual in a safe place. Each brand has their own little quirks, like adjustment screws or special reset tricks, and it’s easier to troubleshoot if you have the original paperwork handy.
Final Thoughts: Getting the Perfect Install
Installing a concealed exterior door hinge is definitely an advanced DIY move, but the payoff is big. You get a smooth, secure, and visually stunning entrance—something you’ll notice every single time you walk through your front door. It isn’t just about following steps or resetting tools; it’s about taking your time, syncing every detail, and enjoying the process. If you’re the kind of person who loves a good challenge (and some bragging rights), this is the project for you.
The first install might feel daunting, but honestly, once you’ve done it, you’ll wonder why you ever settled for regular old hinges. Just remember to go slow, use the right tools, and pay attention to the small stuff. In the end, concealed hinges don’t just upgrade your door—they upgrade the whole look and feel of your home. And isn’t that what DIY is all about?