Here’s the thing: exterior doors and frames take a beating. Weather, slamming, countless open-and-close cycles, maybe even the dog pawing at it. Over time, the screws that hold your door hardware—like hinges or lock plates—can loosen up as the wood around them gets worn out. When you go to tighten them, they just spin around uselessly. It’s frustrating, but it’s also totally fixable with a few simple techniques that honestly work wonders for most brands and types of exterior doors, whether you’re dealing with a classic wooden entry door or a modern metal frame.
Why Do Screw Holes Get Stripped On Exterior Doors?
First, let’s look at what’s really happening when a screw hole gets stripped. In most cases, the wooden frame around your exterior door is built to hold hardware firmly. But wood isn’t invincible. Over time, the stress of using the door, or even just the weather cycling from hot to cold, can cause the fibers around the screw to break down. If you’re using power tools and over-tighten the screws, you can strip out the wood in seconds—especially if the screw’s already been in and out a few times.
Here’s what that means practically: instead of the threads of the screw biting into tight wood, they’re just spinning around in a little hole that’s now too big. The more you try to tighten it, the worse it gets. Think of it like trying to screw a hook into a block of Styrofoam instead of a solid wall. Eventually, the screw can’t grab onto anything.
You might also be dealing with a metal frame or fiberglass. With these, the issue is less about the material crumbling and more about the threads getting worn out or the hole getting misshapen. Still, the fix is pretty similar for most types, though wood is by far the most common problem spot.
What’s important here is understanding that a stripped screw hole is not a rare disaster—it’s just normal wear and tear. In most cases, you’re not looking at a total replacement. You’re just reinforcing the spot so your hardware will actually stay put.
How To Tell If You’ve Got A Stripped Screw Hole
You might be wondering, “Is my screw hole really stripped, or am I just not using enough muscle?” That’s a fair question. There are a few dead-simple signs to watch for:
- The screw keeps spinning: You turn and turn, but it never tightens.
- The screw pulls out easily: There’s little or no resistance when you tug on it by hand.
- Loose hardware: Hinges, strike plates, or deadbolts wiggle, creak, or droop and you can’t secure them by tightening the screws.
Honestly, if you notice any of these—especially on an exterior door, where security and weather protection matter—you should plan to fix it soon. It’s not just about looks; a loose hinge or deadbolt can make your door easier to break, harder to lock, or more likely to sag.
I once had a friend whose storm door practically fell off the house because a single hinge screw kept pulling out. All it took was a gusty day and one too many slams. Luckily, catching a stripped screw hole early lets you avoid bigger headaches later.
Quick Fixes Versus Long-Term Solutions
Here’s where some DIY advice can go off the rails. You’ll find shortcuts all over the internet—cramming in a bigger screw, gluing in a toothpick, or squirting in wood filler and calling it done. Do these work? Sometimes. But if you want your fix to last (and you’re not in the mood to keep repeating this repair every few weeks), it pays to choose the right method for your door and the type of strip you’re dealing with.
- Quick fixes: Jamming in matchsticks, toothpicks, or using a thicker screw can work for lightly stripped holes, especially if you’re in a hurry. But they’re band-aids—not real repairs.
- Permanent repairs: Using wood dowels, proper wood filler, or hardware-specific repair kits gives you a much stronger, longer-lasting result. Some brands actually make their own screw hole repair kits, though honestly, you nearly always have what you need at the hardware store.
Let me explain: if your door hardware is crucial—think locks, door closers, or the main hinges—a long-term fix is worth a few extra minutes. For less important spots, you might get by with a quick fix just to tide things over.
What You’ll Need: Tools And Supplies
Before you start, you’ll want to gather a few basic supplies. Most fixes for a stripped screw hole on an exterior door require just a couple of things you probably already have (or can grab on a quick hardware run). Here’s a handy list:
- Wood glue (for wood frames) or a high-quality exterior wood filler
- Wooden dowels, golf tees, or toothpicks
- Drill and drill bits
- Hammer or mallet
- Screwdriver (manual or electric)
- Sandpaper (medium and fine grit)
- New screws (preferably a little longer and thicker than before)
For metal frames, you might need specialty thread repair kits, or you could use a tap and die set, but for most standard homes, the wood fix is what you’ll reach for. If your door is painted or stained, a dab of touch-up finish can make the repair invisible.
Tip: Always use outdoor-rated products for repairs on exterior doors or frames. Weather and temperature changes will do a number on interior glues and fillers.
Step-By-Step: How To Fix A Stripped Screw Hole On An Exterior Door
Ready to get your hands dirty? Here’s a clear, beginner-friendly process for fixing a stripped screw hole, whether it’s holding a hinge, lock, or deadbolt.
1. Remove The Screw And Hardware
Start by unscrewing the loose hardware. Set aside both the hardware and the screws. If the old screw is bent or stripped, it’s best to toss it—you’ll want a fresh one for the new repair.
2. Clean Out The Hole
Don’t skip this step! Use your drill or a small screwdriver to gently clear out any debris, splinters, or loose wood from the stripped hole. If there’s old glue or wood filler, try to scrape it out so your repair material has a clean surface to grab onto.
3. Fill The Hole
This is the magic step that makes all the difference. You have a few great options:
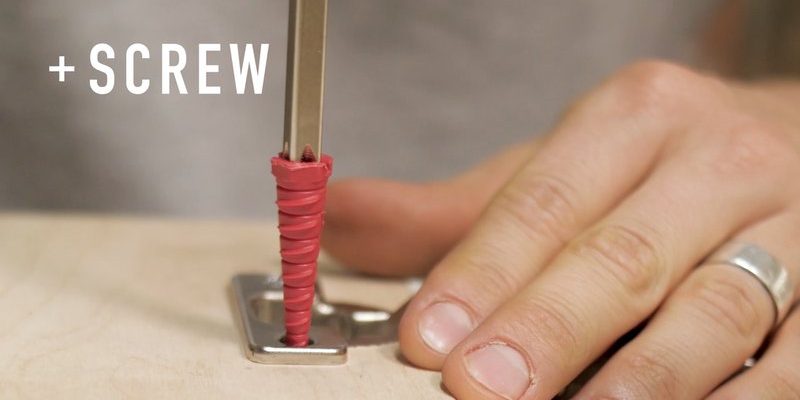
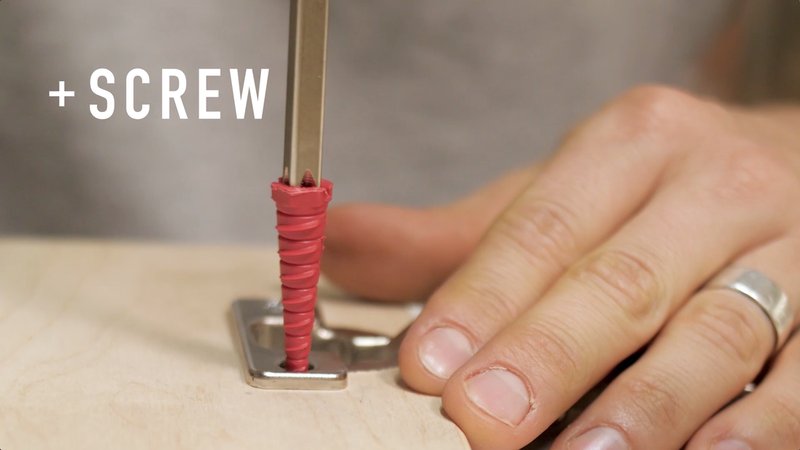
- Wooden dowel method: Dab some wood glue into the stripped hole. Tap in a wooden dowel (trimmed to length), golf tee, or several toothpicks coated in glue. Make sure it’s snug—no wiggling. Let it dry for at least 30–60 minutes for wood glue, or follow the filler’s instructions if you use a wood repair compound.
- Wood filler method: Squeeze a generous amount of exterior wood filler into the hole. Use a putty knife to really pack it in. Let it dry completely (usually a couple hours or overnight).
If you’re using a golf tee, you can even cut off the fat end so it fits perfectly. Honestly, wood dowels are my go-to for big holes—they won’t crumble, and you get a really solid bite for the new screw.
4. Sand And Drill A Pilot Hole
Once your filler or glue is dry, sand the surface smooth. You want it flush so your hardware sits flat. Next, use a drill bit just a little smaller than your screw to make a new pilot hole in the fresh wood. This helps guide the screw, makes it easier to drive in, and stops the new repair from splitting.
5. Reattach The Hardware And Test
Line up your hardware, set your new screw in place, and gently drive it into the new pilot hole. Don’t over-tighten—let the screw bite in naturally. If you did everything right, you’ll feel that solid resistance you want. The screw should hold firm, not spin, and your hardware should feel rock-solid.
Test the door by opening and closing it a few times. If anything still wiggles, check your work—sometimes you need to repeat the process if the hole was extra big or the original wood was soft or rotten.
What If The Repair Doesn’t Hold?
Let me be straight with you: sometimes a stripped screw hole repair doesn’t quite work the first time, especially if the wood is rotten, severely weathered, or if the hole was way larger than you realized.
If your first fix fails, here’s what you can try:
- Go larger: Use a bigger dowel, or fill with more wood filler and let it cure longer.
- Shift position: Move the hardware up or down slightly and drill new pilot holes in fresh, untouched wood.
- Plate repair kits: For locks and deadbolts, you can sometimes add reinforcement plates that give your screws new metal to bite into—especially useful for repeated wear or security upgrades.
In rare cases where the frame is soft, rotten, or splitting, you might need to replace a section of the wood or call in a pro. That’s uncommon, but it’s good to know your limits. If the hole is beyond a basic repair, a full frame or jamb replacement might be smarter and safer, especially with exterior doors that need to sync up for weatherproofing and security.
Alternatives For Metal And Fiberglass Frames
Most of what we’ve talked about so far works for wooden doors and frames. But what if you’ve got a metal or fiberglass exterior door? Here’s how it changes:
- Thread repair kits: These are like little metal inserts you tap into the stripped hole. The new screw threads into the insert, not the original metal. This method is a favorite for pros and can last years.
- Epoxy putty: Some heavy-duty putties are rated for fixing small holes in metal or fiberglass. Pack it in, let it cure rock-hard, then drill your new pilot and install the screw as usual.
- Move the hole: Like with wood, sometimes moving your hardware 1/4 inch up or down gives you a fresh spot to bite into—no fancy repair kit needed.
Just be sure you’re using products that match the material and are rated for outdoor use. The wrong epoxy or filler will fail the first time it gets wet or cold.
Why It’s Important To Fix Stripped Screw Holes Right Away
Here’s the part a lot of folks overlook: a stripped screw hole isn’t just about looks or a wobbly hinge. It can mess up your door’s alignment, let drafts and insects sneak in, and even make your home less secure. If a lock plate or hinge comes loose, it puts extra stress on the other hardware, which can lead to even more failures. It’s a snowball effect you don’t want.
Think about your smart locks, storm doors, or security cameras. If you can’t trust the screws to hold, the whole system is compromised. Trust me, a 20-minute repair now beats replacing a busted lock, fixing a warped door, or dealing with a break-in later. Not to mention, a properly-fixed screw hole saves you the headache of troubleshooting door alignment, sticky latches, or damaged weatherstripping down the line.
Insight: Properly fixing a stripped screw hole is one of those small jobs that pays off big. You’ll notice your door feels sturdier, swings smoother, and just feels “right” again.
Final Thoughts: Keeping Your Exterior Doors In Top Shape
Fixing a stripped screw hole on an exterior door or frame is one of those DIY tasks that’s surprisingly satisfying. You don’t need special skills, and the payoff is instant—a safer, smoother, and more reliable door. Remember: Don’t rush the repair, and always use quality exterior supplies. With just a little effort, your door hardware will stay tight and secure, rain or shine.
If you run into trouble, don’t be afraid to ask for help or try a different method. Most often, taking your time to prep the hole, use the right filler, and create a solid pilot hole is all it takes. Once you’re done, you’ll wonder why you put up with those rattling hinges or loose lock plates for so long.
So next time you grab that screwdriver and feel the dreaded spin, you’ll know exactly how to fix a stripped screw hole on an exterior door—and do it right the first time.