Let’s dive into this DIY fix. We’ll explore how to identify the type of door lever you have and walk through the steps needed to get your door working like new again. We’ll cover specific types of levers, such as Kwikset and Schlage, so you’ll feel confident no matter which style you’re dealing with.
Understanding Your Door Lever Type
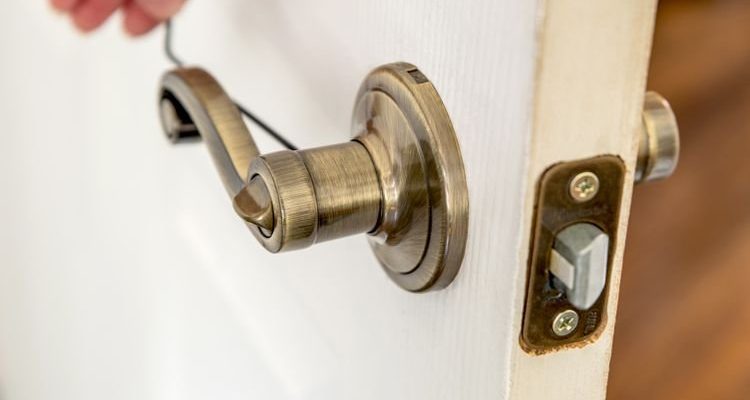
Before you grab your tools, it’s essential to know what kind of door lever you have. Door levers come in various designs, and each may require slightly different approaches to fix a loose set screw.
Kwikset and Schlage are two popular brands frequently found in many homes. Kwikset levers typically have a visible screw on the side, while Schlage levers might have a hidden screw underneath the handle. Identifying these features will set you up for success in your repair.
If you’re unsure, take a moment to examine your door lever closely. You might be surprised by how easy it is to spot the differences. Remember, knowing which type you have makes the fixing process simpler and faster.
Gathering Your Tools
Now that you’ve identified your door lever, it’s time to gather your tools. You don’t need a full toolbox for this job. Here’s what you’ll likely need:
- Flathead screwdriver or Phillips screwdriver: Depending on the screws on your lever.
- Tightening wrench: If your lever has a nut that requires tightening.
- Lubricant (optional): If you notice any stiffness while operating the lever.
Having everything ready will save you a lot of time and frustration. It’s like preparing for a recipe—you want all your ingredients in one place before you start cooking!
Loosening the Door Lever
To fix that loose set screw, you need to access it. First, you’ll want to loosen the door lever. Here’s how:
1. Locate the set screw: If you found it during your identification phase, great! If it’s hidden, look for a small hole or opening around the handle.
2. Remove the lever: Use your screwdriver to back out any screws holding the lever in place. Keep them in a small container so they don’t get lost.
Once the lever is off, you’ll find the set screw snugged up against the door’s spindle. Remember, accessing the screw is vital—it’s the key to your fix!
Tightening the Set Screw
Now that you’ve got access, it’s time for the real work. Tightening the set screw can be straightforward, but it requires a bit of finesse. Here’s what to do:
– Use the right tool: Grab your screwdriver and fit it securely into the set screw.
– Tighten gently: Turn the screw clockwise. It doesn’t need to be super tight—just enough to hold the lever in a stable position.
If your lever still jiggles a bit, you might need to tighten further. Just be careful not to overtighten; you don’t want to strip the screw or damage the lever!
Reinstalling the Door Lever
Once the set screw is tightened, it’s time to put everything back together. This step is like a puzzle piece fitting back into place. Here’s how:
1. Slide the lever back onto the spindle: Make sure it’s aligned correctly.
2. Insert the screws: Secure them back into the holes, tightening them gently, just like you did with the set screw.
As you work, keep checking the lever’s stability. You want it to feel firm but not overly tightened. Think of it as finding a happy medium—just like the perfect cup of coffee!
Testing Your Work
After you’ve reassembled everything, it’s time for the moment of truth. Test your door lever a few times to ensure it operates smoothly. Here’s what to check:
– Does the lever lift and lower easily?
– Is there any wobbling?
If you notice any issues, don’t panic! It might require another round of tightening. Just remember, these things happen, and it’s all part of the learning process.
Preventative Tips for Future Maintenance
Now that you’ve fixed the loose set screw, let’s talk about keeping it tight. Here are a few quick tips to prevent this issue from recurring:
– Regular checks: Every few months, give your door hardware a quick inspection. It’s like checking your car’s oil—better to catch it early!
– Lubricate periodically: If you notice any stiffness or squeaks, a little lubricant can work wonders.
– Pay attention to usage: If you have kids or pets swinging the door, consider how they might affect the mechanism.
By staying on top of these small tasks, you can prolong the life of your door lever mechanisms and avoid future repairs.
Fixing a loose set screw on an interior door lever is a simple task that can save you from more significant headaches down the road. Just remember to identify your lever type, gather the right tools, and follow each step methodically.
With a bit of care, you can have your door lever working smoothly again in no time. So, the next time you hear that annoying rattle, you’ll know exactly what to do. Happy DIY-ing!