Now, you might be wondering why your door latch is acting up in the first place. There can be several culprits, ranging from dirt and grime buildup to misalignment issues. Tackling this problem doesn’t have to be daunting. In this guide, we’ll break down the steps to identify and fix a sticking door latch so you can get back to smoothly opening your doors without the hassle.
Understanding Why Your Door Latch Sticks
Before diving into solutions, it helps to understand what causes a door latch to stick. Think of the latch as a tiny hero that works hard to keep your door secure. However, when dirt, dust, or rust invade its territory, it can become less effective. A sticking latch typically results from one of the following issues:
- Dirt and grime buildup: Over time, dirt can accumulate around the latch and strike plate, making it hard for the latch to move smoothly.
- Misalignment: If the door or frame shifts, it can affect how the latch fits into the strike plate, causing it to stick.
- Wear and tear: Like anything else, latches can become worn, especially in high-traffic areas, making them sluggish.
Understanding these causes will help you troubleshoot the issue more effectively. So, grab a cup of coffee, and let’s get to work on fixing that pesky latch!
Essential Tools for the Fix
Before you start, it’s good to have the right tools on hand. Imagine this as your toolbox of goodies. You wouldn’t want to begin a recipe without all the ingredients, right? Here’s what you’ll need:
- Screwdriver: A flathead or Phillips that fits your latch screws.
- Lubricant: A silicone spray or graphite lubricant works wonders for moving parts.
- Clean cloth: To wipe away any dirt and grime.
- Measuring tape: Useful for alignment checks.
- Wood shim or cardboard: These can help adjust the door if it’s misaligned.
Having these tools ready will make your life easier. You don’t want to hunt for a screwdriver in the middle of a project, after all!
Step-by-Step Cleaning of the Latch
Cleaning is often the first step to fixing a sticking door latch. This is like giving your latch a refreshing shower! Here’s how:
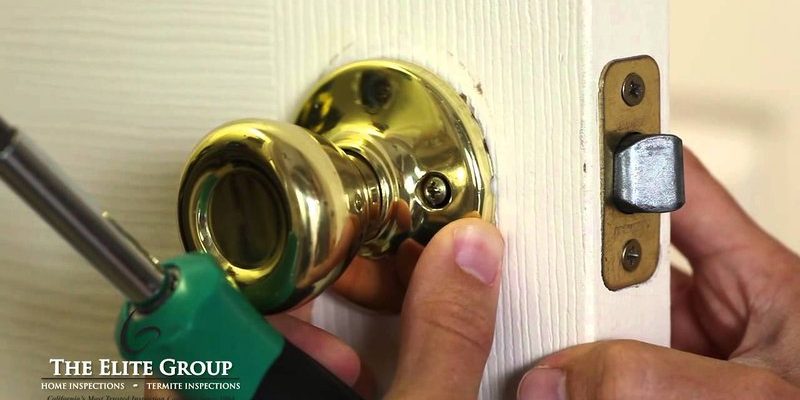
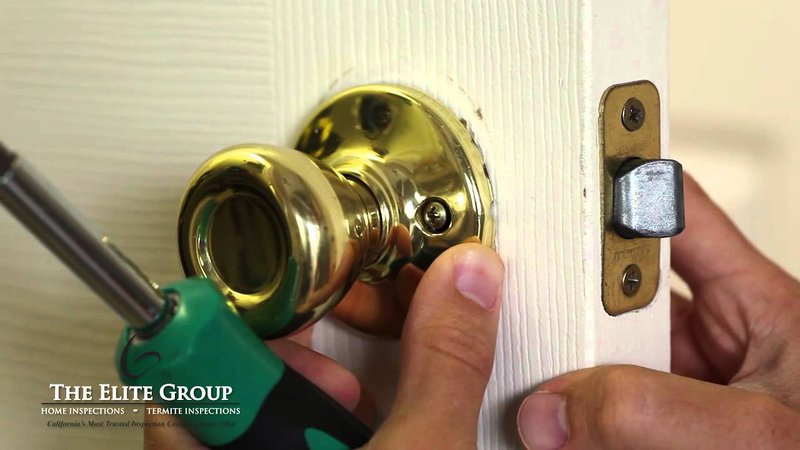
1. Remove the latch: Use your screwdriver to unscrew the latch from the door. Be careful not to strip the screws.
2. Clean the latch: Take your clean cloth and wipe down the latch, removing any visible dirt or grime. If it looks extra dirty, you can soak it in warm soapy water for a few minutes before rinsing and drying thoroughly.
3. Inspect the strike plate: Don’t forget the strike plate! Check it for dirt or any blockages and clean it as well.
4. Lubricate: Apply a small amount of your lubricant to the latch, focusing on the moving parts. This will help reduce friction and allow the latch to move more freely.
After you’ve cleaned and lubricated, it’s time to put everything back together and test it out. You should feel a noticeable difference!
Aligning the Door and Latch
If cleaning didn’t solve the problem, it might be time to check the alignment. Picture your latch and strike plate like a dance duo; they need to work together in harmony to function properly. If one is out of sync, you’ll have issues. Here’s how you can fix alignment:
1. Close the door: First, close the door gently to see where the latch meets the strike plate.
2. Check the gap: Ideally, you should have a small gap between the door and the frame. If the door is rubbing against the frame, it could be misaligned.
3. Use a shim: If the door is too low on one side, insert a wood shim or some cardboard under the hinges on that side to raise it slightly.
4. Re-test the latch: After making adjustments, test the latch again. If it still sticks, you might need to adjust the strike plate itself.
Aligning your door properly can work wonders and eliminate that annoying sticking!
When to Replace the Latch
Sometimes, despite your best efforts, the latch may still stick. This could indicate that the latch is worn out or damaged beyond repair. If that’s the case, it might be time to consider a replacement. Here’s what to keep in mind:
– Inspect for wear: Look for visible signs of wear, such as cracks or a bent latch. If the latch has seen better days, it’s probably best to say goodbye.
– Choose the right replacement: When shopping for a new latch, make sure it’s compatible with your door type. Whether you go for a standard latch or an upgraded model, ensure it fits your needs.
– Follow installation instructions: Installing a new latch is often straightforward. Just follow the manufacturer’s instructions, and you’ll have a working latch in no time!
Replacing the latch can seem intimidating, but it often solves persistent sticking issues and guarantees your door operates smoothly.
Preventing Future Sticking Issues
Now that you’ve tackled the latch problem, let’s talk prevention. Just like you’d maintain your car to keep it running smoothly, a little upkeep can save you headaches later. Here are some tips:
1. Regular cleaning: Make it a habit to clean your latch and strike plate every few months. A simple wipe-down can keep them functioning well.
2. Lubricate periodically: Just like oiling a squeaky hinge, lubricate your latch regularly to keep it moving freely.
3. Check the alignment: Every so often, check to ensure the door hasn’t shifted. If you notice any changes, make adjustments promptly.
By taking these preventive steps, you can avoid finding yourself back at square one with a sticking door latch.
Dealing with a door latch that sticks when opening can be a real hassle, but fixing it doesn’t have to be! With some simple cleaning, alignment checks, and maybe a replacement if needed, you can solve this issue quickly. Remember, just like keeping a tidy home, regular maintenance can keep your door working perfectly.
So, the next time you find yourself wrestling with a stubborn latch, you’ll know exactly what to do. Happy fixing!