
This kind of issue can crop up on all sorts of doors, from the classic wood entrance doors you see on old craftsman houses to sleek steel doors you find in modern offices. Whether you installed a Baldwin, Schlage, or Kwikset kick plate, the brand doesn’t matter much—damage to the door finish almost always comes down to how the kick plate is attached, the materials involved, and, sometimes, plain old wear and tear. Let’s get into what’s really going on and how you can diagnose and solve the problem without making things worse.
What Is a Kick Plate, and Why Does It Matter?
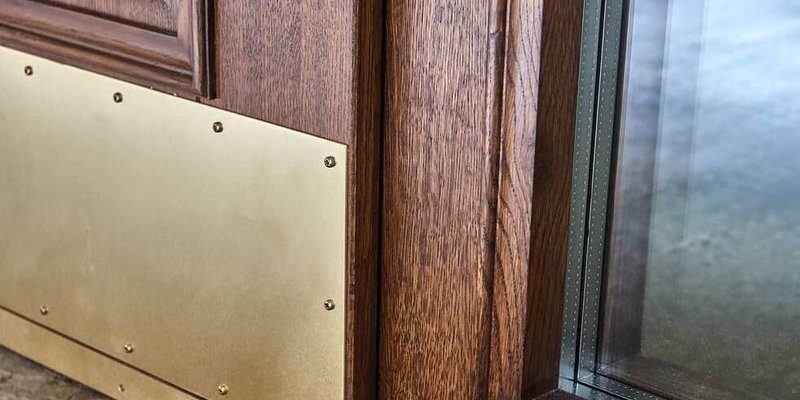
Kick plates might seem like a tiny detail, but they actually play a big part in keeping your door looking good. A kick plate is just a thin sheet—usually brass, stainless steel, or aluminum—screwed or glued to the bottom of a door. Its main job? Take the abuse from shoes, pets, bags, and anything else that would normally leave marks or dings.
Here’s the thing: a properly installed kick plate can add years to your door’s life. But if something’s off, it can trap moisture, scratch the surface, or even pull off bits of paint every time the door moves. If you’re seeing damage, it isn’t always the fault of the kick plate itself, but maybe how it was installed—or what’s happening *behind* it.
You might be wondering why you even need one. In high-traffic spots—think schools, busy homes with kids and dogs, or offices with rolling carts—a kick plate saves you from a lot of annoying touch-ups. It’s kind of like putting a case on your phone: not everyone does it, but you’ll be glad you did if life gets a little rough.
Signs Your Kick Plate Is Causing Door Finish Damage
Honestly, it’s not always obvious that the kick plate is to blame. Sometimes the damage looks like normal wear and tear, or maybe just the door getting old. But there are a few telltale clues that point to the kick plate as the culprit.
- Peeling or bubbling paint around the edges of the plate, especially near screws or mounting tape.
- Rust stains or discoloration creeping out onto the door surface—common if the kick plate or fasteners aren’t stainless or corrosion-resistant.
- Wood swelling or soft spots just above or below the plate, which could mean trapped moisture.
- Visible scratches or scuffs right at the edge where the plate meets the door.
You might also notice a weird outline where the metal meets the paint or finish—even after you clean it. That’s a sign the plate is either rubbing or reacting with the door material. Keep in mind, if the plate is loose or shifts at all, it acts like sandpaper every time the door moves.
A good way to check? Gently wiggle the plate. If you hear creaking, or you see it move at all, you’re probably getting micro-abrasions underneath—tiny scratches that add up over time.
Why Do Kick Plates Cause Damage?
If you’re picturing the kick plate as some innocent bystander, think again. Problems usually start with installation. If it’s put on crooked, with the wrong screws, or over a dirty surface, you can bet it’ll cause headaches.
Here’s what usually goes wrong:
- Poor fit: If the plate is too tight, it puckers the door material. Too loose, and it rattles or scrapes with every movement.
- Wrong fasteners: If you use screws that aren’t intended for your door’s material (wood, composite, steel), they can pull out or rust—leading to damage and staining.
- Double-sided tape issues: Some tapes don’t hold up to moisture or temperature swings, so the plate shifts, letting gunk and water underneath.
- No padding: If there’s no buffer (like a thin foam or rubber strip), metal-on-paint contact causes scratches and can “wear down” even tough finishes over time.
Sometimes, it’s just bad luck—an unsealed door edge, condensation, or repeated impacts. But for most people, it’s all about the install. And once you see the first signs, it tends to get worse pretty quickly.
How To Check for Installation Problems
Let me explain how you can play detective without pulling out every tool you own. The goal is to spot anything odd—like loose screws, bubbling tape, gaps, or areas where the plate seems to dig into the door.
- Inspect all fasteners. Make sure every screw is flush and tight. If one is loose, it’s easy for the plate to shift and scrape.
- Look for gaps. Hold a piece of paper at the top or sides of the plate and see if it slides underneath—that means gaps where dirt and moisture get in.
- Check the plate edges. Run your finger gently along all sides. Any sharp, unfinished metal can act like a blade on soft wood or paint.
- Observe for discoloration. If you see black marks, greenish stains, or rust, that’s a hint that there’s a chemical reaction or water trapped under the plate.
If you see any of these, it’s time to troubleshoot your kick plate attachment. Sometimes, just tightening the screws or cleaning out debris will buy you some time—but if you keep seeing issues, you’ll need a more permanent solution.
Steps To Diagnose the Cause of Door Finish Damage
Here’s a simple, step-by-step way to figure out what’s really going on with your kick plate and door finish:
- Remove the kick plate. Use a screwdriver (manual, not power) to avoid slipping. If it’s taped, pry gently with a plastic spatula—avoid metal tools to protect the finish.
- Examine the back of the plate. Look for signs of rust, tape residue, or debris. If there’s moisture or sticky stuff, that’s a clue it’s not sealing right.
- Inspect the door surface. Look for peeling paint, deep scratches, or soft spots. Press gently—a spongy feel means underlying moisture damage.
- Check for uneven wear. If the finish is only damaged in certain spots, it could be from uneven pressure or warped plate edges.
- Assess your mounting system. Compare the screw types or adhesive to your door’s material (wood, metal, composite). If they’re mismatched or corroded, consider swapping them out.
You might even want to take a photo of the damage and the back of the plate. Sometimes, patterns—like parallel lines or tape residue—make it clear what’s rubbing where.
How To Prevent Future Damage From Kick Plates
Now you know what’s happening, but how do you keep it from happening again? Honestly, prevention comes down to a mix of the right materials and better installation.
- Choose a matching metal: Don’t mix metals—putting brass on a steel door, for example, can cause subtle chemical reactions and stains.
- Pilot holes for screws: Always drill tiny starter holes for your screws. That keeps the door material from splitting or swelling.
- Use weather-resistant fasteners: Stainless or coated screws won’t rust or stain the door finish—even in damp climates.
- Add a thin barrier: Install a thin foam or clear adhesive strip along the back edges of the plate. This acts like a gasket, stopping scratches and trapping less water.
- Seal raw edges: If your door is wood, brush a little clear sealer or paint along any raw edges before the plate goes on. This keeps moisture out.
And here’s a pro move: every six months or so, take off the plate and clean underneath. It sounds like a hassle, but it can add years to both the plate and door finish.
Comparing Kick Plate Materials and Brands
You might be thinking, “Does it really matter which kick plate I buy?” In short, yes—especially if you want to avoid future finish damage. Not all kick plates are built the same, and the wrong one can make things worse over time.
- Brass Kick Plates: Good for classic wood doors. Look elegant, but can tarnish if not polished or sealed. Go for a lacquered version to minimize maintenance.
- Stainless Steel Kick Plates: Great for high-traffic, modern, or outdoor doors. Resist rust and scratches, but can leave gray rub marks if pressed too tight.
- Aluminum Kick Plates: Lightweight, affordable, but often thinner. May bend more easily and can transfer scuffs to light paint colors.
When it comes to brands, top names like Baldwin, Schlage, and Kwikset usually mean better quality control and smoother edges—worth it if you don’t want to troubleshoot later. Some generic or universal kick plates can work, but double-check the thickness, edge finishing, and whether the mounting hardware is included.
Can You Repair Door Finish Damage Yourself?
If you’re staring at scratches or peeling paint and wondering if you need a pro, don’t panic. Most cosmetic door finish damage from kick plates is totally fixable with a few simple tools.
- For small scratches: Sand lightly with fine grit paper, wipe clean, and touch up with matching paint or finish.
- For peeling paint: Scrape off loose paint, sand the area smooth, and apply a primer before repainting. Let it cure fully before reinstalling the kick plate.
- For minor wood dents: Use wood filler, sand smooth, then paint or stain to match. For deep rot or softness, you probably need to replace the door section.
- For metal doors: Use a rust remover and apply a rust-inhibiting primer before touching up with exterior-grade paint.
Let everything dry completely before reattaching the kick plate. Otherwise, you’re sealing in moisture, which just starts the cycle again. If you’ve dealt with recurring problems, you might want to call a door specialist, but honestly—most folks can handle these fixes with patience and a little elbow grease.
Key Takeaways for Diagnosing a Problem Kick Plate
If you started out thinking a damaged door finish was just bad luck, hopefully now it’s clear that your kick plate setup makes a huge difference. The trick is to diagnose exactly why the damage started—whether it’s loose hardware, the wrong material, or trapped moisture.
- Look for signs like peeling paint, swelling wood, or metal scratches near the plate.
- Check installation: fastener type, tightness, and whether there’s any buffer material.
- Choose the best kick plate material for your door, and don’t compromise on proper mounting hardware.
- Prevent damage by routinely checking and cleaning under the plate—think of it like regular phone case maintenance.
A well-installed kick plate should disappear into the background, doing its job quietly. If it’s causing problems, don’t ignore it. The sooner you diagnose and fix the issue, the longer your door will look and work its best.
Don’t let a small detail undo all the work you put into your home’s look. A little troubleshooting now can save you from expensive repairs down the line—and keep your entryway as sharp as the day you painted it.