
Whether you’re revamping a piece of furniture, hanging a new door, or just seeking to improve an old project, understanding how to create a custom mortise opens up a realm of possibilities. Non-standard hinges, like European concealed hinges or unique pivot hinges, often demand a little extra work to ensure they fit snugly and securely. Here’s the thing: you don’t need to be a master woodworker to get it right. With some basic tools and a clear plan, you can craft a mortise that’s both functional and aesthetically pleasing.
What is a Mortise and Why is it Important?
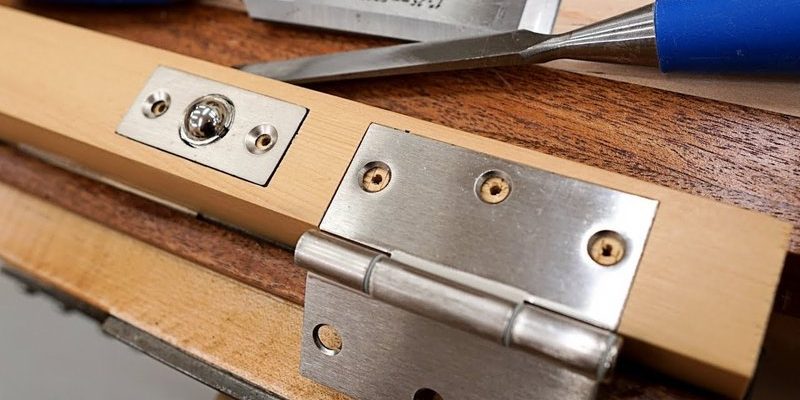
A mortise is a rectangular cavity cut into a piece of wood that allows a hinge (or other hardware) to sit flush. Think of it as a little pocket that holds the hinge in place. This makes it essential for proper door function, stability, and appearance. The importance of a well-made mortise goes beyond just fitting the hinge; it ensures that the door or cabinet opens and closes smoothly without any unsightly gaps.
When your hinges sit well in their mortise, it adds to the longevity of the installation. If this pocket isn’t correctly made, you might experience binding, where the door rubs against the frame, or even misalignment, where the door hangs crookedly. Creating a custom mortise allows you to tailor the fit, especially when working with non-standard hinges that might not follow typical dimensions.
Remember, doing this step right means fewer headaches down the line. You don’t want to end up with a door that catches or doesn’t close properly just because the mortise was a little off!
Gathering Your Tools and Materials
Before diving into the process, make sure you have the right tools. Here’s a handy list to get started:
- Chisel: A sharp chisel is essential for carving out the mortise.
- Wood Mallet: This helps you apply force to your chisel without damaging it.
- Measuring Tape: Accurate measurements are crucial.
- Pencil: Use this for marking your wood.
- Square: Ensures your angles are straight and even.
- Router (optional): A router can save time and effort for larger mortises.
- Wood Files: Perfect for smoothing rough edges after chiseling.
Having your workspace organized can also make a big difference. A clean surface allows you to focus on the task at hand. Make sure you’re in a well-lit area where you can clearly see your measurements and cuts.
With your tools in place, you’re ready to get started!
Measuring for Your Mortise
Measuring is perhaps the most critical step in creating a custom mortise. You want to ensure that the mortise will snugly hold the hinge without being too tight or too loose. Here’s how to do it:
1. Identify the Hinge Type: Look at your non-standard hinge. Determine its thickness, width, and depth. This will guide your mortise dimensions.
2. Mark the Placement: Using your pencil, lightly mark where the hinge will sit on the door and the frame. It’s essential to keep these marks precise; even a tiny error can lead to misalignment.
3. Use a Square: Align your square against the marked area to establish straight lines. This will help you visualize where to cut the mortise.
Now, let’s talk about the depth of the mortise. Usually, you want the mortise to be slightly deeper than the hinge plate. A good rule of thumb is to make the mortise about 1/16 inch deeper than the thickness of the hinge. This ensures the hinge will sit flush, which is key for both function and appearance!
Cutting the Mortise
Now comes the fun part—cutting the mortise! If you’ve marked everything correctly, this process can be straightforward. Here’s how to do it step by step:
1. Position Your Chisel: Place the chisel on one of your marked lines, ensuring it’s aligned with the cut you made.
2. Tap with the Mallet: Gently tap the chisel with the mallet to carve out the wood. Don’t go too deep on the first hit; instead, focus on creating a clean, shallow cut along the marked edge.
3. Work Your Way Down: Continue tapping along your marked lines until you create the first side of the mortise. After you have your side defined, continue to carve out the rest of the mortise, working from side to side toward the back of the cavity.
Keep in mind this might take a bit of time, especially if you’re working with harder wood. It’s better to go slow and make clean cuts than rush and end up with uneven edges. A good mortise should feel solid and smooth when you’re finished.
Testing the Hinge Fit
Once you think your mortise is ready, it’s time to test the fit of the hinge. Here’s how to do it:
1. Place the Hinge: Before screwing it into place, lay the hinge into the mortise to see how it fits.
2. Check for Gaps: Look for any gaps or areas where the hinge might be too tight. It should sit flush against the wood without wobbling.
3. Re-chisel if Necessary: If it doesn’t fit perfectly, you may need to re-chisel areas that are too tight or add slight depth if the hinge isn’t sitting deep enough.
This is an important step because the fit can impact how smoothly your door opens and closes. If everything lines up well, you’re one step closer to a successful installation!
Finishing Touches
After your hinge fits nicely into the mortise, it’s time to finalize your work. Here are some finishing touches that can really make your project stand out:
– Smoothing the Edges: Use wood files to smooth out any rough edges around the mortise. This ensures that the hinge fits well and looks neat.
– Staining or Sealing: If you’re working on a visible area, consider staining or sealing the wood to match the rest of your project. This not only improves aesthetics but also protects the wood from moisture.
– Test Again: Once any finishes are applied and dried, do a final test fit of the hinge. Ensure everything is still lining up properly.
Taking the time to add these finishing touches will elevate your project and help ensure it lasts longer, too!
Common Mistakes and How to Avoid Them
When working on creating a custom mortise, it’s easy to make some common mistakes. Here are a few to be aware of and tips for avoiding them:
– Not Measuring Correctly: Always double-check your measurements before you cut. A small error can lead to a major headache later on.
– Cutting Too Deep: If you cut too deep, the hinge won’t sit correctly. Aim to start shallow and work your way deeper as needed.
– Forgetting to Test Fit: Always test the hinge fit after cutting. It saves you time and ensures everything is aligned properly.
By being mindful of these common pitfalls, you’ll be on your way to creating custom mortises like a pro.
Wrapping Up Your Project
Creating a custom mortise for non-standard hinges requires some patience and practice, but the rewards are well worth the effort. Not only will you have a strong, functional installation, but you’ll also gain a sense of accomplishment from mastering a valuable skill. Take your time with each step, measure carefully, and remember to enjoy the process.
In the end, being able to modify hinges for your projects can open doors—literally and figuratively! And who knows? You might find yourself excited to tackle even bigger projects as you gain confidence in your woodworking abilities.