
You might not realize it, but over time, dirt, dust, and grime can build up inside the tiny components of your door knob, making it less effective. Perhaps you have a typical round or lever-style knob from a brand like Schlage or Kwikset—no matter. The process of cleaning the mechanism is quite similar. Let’s dive in and get that door knob working like brand new!
Why Clean Your Door Knob Mechanism?
Cleaning the inside of your door knob isn’t just about aesthetics; it plays a crucial role in maintaining functionality. When dust and dirt accumulate, they can hinder the smooth operation of the knob, leading to frustration. A stuck or squeaky knob can be really annoying, especially if you’re in a hurry.
Moreover, taking care of your door knobs is essential for longevity. Just like we perform regular maintenance on our cars or appliances, our door hardware deserves the same attention. A little cleaning can extend the life of the knob, saving you the hassle of a replacement down the line.
You might be wondering if this task requires any special skills. Honestly, it’s simpler than you might think! Let’s break it down step by step so you can tackle it with confidence.
Gather Your Supplies
Before you jump into cleaning, it’s important to gather a few essential tools. You don’t need anything fancy, just some basic supplies that you probably already have at home. Here’s what you’ll need:
- Screwdriver: A flat-head or Phillips screwdriver, depending on your knob’s screws.
- Cleaning solution: You can use a store-bought cleaner or make a simple solution with soap and water.
- Microfiber cloth: This is great for wiping down surfaces.
- Small brush: A toothbrush works well to get into those tight spots.
- Lubricant: A silicone-based lubricant will help keep things moving smoothly.
Taking the time to gather the right tools not only makes the process smoother but also ensures you don’t have to stop midway through. It’s like preparing for a recipe—you won’t want to search for ingredients while your dough is rising!
Remove the Door Knob
Now that you have your supplies, it’s time to remove the door knob. Don’t worry; it’s a straightforward task. Start by examining the knob for visible screws. If you can’t see any, look for a small pinhole that might indicate a hidden screw.
1. Unscrew the Knob: Using your screwdriver, carefully remove the screws holding the knob in place. Be sure to keep these screws safe; you’ll need them later.
2. Detach the Knob: Gently pull the knob off the door. If it’s stuck, give it a little twist while pulling to dislodge it.
3. Take Off the Faceplate: If there’s a faceplate covering the mechanism, you’ll want to remove that as well. This might require more screws, so keep your screwdriver handy.
Removing the knob can feel intimidating, but once you get into it, you’ll see it’s a lot easier than it looks.
Inspect the Mechanism
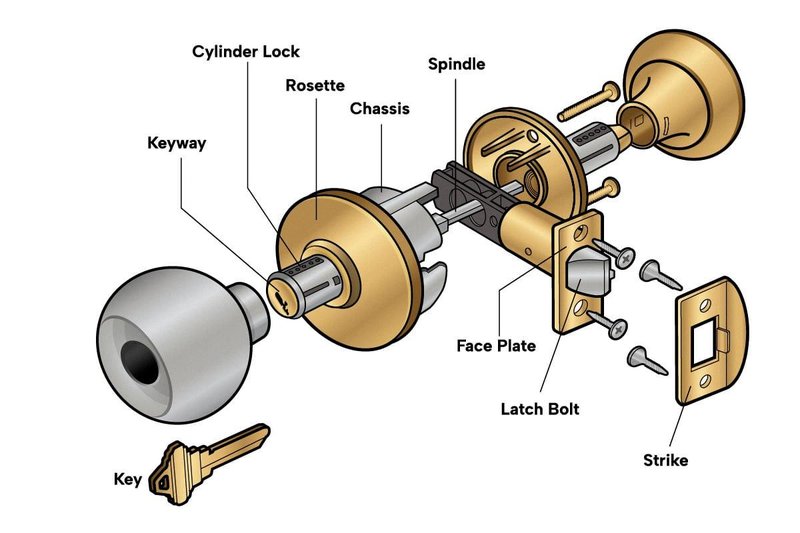
With the door knob detached, take a moment to inspect the mechanism. Look for any visible dirt or debris that might be affecting its performance. You should see several components: the spindle (the metal rod that turns), springs, and possibly a latch mechanism.
Check for any signs of wear or damage. You might notice that the springs aren’t as bouncy as they used to be or that rust has developed in places. If things look worn out, it might be time to consider a replacement.
But let’s not jump to conclusions just yet. A thorough cleaning might solve your issues without any need for a brand-new knob!
Clean the Components
Now comes the fun part: cleaning! Start with your small brush and your chosen cleaning solution.
1. Brush Away Debris: Use the brush to gently scrub the components, focusing on any crevices where dirt tends to hide. Get into those hard-to-reach spots where grime builds up, especially around the spindle.
2. Wipe Surfaces: Take your microfiber cloth and dampen it slightly. Wipe down all surfaces of the knob and mechanism to remove any remaining dust or sticky residue.
3. Rinse and Dry: If you used soap, make sure to follow up with a clean, damp cloth to rinse off any soapy residue. Finally, dry all components thoroughly before reassembling.
By cleaning each part carefully, you ensure that the mechanism will function smoothly when you put everything back together.
Lubricate the Knob
After cleaning, it’s important to lubricate the moving parts to prevent future jams. Here’s how to do it right:
1. Choose the Right Lubricant: A silicone-based lubricant is ideal for door knobs, as it doesn’t attract dirt like oil-based ones can.
2. Apply Sparingly: You only need a few drops on the spindle and any springs. Excess lubricant can attract dirt, so less is more in this case.
3. Work the Lubricant In: Turn the knob a few times to distribute the lubricant evenly across the mechanism.
Lubrication is like giving your door knob a little spa treatment, helping it glide smoothly and stay functional longer.
Reassemble the Door Knob
With everything cleaned and lubed up, it’s time to put your door knob back together. This step is just as straightforward as removing it:
1. Reattach the Faceplate: If you took off a faceplate, now is the time to screw it back into place.
2. Put the Knob Back On: Align the knob with the spindle and gently push it back into its position. Make sure it feels secure.
3. Screw It In Place: Use your screwdriver to tighten the screws you removed earlier. Don’t overtighten; just secure it enough to prevent wobbling.
After reassembling, check the knob’s operation. It should turn smoothly without any sticking or squeaking. If it does, you’ve done a fantastic job!
Regular Maintenance Tips
Now that you’ve cleaned out your door knob, it’s wise to think about regular maintenance to keep it functioning well in the long run. Here are a few tips:
– Check for Dirt: Periodically, take a look at your knobs. A quick wipe with a damp cloth can keep them looking fresh.
– Lubricate Annually: Consider lubricating your door knobs every year, especially if they’re used frequently.
– Listen for Sounds: If you start hearing squeaks or notice resistance when turning, it’s a sign that cleaning is needed.
Remember, just like you wouldn’t ignore a car that makes strange noises, don’t overlook a door knob that’s showing signs of wear. Routine care will keep everything operating smoothly.
Cleaning the inside mechanism of an interior door knob might seem like a small task, but it can make a world of difference in functionality. Plus, tackling it yourself can be quite satisfying. Now you know how to get it done, keep your door knobs in prime condition, and save yourself from the annoyance of a jammed knob. You’ve got this!