Cleaning and polishing a brass kick plate isn’t complicated, but there are some secrets to doing it right—without accidentally ruining that warm gold shine. If you’re new to this, don’t worry. You won’t need any fancy machines, and you don’t have to be a “DIY pro” either. With the right steps and a bit of patience, you’ll have your kick plate looking as good as new (and yes, you’ll feel a little proud every time you open the door).
Let me walk you through the whole process—how to clean, polish, and protect your brass kick plate so it can keep doing its job and looking great at the same time.
What Is a Brass Kick Plate—and Why Care About Cleaning It?
A brass kick plate is a thin strip of metal (usually brass, obviously) that’s attached to the bottom portion of your door. Its job is mostly practical: it protects your door from marks, dents, and scuffs when people (and pets) push open the door with their feet or, let’s be honest, a good hard kick.
But here’s the thing: brass isn’t just tough, it’s also pretty. That golden sheen makes any entryway look a little bit more classic. Over time, though, brass reacts with air and moisture, causing it to tarnish, darken, and develop spots. That’s normal, but if you want your home to look tidy and well-kept, a dirty brass kick plate can be an eyesore.
Honestly, keeping your kick plate clean isn’t about being “fancy.” It’s about protecting your investment—good brass can last for decades if you take care of it. And let’s be real, nobody wants guests to notice grime before they even ring the doorbell.
How to Tell If Your Kick Plate Is Real Brass or Just Brass-Plated
You might be wondering: does it matter if my kick plate is solid brass or just brass-plated? The short answer is yes. Real brass can be polished again and again, but brass-plated kick plates have a thin layer of brass over another metal—once you wear through that plating, you can’t really bring it back.
Here’s how you can check:
- Magnet test: Stick a small magnet to the plate. If it sticks, the plate is probably just brass-plated steel.
- Look for tarnish: Solid brass tarnishes and develops a patina (brown/green spots), while plated brass might show flaking or rust.
- Check the edges: Sometimes, the plating wears off at the corners. If you see a different metal underneath, it’s not solid brass.
If it’s just brass-plated, use a gentle touch and avoid harsh polishes or abrasive pads. For solid brass, you can be a bit more aggressive with cleaning and polishing.
What You’ll Need to Clean and Polish a Brass Kick Plate
Let me explain: you don’t need a bunch of fancy or expensive tools. In fact, most supplies are probably already in your kitchen or garage. Here’s a simple list:
- Soft, clean cloths (microfiber is ideal)
- Warm, soapy water (a drop of dish soap does the trick)
- Non-abrasive sponge or soft brush
- Brass polish (commercial or homemade—more on that in a minute)
- Masking tape (to protect the door’s paint or finish)
- Rubber gloves (optional, but helpful if you have sensitive skin)
If you want to go the DIY route, lemon juice and baking soda (or vinegar and salt) can work as a natural brass polish. We’ll walk through both commercial and homemade options.
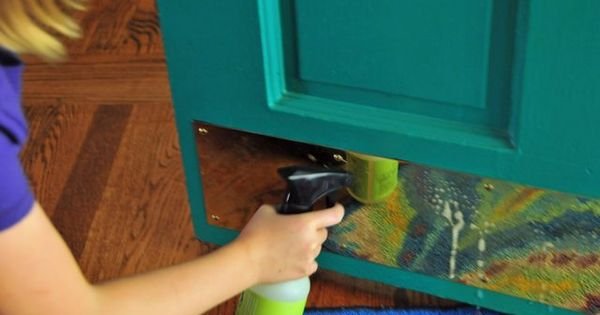
Cleaning Your Brass Kick Plate: Step-by-Step
Here’s the thing: Always start simple before using strong chemicals or abrasive tools. Brass is softer than you’d think, and harsh methods can scratch or dull the finish.
Step 1: Wipe Down First
Wipe the kick plate gently with a dry cloth to remove dust and loose dirt. If you start scrubbing without this, you risk grinding those particles into the brass.
Step 2: Wash With Soapy Water
Dip a soft cloth or sponge in warm, soapy water. Wipe the kick plate thoroughly, paying extra attention to sticky spots or shoe scuffs. Don’t soak the plate (you don’t want water leaking behind it, which can cause rust on the screws or door). Rinse with a clean, damp cloth, and dry completely.
Step 3: Mask Off the Door (If Needed)
If you plan to use brass polish or anything acidic, use masking tape to cover the area around the plate. This keeps polishes from damaging the paint or wood.
If your kick plate still looks dull or spotted after this, don’t panic. That just means it’s time for polish, not that you’ve done something wrong.
How to Polish a Brass Kick Plate: Store-Bought and DIY Methods
Let’s talk polish. There are basically two ways to go: grab a commercial brass polish from the hardware store, or mix up a homemade solution with stuff from your pantry. Both work!
Using Commercial Brass Polish
Most hardware stores stock polishes like Brasso or Weiman. These are great for restoring shine and removing tarnish.
- Apply a small amount of polish to a clean, dry cloth.
- Rub gently in small circles, focusing on dull or tarnished areas.
- Let the polish sit for a couple of minutes (read the instructions).
- Buff with a fresh, clean cloth until the kick plate gleams.
Wear gloves if you’re sensitive to cleaning chemicals. And always make sure you have good ventilation.
DIY Brass Polish: Lemon and Baking Soda
This is an old school favorite—and it really works. Sprinkle a little baking soda on half a lemon (or use a tablespoon of lemon juice mixed with soda), then rub directly onto the brass. The acid lifts the tarnish while the soda acts as a mild abrasive.
- Let it sit for 2–3 minutes.
- Wipe off with a damp cloth.
- Buff with a dry, soft cloth for shine.
This natural solution is safe for most real brass, but if you have a brass-plated kick plate, test a tiny hidden spot first to make sure it won’t cause any discoloration.
Extra Tough Tarnish? How to Troubleshoot Stubborn Spots
Some tarnish just won’t budge, no matter how much you polish. Here’s how to tackle the really stubborn stuff:
- Make a paste with vinegar, flour, and salt (equal parts). Spread it on thick, let it sit for 15–30 minutes, then wipe away.
- Try a soft-bristled toothbrush to get into grooves or around screws.
- If you see green spots (verdigris), you can remove them gently with a cotton swab soaked in vinegar—just be careful not to soak the area.
- For deep scratches or worn spots, sometimes the only fix is a little touch-up paint or replacing the plate. Luckily, that’s rare.
Don’t reach for steel wool or anything super abrasive. That’ll scratch the surface and make future cleaning a nightmare. When in doubt, more polish and gentle scrubbing is almost always better than brute force.
How to Protect Your Brass Kick Plate After Polishing
Once your kick plate is sparkling, you’ll want to keep it that way. The best way? Give it a little protection. Here’s what I suggest:
- Buff the plate with a clean, dry cloth regularly—once a week is plenty.
- If it’s an exterior door, consider applying a thin coat of car wax or even a specialty brass lacquer. This puts a protective barrier between the brass and the elements.
- Wipe off dirt and spots as soon as you notice them. The less time grime has to sit, the less it can stain.
- Don’t use harsh chemical sprays or abrasive sponges for regular cleaning. They’ll just strip away that nice shine.
Here’s the thing: even with regular upkeep, brass naturally develops a patina over time. Some people like that antique look; others want a constant shine. There’s no “wrong” finish. Just clean and polish when you see the shine slipping.
Common Mistakes When Cleaning Brass Kick Plates (And How to Avoid Them)
If you’ve ever ended up with streaks, weird spots, or scratched up metal after trying to clean brass, you’re not alone. Let me explain a few classic mistakes and how to dodge them:
- Forgetting to check if it’s brass-plated: If you’re too rough on a thinly-plated plate, you’ll wear right through the brass layer and expose the metal underneath. Always test first!
- Skipping the rinse: If you leave polish or cleaning residues behind, it can make the brass look cloudy or sticky.
- Using steel wool or scouring pads: These just scratch the surface and make things look worse in the long run.
- Neglecting protective measures: Not masking off the door can lead to polish stains on your paint or wood.
The best approach is slow and steady. If you’re not sure your polish or method is safe, test a tiny spot first.
When Should You Replace vs. Clean a Brass Kick Plate?
Honestly, most brass kick plates can be cleaned and polished for decades, but there are times when replacement makes more sense:
- Visible holes, large patches of missing brass, or deep dents that can’t be buffed out
- Severe corrosion or rust on the underlying metal (especially with brass-plated options)
- Loose, rattling kick plates that won’t stay secured
Replacing a brass kick plate is usually simple: unscrew the old one and attach a new plate with matching screws. If you’re feeling handy, you can even upgrade to a thicker, solid brass option for longer-lasting shine.
Wrapping Up: Keep That Brass Kick Plate Gleaming
Taking care of a brass kick plate is a little like looking after a favorite pair of shoes—it’s about small steps that add up over time. Whether you go for store-bought polish or a homemade mix, a few minutes every couple of months goes a long way. Clean, polish, and protect, and your entryway will stay welcoming (and your door protected) for years.
It’s easy to forget the little details like the kick plate at the bottom of your door, but honestly, those finishing touches make your home feel more inviting. So next time you spot a smudge or tarnish, you’ll know exactly how to handle it—and maybe even show off your results to a neighbor or two.