Cleaning and lubricating individual pins in a lock cylinder isn’t just for old, rusty padlocks. Even new residential brands like Schlage or Kwikset can develop issues if the cylinder isn’t kept clean. And while most people stick to a quick squirt of graphite or WD-40, those methods barely scratch the surface. Honestly, if you want your lock to work smoothly and last longer, giving attention to the tiny pins inside makes a big difference.
You might be thinking, “Isn’t cleaning a lock cylinder something for locksmiths?” Not necessarily. With some patience, the right tools, and a little know-how, you can tackle this at home—even if this is the first time you’ve popped a lock apart. Let’s walk through why this matters, what you’ll need, and exactly how to get those pins moving like new again.
Why Clean Individual Pins in a Lock Cylinder?
Here’s the thing: most lock troubles start small—usually at the pins. Each time you slide a key in, those pins move up and down, lining up perfectly if the key matches. Add enough dust, sticky old lube, or pocket lint, and suddenly the pins don’t move as freely. Before you know it, your remote key fob isn’t the only thing giving you trouble; now your door lock is a daily exercise in patience.
Dirty or jammed pins aren’t just annoying; they can wear out both the pins and your key. If you keep forcing a sticky lock, you’ll slowly grind down the metal, making a good lock turn bad in no time. Worse still, a gummed-up pin set can lock you out completely—defeating even the best code or battery-operated lock if you can’t even turn the cylinder.
Taking the time to clean individual pins helps prevent bigger issues down the line. It’s like cleaning your coffee grinder or keeping your remote battery charged: the little bits of maintenance add up and save you hassle (and money) later.
What Tools and Supplies Do You Need?
For most popular home locks—think brands like Schlage, Kwikset, or Yale—you don’t need a fancy locksmith kit. But it’s smart to gather the right bits so you don’t end up halfway through and scrambling for a tool. Here’s a quick rundown of what you’ll want:
- Phillips screwdriver (for removing the lock from the door)
- Pinning tweezers or fine-point tweezers
- Small tray to keep track of pins (they’re easy to lose!)
- Denatured alcohol or electronic contact cleaner (safe for metal, evaporates quickly)
- Lubricant made for locks (e.g., dry Teflon spray, Tri-Flow, or graphite—not oil-based WD-40)
- Soft brush or pipe cleaner for scrubbing pins and chambers
- Key blank (optional, but great for testing and reassembly)
A quick note: If you’re working on a lock with electronic parts—like a smart lock with sync or code features—be careful not to expose anything labeled for electronics to cleaning fluids or sprays. Always remove and set aside any non-mechanical modules before you dive into the pin cylinder itself.
How to Disassemble the Lock Cylinder Safely
Let me explain: opening up a lock cylinder isn’t magic, but it does take a steady hand and a bit of organization. Before you start, snap a photo of the lock from a few angles—trust me, it’ll save you if you forget how things fit back together.
Start by removing the lock from the door. Usually, this means unscrewing the faceplate with your Phillips screwdriver and gently pulling out the cylinder. Place the screws and exterior parts in a small bowl so nothing rolls away.
Now, look for a retaining clip or screw on the back of the cylinder (this can vary by brand). Use your tweezers or a small flathead to gently slide this off. With the clip removed, you should be able to slide the plug (the part that turns with your key) out of the housing. Be careful: the pins and tiny springs are sitting in channels—if you turn the cylinder upside down, they’ll spill everywhere like confetti at a wedding.
Once the plug is out, work over your tray. Remove the key gently. The pins will now be exposed in both the plug and the upper housing. Take your time and use the tweezers to place each pin and spring in order (lining them up in the tray helps for reassembly). Don’t rush: the whole point here is to keep things neat so you don’t end up searching the carpet for a rogue spring.
How to Clean Individual Pins and Chambers
With the cylinder disassembled, you can finally focus on those stubborn pins and the grime they’ve collected. You might be surprised at how much gunk hides inside—think dust, dried lubricant, or even tiny metal shavings from years of use.
For each pin and spring, use a soft brush dipped in denatured alcohol or contact cleaner to gently scrub away debris. Work slowly. Pay special attention to the ends of the pins (these touch the key and shell), as they need to slide smoothly. If pins look damaged or corroded, don’t hesitate to replace them—most hardware stores sell pinning kits, or you can swap in extras from an old lock if needed.
Now, turn your attention to the pin chambers—the little holes in both the plug and the cylinder housing. Run a pipe cleaner or cotton swab dipped in cleaner through each one. If you spot stubborn grime, let the cleaner soak for a minute, then scrub again. Make sure everything is completely dry before you move to the next step.
For a lock to work its best, every pin and chamber has to be spotless—think of it like rinsing every last bit of coffee grounds out of a French press before your next brew.
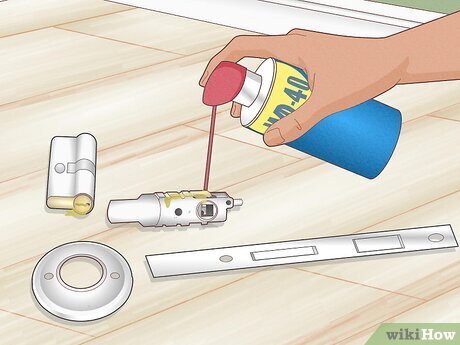
Choosing the Right Lubricant for Lock Pins
Lubricating pins is where a lot of people make mistakes. It’s tempting to reach for whatever oil or spray you have handy, but not all lubricants are created equal—especially for delicate lock mechanisms.
Here’s what matters: oil-based sprays (like standard WD-40) might work at first, but they quickly pick up dust and form sludge inside your lock. Instead, reach for a lubricant made specifically for locks. Dry graphite, PTFE sprays, or dry Teflon formulas are ideal. These coat the pins without attracting dirt, letting everything glide with less risk of sticking.
Apply a small amount of your chosen lube to each pin and the walls of each chamber—just a light touch is enough. For dry powders, you can dip the pins or sprinkle a bit into the plug before reassembly. If you prefer sprays, direct the nozzle with care so the lubricant goes on the pins, not just into the housing.
Avoid over-lubricating. If you see liquid pooling at the bottom of the cylinder, you’ve used too much—wipe away excess with a lint-free cloth before moving on.
How to Reassemble and Test Your Cleaned Lock Cylinder
Ready to put everything back together? Here’s where that photo you took earlier might come in handy. Start by carefully placing each pin and its corresponding spring back into their channels, following the original order. Take your time. A single pin out of place can make the lock jam or even refuse to accept your key.
Once all the pins and springs are set, gently slide the plug back into the housing—keep everything level so nothing pops out. Replace the retaining clip or screw to secure the plug.
Now for the fun part: test the cylinder with your key before reinstalling it in the door. The key should glide in smoothly, and the cylinder should turn without catching or grinding. If you have a backup key or key blank, test that too. If anything feels off, disassemble and double-check that all pins are in their correct order and nothing is missing.
Reinstall the cylinder into the door, tighten everything down, and give it one more test. With clean, freshly lubricated pins, even an older Schlage or Kwikset lock should feel as smooth as the day you bought it.
Comparing Alternatives: Quick Sprays vs Pin-by-Pin Cleaning
You might be wondering: “Is all this work really better than just spraying some lube in the keyhole?” Honestly, there’s a big difference. While a quick spray will temporarily help a sticky lock, it won’t fix underlying issues like jammed pins or built-up grit inside the chambers. Over time, those sprays can build up, leading to worse performance.
Pin-by-pin cleaning takes more time, but it gets rid of deep-seated dirt and lets you spot—and fix—worn pins, broken springs, or even subtle misalignments. If you’re maintaining a high-security lock or a smart lock where code or sync failures could leave you stranded, this detailed approach is worth it.
There’s also the universal vs brand-specific debate. Universal lubricants may seem handy, but sometimes they don’t mix well with the metals or plastics in certain lock brands. Stick to lubricants recommended for your specific lock (check Schlage or Kwikset’s website if you’re not sure) to get the best performance and avoid voiding any warranties.
Common Problems and Troubleshooting Tips
Even with careful work, things can go sideways. Here are a few common issues and how to handle them:
- Lost a pin or spring? Don’t panic. Most hardware stores have universal pinning kits, or you can “borrow” a part from an unused lock. Make sure the replacement matches size and length.
- Key still sticks after reassembly? Double-check that all pins are in their correct order and seated properly. Run a little more dry lubricant and wipe off any excess.
- Lock won’t turn at all? The plug may be reinstalled upside down, or a spring may have fallen sideways. Disassemble, inspect, and try again.
- Electronic or smart lock not working after cleaning? Make sure you didn’t get cleaning fluid on any circuit boards or battery contacts. Let everything dry thoroughly before reassembling.
If you’ve tried everything and the lock still won’t cooperate, it might be time for a new cylinder—or a call to a professional locksmith.
Final Thoughts: When and Why to Clean Your Lock Pins
Cleaning and lubricating the individual pins in a lock cylinder might feel like a lost art in a world of smart remotes, code locks, and battery-powered door hardware. But here’s the truth: the little details still matter. Whether you’re troubleshooting an old lock that sticks, resetting a lock after years of use, or just want things working as smoothly as possible, taking time to clean those pins pays off.
You don’t need to wait until disaster strikes. Make this part of your occasional home maintenance routine—right along with changing smoke detector batteries or syncing your garage remote. Little steps, like cleaning and lubricating lock pins, keep your doors working right and save you from headaches down the road.
Give it a try the next time you notice your key getting stuck—you’ll be surprised how much smoother your day (and your locks) can be.