Here’s the thing: a deadbolt isn’t something you want to get “almost right.” If the bore hole isn’t deep enough, the lock won’t seat completely. If it’s too deep, you might weaken the door or create unnecessary hassle lining things up. So, let me explain how to check the bore hole depth for a new deadbolt installation step by step—no fancy tools, no confusing lingo, just the basics you need (and maybe a trick or two pros use).
What Is a Bore Hole? Why Does Depth Matter?
You might be wondering what exactly a bore hole is. In simple terms, it’s the main round hole drilled through your door where the body of the deadbolt sits. Think of it like the parking space for your lock mechanism—it needs to be the right size and depth or the “car” just won’t fit.
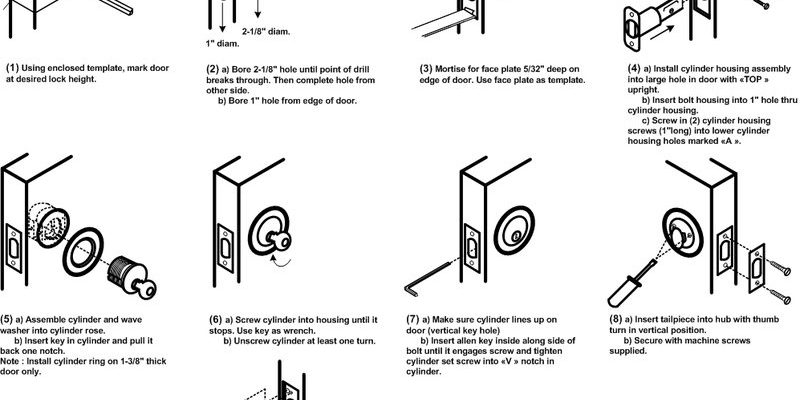
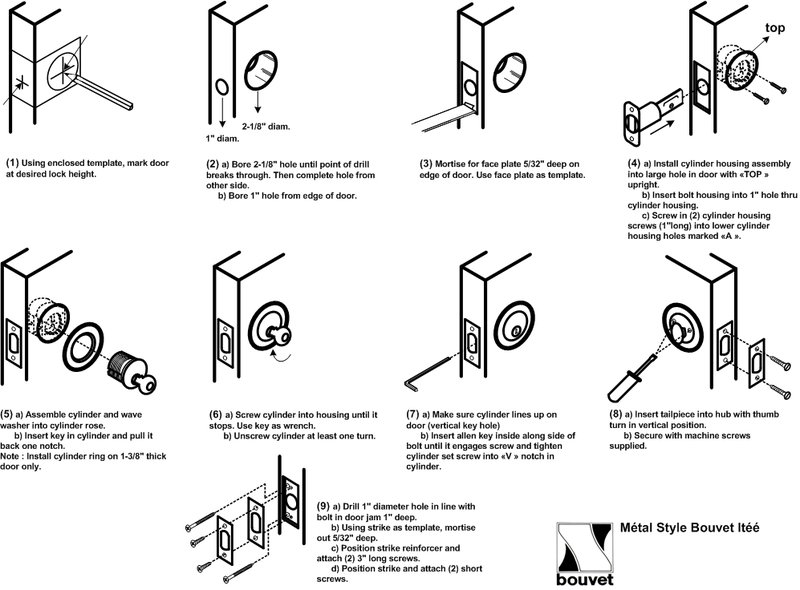
Bore holes are pretty standardized for most deadbolts, but there can be differences depending on the brand and type. If you’re working with a trusted lock—let’s say a Schlage or Kwikset—their instructions will tell you the recommended bore hole depth, usually around 21⁄8 inches in diameter and 1 inch deep for the cross bore (that’s the edge hole where the bolt comes out). But here’s the catch: if you’re off by even a quarter-inch, your lock can get stuck or fail to latch correctly.
Depth matters for a few big reasons:
- Security: A flush, properly seated deadbolt resists tampering and forced entry.
- Functionality: The lock won’t rattle, jam, or drag against the metal.
- Longevity: You avoid unnecessary wear or damage to your hardware and door.
It’s tempting to skip this check “just to get things done,” but trust me—it’s worth a few extra minutes to do it right.
Tools You’ll Need to Measure Bore Hole Depth
Honestly, you don’t need a pro toolkit for this job. Most homeowners already have what’s needed lying around. Here’s a quick list so you can set things up before starting:
- Tape measure: The simplest, most direct way to check depth. A rigid ruler will also do in a pinch.
- Pencil or marker: For marking drill points or checking alignment.
- Flathead screwdriver: Sometimes useful for cleaning out wood chips or debris left inside the bore hole.
- Deadbolt template: Some lock kits (especially Schlage or Kwikset) include a paper or plastic guide for marking depth and alignment.
- Drill with hole saw and spade bit: Only needed if you have to adjust the depth—not just measure it.
Think of this as your “locksmith starter kit.” If you don’t have a tape measure, even a chopstick or straight straw can stand in if it fits the bore cleanly and you can mark the depth with your finger or a pen.
How To Actually Check The Bore Hole Depth
Here’s where it gets hands-on. You’re probably standing in front of your door, ready to go, so let’s take this one slow step at a time. I’ll walk you through what I’ve done dozens of times—no guesswork, no magic.
Step 1: Confirm The Deadbolt Specs
Before you even touch the door, check your deadbolt’s installation guide. Most major brands print the recommended depth and diameter right on the box or a quick-start card. Usually, you want:
- Bore hole diameter: 21⁄8 inches (54mm)
- Edge bore (bolt hole) diameter: 1 inch (25mm)
- Minimum depth: Just a hair deeper than the lock body itself; measure this or check your instructions
Step 2: Insert the Tape Measure
Unroll your tape and gently insert the metal end into the bore hole until it hits the back. Make sure it’s touching dead straight—no angling or you’ll get an off reading. If the tape measure is too stiff or wide, use a straight ruler or anything that can reach the back wall smoothly.
Step 3: Record and Compare
Look at the measurement at the door’s surface—the number where the edge of the tape meets the face of the door is your bore hole depth. Jot it down, then hold it up against your deadbolt’s lock body. There should be a tiny bit of “wiggle room” (we’re talking millimeters, not inches!) to allow the lock to seat fully, but not so much that it’s loose or rattles.
Step 4: Test Fit The Lock
If you’re unsure, go ahead and gently try sliding the deadbolt body into the bore hole. If it stops before sitting flush—or the tailpiece can’t reach through to the other side—you need to deepen the hole. If it slides in too easily or feels wobbly, the hole could be too deep or too wide.
Pro tip: When measuring, always account for any weather stripping, paint buildup, or wood chips stuck in the hole. Those can throw off your numbers just enough to cause headaches later.
What To Do If The Bore Hole Is Too Shallow
Let’s say you measured and realized your bore hole’s a bit too shallow. No panic—it’s a common snag, especially in older doors or when manufacturers change their lock styles over time. Here’s how to handle it:
- Re-measure: Double-check your measurement before drilling anything. Sometimes a stray wood splinter or the wrong angle throws things off.
- Choose the right bit: You’ll want a spade bit (for edge holes) or a hole saw (for the main bore) in the correct diameter. Most deadbolt kits will list the bit size right on the packaging.
- Drill carefully: Set your drill to a lower speed and hold it perfectly straight. Only remove a little material at a time, stopping often to test the fit with your tape measure or deadbolt body.
- Clean the hole: Sawdust, splinters, and little wood curls can collect fast. Use your screwdriver or a vacuum to get everything out before test-fitting the lock again.
It’s better to “sneak up” on the perfect depth than accidentally go too deep. Trust me, you’ll be glad you took the extra minute.
What Happens If The Bore Hole Is Too Deep?
Now let’s talk about the opposite problem. Maybe someone went a little overboard with the drill. A bore hole that’s too deep usually won’t destroy your installation, but it can cause annoying issues.
- Loose fit: The deadbolt body can wobble in the hole, causing the lock to feel spongy or loose when you turn the key or thumbturn.
- Security risk: A deep hole can weaken the door at its most critical point, making it a little easier to break in with enough force.
- Stripped screws: The mounting screws may not engage securely, making the lock prone to working itself loose over time.
If you find yourself with a bore hole that’s deeper than necessary, there are a couple of fixes. You can use wooden shims or filler pieces behind the lock body to “shorten” the hole from the inside, then re-secure everything. Just make sure the lock sits tightly and doesn’t shift when you use it.
Honestly, I’ve seen old-school carpenters pack holes with dowels, glue, or even a bit of epoxy putty in a pinch. The goal is always to firm up the fit and keep things stable—don’t just force the lock in and hope for the best!
Comparing Bore Hole Depths: Universal Vs. Brand-Specific Deadbolts
You might be considering a universal deadbolt—these are marketed as fitting “any standard door.” Seems easy, right? But here’s something I’ve run into: not all universal models line up perfectly with every bore hole depth, especially if your door is older, custom-made, or was previously fitted for a different brand like Yale, Schlage, or Defiant.
- Brand-specific deadbolts generally come with very clear instructions and templates. The bore hole depth and size are matched exactly to the lock body, leaving less room for error.
- Universal deadbolts can be a little more “forgiving” in diameter but may require you to check both the diameter and the depth more carefully. Some have adjustable tailpieces or extra bushings to compensate for variances.
- Smart locks (like August or Nest) often fit into standard deadbolt bores but may need more internal space for batteries or wiring. Always double-check their specific requirements and measure twice before drilling anything out.
If you’re not sure what type you’ve got, measure everything and compare with your lock’s paperwork. The “universal” label is helpful, but real-world doors have quirks that templates can’t always predict.
Common Mistakes and Troubleshooting Bore Hole Issues
Even seasoned DIYers make mistakes, so don’t beat yourself up if things don’t line up perfectly first try. Here are the goof-ups I see most often—and what to do about them:
- Misreading the tape: Rushing through the measurement or measuring at an angle throws everything off. Always go slow and ensure your tape or ruler is straight.
- Ignoring paint or debris: Little things like old paint drips, varnish, or stray wood chips can reduce your real depth. Clean first, measure after.
- Not checking both sides: Sometimes, the bore hole isn’t drilled perfectly straight from one side of the door to the other, leading to misalignment. Measure from the inside and outside for accuracy.
- Skipping the test fit: This is a big one—always try to dry-fit the deadbolt before mounting screws. If it won’t sit flush by hand, don’t try to force it in!
If you run into trouble and the lock doesn’t seem to seat right, pause and double-check every step. Nine times out of ten, a quick remeasure or hole cleanup is all it takes to fix things.
Final Checks Before Lock Installation
You’ve measured, drilled, cleaned, and test-fitted. Before you grab that screwdriver and finish the install, run through these last checks:
- Is the depth perfect? The lock body should slide in smoothly, rest flush with the door’s surface, and not rattle or wobble.
- Does the tailpiece reach? The metal piece that connects the interior and exterior parts needs a clear path—if it bends or catches, you’ll have trouble syncing the lock or getting it to operate smoothly.
- Are all holes debris-free? Any leftover wood, paint, or dust can jam up the lock’s internal mechanics, especially in smart locks that use sensors or batteries inside.
- Does the faceplate align? The faceplate on the door’s edge should sit flat and flush, covering the edge bore completely.
Tip: If your deadbolt comes with a template or cardboard guide, use it. Align the template, mark your holes, and follow the measurements—it’ll save you a ton of trouble and second-guessing.
Closing Thoughts: Take Your Time, Get It Right
Checking the bore hole depth for a new deadbolt installation isn’t rocket science, but it’s one of those small steps that pays off every time you lock your door at night. The difference between a secure, reliable lock and one that jams or feels shaky comes down to precision and patience—nothing fancy. Whether you’re working with a universal model or a specific brand like Kwikset or Schlage, measuring and prepping your bore hole means your new deadbolt will work as it should for years to come.
So breathe easy, grab your tape measure, and take your time. When you hear that satisfying “click” of your new lock sliding into place, you’ll know it was worth getting the details just right.