If you’ve never used caulk before, don’t worry. Applying a thin bead is more approachable than you might think. It’s a bit like icing a cake—steady hands win the day, and going slow beats hurrying every time. Whether you bought a GE Silicone II caulk tube or another trusted brand, they all work in pretty much the same way. The magic is in the details.
Why Adding Caulk Helps Weatherstripping Do Its Job
Let me explain why these two go hand-in-hand. Weatherstripping is great for sealing the edges around doors and windows, but it has one big weakness: irregular or damaged surfaces. If your door frame is warped or your window trim isn’t totally flush with the wall, air can slip through the tiniest cracks that weatherstripping just can’t hug. That’s exactly where a *thin bead of caulk* comes in.
Think of caulk as a flexible, rubbery glue that fills in gaps up to about half an inch wide. When you apply it right, it blocks wind and moisture from sneaking past the weatherstripping. What’s even better is that a proper caulk job can extend the life of your weatherstripping and give your heating or cooling system a break. Over time, a few tubes of caulk can save you real money—and a whole lot of chilly nights.
Honestly, you might even notice less outside noise once everything’s sealed tight. That’s a nice bonus most people don’t realize until after the fact. In short: weatherstripping covers the big stuff, and caulk finishes the job.
What You’ll Need Before You Get Started
Before you dive in, gather your materials. You don’t need a bag full of fancy tools, but you do need a few basics to make the process smooth.
- Caulk: Silicone or acrylic latex caulk works best for most window and door projects. GE Silicone II and DAP Alex Plus are popular options.
- Caulking gun: If your caulk comes in a standard tube, you’ll need one of these. Squeeze tubes are fine for tiny jobs but less precise for long seams.
- Utility knife or scissors: To trim the caulk tube’s tip.
- Painters tape (optional): For crisp, straight lines.
- Paper towels or rags: Trust me, you’ll want these for cleanups.
- Gloves: Caulk is sticky and can irritate skin.
- Mild soap and water: For cleaning up mistakes while the caulk is still wet.
If you want your bead to look neat and professional, have a damp finger or a caulk finishing tool handy. Sometimes the simplest things make all the difference.
How to Prepare the Area for Caulking
A little prep goes a long way when you’re trying to *apply a thin bead of caulk* that actually sticks. First off, make sure the surface is bone-dry and clean. Any dirt, old caulk, or loose paint will keep the new caulk from making a solid bond.
Here’s my tried-and-true process:
- Use a putty knife or screwdriver to scrape off old caulk or peeling paint. Don’t be gentle—leftover junk will mess with your seal.
- Wipe everything down with a damp rag or sponge. If you spot grease or mold, a bit of soap or a household cleaner helps.
- Let the area dry completely. Moisture is the enemy here—it keeps caulk from setting right.
If you’re worried about smudges or messy lines, painters tape along the edges of the seam is your best friend. When you peel it off after caulking, you’ll get that crisp, clean look.
Cutting the Caulk Tube for a Thin, Even Bead
This part might seem small, but it’s a game changer. If you’re hoping to *apply a thin bead of caulk*, you’ve got to start by cutting the tube’s tip correctly. Most caulk tubes have a long, tapered nozzle that you snip to your desired width. The trick is to start small—you can always cut more, but you can’t put plastic back on.
Use a utility knife or sharp scissors to cut off the very tip of the nozzle at a 45-degree angle. For most weatherstripping jobs, a 1/8″ opening is plenty. Squeeze a bit out onto a scrap piece of cardboard to test the width before you start running it along your door or window. If it looks too thin, cut a little more. Too thick, and you’ll waste caulk and end up with a sloppy job.
Here’s the thing: angled cuts give you more control and make it easier to press the caulk right into a joint. If your caulk tube has a seal inside, poke it with a long nail or the tool on your caulk gun. Once it’s flowing, you’re ready for action.
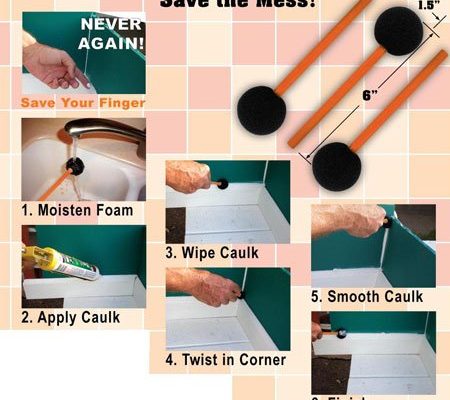
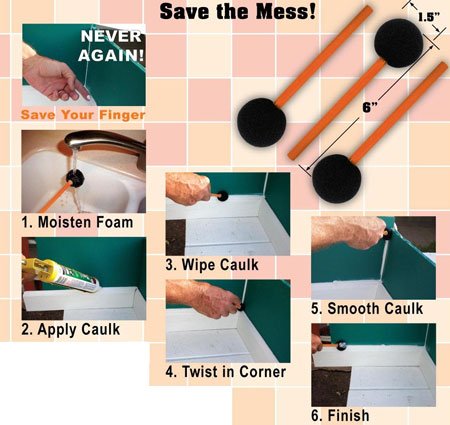
Step-by-Step: How to Apply a Thin Bead of Caulk
Let’s walk through the process, slow and steady. Think of it like drawing a careful line—speed and patience matter more than brute force.
- Hold the gun at a 45-degree angle: This helps the caulk seep right into the crack, not just sit on top.
- Apply steady, even pressure: Squeeze the trigger gently and move the gun along the seam in one fluid motion. Pause if you need to—it’s not a race.
- Keep your bead thin: You want just enough caulk to fill the gap, not overflow. Excess looks messy and wastes material.
- Finish with a swipe: Use a damp fingertip or finishing tool to smooth the bead within 5–10 minutes of applying. This presses the caulk into the seam and gives it a pro-level finish.
If you didn’t use tape, watch the edges carefully—clean up as you go with a damp rag. For inside corners or tricky angles, slow down and work in short sections. Trust me, patience pays off.
Tips for Avoiding Common Caulking Problems
You might be wondering, “What could possibly go wrong?” Plenty, actually! But with a few pointers, you’ll sidestep the biggest pitfalls.
Messy beads and gaps are the two most common issues.
- Too much caulk: Big, blobby beads look terrible and can stop doors or windows from closing right. Always cut the nozzle small.
- Not enough caulk: If you can still see daylight or feel a draft, you didn’t fill the gap. Go over thin spots if needed.
- Skipping prep: Dirt and dust will keep your caulk from sticking, so always clean thoroughly.
- Working in the wrong weather: Temperature and humidity matter. Ideally, caulk when it’s above 45°F and dry out. Too cold, and it won’t set. Too wet, and it won’t stick.
Honestly, the first try won’t always look perfect. But don’t stress—a little practice and you’ll be caulking like a pro.
How Long Does Caulk Take to Dry and Cure?
Here’s a question I hear all the time: “How long do I have to wait before using my window or door?” Well, it depends on the caulk type and the weather.
Most acrylic latex caulks are touch-dry within 30–60 minutes, but don’t get tricked—the full cure can take up to 24 hours or more. Silicone caulks (like GE Silicone II) sometimes set in just a few hours but also need a full day to reach their strongest bond. If you paint over caulk that’s still wet, or if you open a window before it’s set, you risk pulling up all your hard work.
If you want to play it extra safe, check the label on your caulk tube. When in doubt, wait a full day before painting or heavy use. Weather and ventilation make a difference too—humid air slows down curing.
Tip: Keep kids and pets away from fresh caulk. It’s tempting to poke, but you’ll regret having to redo it all!
Comparing Caulking to Other Weatherstripping Methods
You might be wondering, “Can’t I just use more weatherstripping or try a universal seal?” The answer is, sort of—but each method has strengths and weaknesses.
- Weatherstripping tape is quick to install and great for smooth surfaces, but it can peel off with heavy use.
- Foam and rubber strips handle big gaps but don’t mold to uneven edges the way caulk does.
- Caulk fills odd shapes and hairline cracks that other products can’t touch. Once it’s set, it’s nearly invisible and lasts for years.
The best solution? Use both together. Caulk seals the cracks, and weatherstripping blocks the bulk of the draft. Honestly, if you’ve struggled to fix a stubborn breeze with just tape or foam, adding a thin bead of caulk can be the missing piece.
Wrapping Up: A Small Step That Makes a Big Difference
Sealing up those tiny gaps with a thin bead of caulk isn’t just about tackling drafts or saving on your energy bill—it’s about making your home feel solid and cared for. Once you get the hang of handling a caulking gun, you’ll be surprised how quick and satisfying it is to give your weatherstripping a real upgrade. For most folks, this job takes less than an hour and pays itself back every time your house feels just a bit warmer (or cooler, depending on the season).
So next time you feel a little breeze sneaking in, grab that caulk tube and give it a whirl. Your future self—and your heating bill—will thank you.