A lot of people picture this process as just “eyeballing” where the lock feels comfortable, then hoping it works out. But honestly, getting it right often means thinking about both function and style—and maybe even what the manufacturer (like Schlage or Kwikset) recommends. Brands usually include a template for their remotes and handlesets, but your door and your height might call for something a little different. If you’ve ever walked up to a door and felt the deadbolt was weirdly high, you know what I mean.
Let me walk you through how to adjust the height of a handleset—whether you’re working with a standard Schlage set, a modern Kwikset, or any other brand. From lining things up to troubleshooting those classic “hole’s in the wrong spot” moments, we’re going to cover everything you need to know before picking up the drill.
Why Handleset Height Matters More Than You Think
You might be wondering, “Does it really make a difference if my doorknob is an inch higher or lower?” Here’s the thing: a door handleset isn’t just about security—it’s also about comfort, accessibility, and curb appeal. If you mount a Schlage handleset too high, younger kids and some adults may struggle to reach it. Too low, and you’ll constantly find yourself bending down.
Think about all the times your hands are full—carrying groceries or typing in a code to unlock a smart remote. If the handleset sits at an awkward height, every entry becomes annoying. Consistency also matters. Most entry doors in North America place the center of the handleset about 36 to 38 inches from the floor. This helps homes feel familiar and safe, no matter who lives there.
A poorly placed handleset can even affect your door’s strength. If it sits too close to the top or bottom, it might not latch securely or could even cause your door to warp over time. So, while it seems like a small detail, adjusting the height of a handleset is one of those finishing touches that makes a big difference in how your door looks, feels, and works.
How To Measure For Handleset Height On A New Door
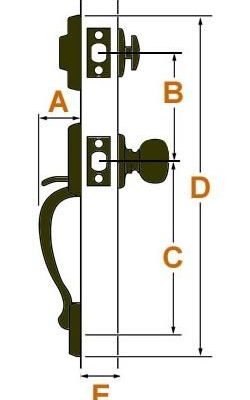
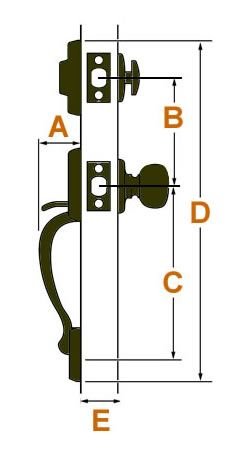
Before you start drilling holes, you need to do a little measuring. The ideal height for most handlesets—regardless of whether it’s Kwikset, Schlage, or another brand—lands right at that 36-38 inch range from the finished floor to the center of the handle. But there are a few steps to make sure you get it right.
First, grab a tape measure, pencil, and the handleset (or its template, if your kit came with one). Keep in mind whether you’ll be adding a deadbolt above the main handle—most entry sets include both.
- Measure from the finished floor. Don’t measure from the bottom of the door itself, since floors and thresholds can vary.
- Mark the center point for the handle. This is usually where the main grip or thumb latch will go.
- Double-check for alignment with the deadbolt. If you’re installing both, most templates space them about 5-6 inches apart, center to center.
- Think about door thickness and side clearance. Some handlesets, especially remote keypad models or extra-large designs, may need more room on the edge or face of the door.
Don’t skip the dry-fit. Hold the hardware up to your marks and imagine opening, closing, and locking the door. Adjust the height if anything feels off, and repeat the measurement until you’re confident.
Adjusting The Handleset Height: Dealing With Pre-Drilled Holes
So, what if your new door already has holes drilled—and they don’t quite match where you want the handleset? This is a common hiccup, especially with builder-grade or replacement doors. Let me explain how to handle it.
You have a few options. If the existing holes are close to the right height, you might get away with a slight adjustment. Most handlesets allow for a little wiggle room—maybe an eighth of an inch up or down—when you install the mounting plate. However, if the holes are way off (let’s say more than an inch), you’ll need to make a choice:
- Fill and redrill. Use a sturdy wood filler or dowel to fill the old hole, let it dry and cure completely, then sand it flat and drill your new hole at the correct height.
- Choose a handleset with a larger backplate or escutcheon. Some brands have extra-wide faceplates that can cover old holes—great for a clean look without big repairs.
- Go custom. If you’re feeling DIY-savvy, you could patch and repaint the door, especially if you’re planning to update the color anyway.
This step isn’t fun, but it’s worth it. Handleset height is noticeable, and patching an old hole beats living with a setup that’s annoying daily.
Installing The Handleset At The New Height
Once your measurements and markings feel spot-on, it’s time to actually install the hardware. Whether you’re working with a high-tech smart remote handleset or a classic mechanical set, the basic steps are similar.
Here’s how to do it:
- Drill the pilot holes. Use the template (supplied by Kwikset, Schlage, or your chosen brand) as a guide. Double-check your center marks before committing—mistakes here are tough to fix later. Use the proper drill bit size listed in the instructions.
- Install the latch mechanism first. Slide the latch into the side of the door, making sure it’s flush and square. Secure it with screws.
- Attach the exterior handleset. Place it against the door, line up the holes, and push the spindle or connecting bar through the latch.
- Secure the interior trim. This piece often holds everything together, so make sure it lines up perfectly before tightening the screws.
- Add the finishing touches. Install the deadbolt (if included), and test that everything lines up and turns smoothly. Troubleshoot sticking or misalignment by loosening and gently shifting the handleset as needed before tightening everything fully.
Take your time. Rushing this part can mean the remote keypad doesn’t sync, or the door won’t lock smoothly. If something feels off, don’t force it—double-check the alignment, and adjust as needed.
Troubleshooting Common Handleset Height Problems
Even with careful measurements, issues can pop up. Here’s what tends to go wrong, and how to fix it.
Sometimes, your handleset just won’t sit right after you bolt everything together. Maybe the door won’t close easily, or the remote code pad feels awkward and out of reach. Don’t panic—these are fixable.
- Misaligned latch or deadbolt: If the latch doesn’t slide smoothly, the hole in the door jamb (the strike plate) might need adjusting. Move it slightly up or down using a chisel and reinstall the plate.
- Loose hardware: If you feel wobble or rattling, the screws might not have enough “meat” to attach to. Double-check the door thickness, and use longer screws if needed.
- Height still feels wrong: If everything’s installed but still feels off, you may need to start over with your marks and possibly fill the holes to redrill (see above).
- Smart handlesets not syncing: For electronic remotes, always check batteries and follow the brand’s reset, code, or pair instructions if the keypad doesn’t respond.
If you get stuck, checking the manufacturer’s troubleshooting section can save you a lot of guesswork. Most brands have solid guides and even video walkthroughs.
Comparing Handleset Brands And Styles: Does It Change The Height?
Not all handlesets are designed the same way. Some entry door remotes—especially touchscreen or keypad styles—have much larger faceplates that may shift your preferred mounting height up or down a bit. Let me explain how to work around this.
For classic keyed handlesets (like most Schlage or Kwikset models), the 36-38 inch rule usually applies. But for more modern or universal-style remotes, consider the following:
- Keypad and smart lock thickness: Some electronic handlesets need extra room at the top or bottom for batteries and wiring. Check the brand’s specs and make sure your marks fit inside the door panel.
- Universal handlesets: These are designed to fit a variety of doors and sometimes let you move the handset up or down within a limited range to match old or new holes.
- Decorative plates and pulls: Oversized styles or ones with a pull handle (not a knob) may need more vertical clearance, especially near glass panels or trim.
It’s smart to double-check door compatibility before buying. If you’re set on a certain handleset, measure the space and make sure you have enough room for all parts—especially if your door has fancy panels or glass.
Alternative Approaches: Relocating Or Replacing A Handleset
Sometimes, no matter how you adjust the height or troubleshoot, the handleset just doesn’t feel right. Maybe your door came with holes in wonky spots, or maybe you chose a brand-new handleset that simply doesn’t fit. You’ve got options.
- Patch and repaint: Fill old holes with wood filler or dowels, sand smooth, and touch up with paint for a seamless look. This gives you a fresh slate to drill new holes at the ideal height.
- Use an oversized escutcheon: Some brands (especially in the universal or “retrofit” category) make handlesets with big faceplates to cover mistakes or old holes.
- Consider a smart lock retro kit: These often work with existing holes and let you add remote entry or keypad features without redrilling—saving time and mess.
Honestly, don’t be afraid to get creative—especially if you’re working with a beautiful old door or trying to sync a modern setup with classic hardware. Sometimes, the best solution is a mix of patching, clever hardware choices, and careful measuring.
Finishing Up: Testing For Comfort And Security
After you’ve installed and adjusted your handleset, it’s time to make sure everything feels and works just right. This last step is easy to skip, but it’s where you find out if all your careful measuring pays off.
- Open and close the door several times. The latch and deadbolt should engage smoothly, with no sticking or scraping.
- Try the handleset at different angles. Make sure everyone in your home—kids, adults, anyone who might use a remote or keypad—can reach and use it comfortably.
- Test all features. If you have a code pad, remote, or smart lock, make sure the pairing and syncing work as expected. Replace batteries if needed.
- Lock up and check from both sides. It should feel natural and easy every time you use it.
If something feels off, adjust as needed—sometimes a tiny tweak makes a big difference. Twenty minutes spent now means years of easy, comfortable access down the road.
Adjusting the height of a handleset on a new door is a perfect example of a “small job, big impact.” A little care here goes a long way toward making your home safe, comfortable, and welcoming.
Working with different brands, modern remotes, or classic handlesets, the key is always the same: measure twice, drill once, and don’t be afraid to adjust until it’s truly right. That way, every time you come home, your door just feels… perfect.