
If you’re dealing with a bifold door that just won’t cooperate, you’ve come to the right place. Whether your door is from a specific brand or a universal model, knowing how to adjust its height can save you from the frustration of sticking doors or uneven gaps. Plus, it’s a satisfying little project to tackle in your home. So, grab your tools, and let’s dive into how to get your bifold door standing tall and proud!
Understanding Bifold Doors
To grasp how to adjust the height of a bifold door, it’s essential first to understand how these doors work. Bifold doors consist of two or more panels that pivot on hinges and fold against one another. They’re popular for closets and room dividers because they maximize space without taking up much room when opened.
By design, bifold doors typically hang from a track at the top, sliding sideways to open. The real magic happens in the way they balance on these tracks. If one side is lower than the other, it can cause annoying friction or gaps. Think of it like a seesaw—if one side is too low, it just won’t work right.
When height adjustments are needed, it’s often due to changes in the foundation of your home or simply wear and tear. If you live in an area with significant temperature changes, wood can expand or contract, impacting the door’s performance. So, before you grab your tools, look around and notice how your door interacts with the surrounding space.
Tools You’ll Need Before You Start
Before diving into the height adjustments, you’ll want to gather a few basic tools. Think of this as packing your bag for a hiking trip—you need the right gear to make the journey easier. Here’s what you’ll need:
- Screwdriver: A flathead or Phillips screwdriver works best for adjusting screws.
- Level: This handy tool helps ensure your door is balanced correctly.
- Measuring tape: For measuring the height accurately before and after adjustments.
- Allen wrench: Some doors have adjustable screws that require this specific tool.
- Step stool: If your door is tall, you might need some extra height to reach the top track.
Once you have these tools ready, you’ll feel much more prepared. It’s always good to have everything in one place before you start, saving you from those “where did I put that screwdriver?” moments!
Checking the Current Height of Your Bifold Door
Now that you’re all set with your tools, it’s time to check the current height of your bifold door. This step is crucial because it gives you a baseline to work from. You might wonder how to do this effectively. Here’s a step-by-step process:
1. Close the door completely. Make sure the door is fully closed for the most accurate measurements.
2. Use your measuring tape. Measure the distance from the floor to the bottom of the door. Take note of this height.
3. Check for gaps. Look at the top of the door as well. Are there any noticeable gaps between the door and the frame? This can indicate that the door is too low on one side.
If your measurements show that one side is higher than the other, it’s time to adjust.
Adjusting the Height of the Bifold Door
Adjusting the height of your bifold door typically involves raising or lowering the hinges or rollers. Here’s how to do it:
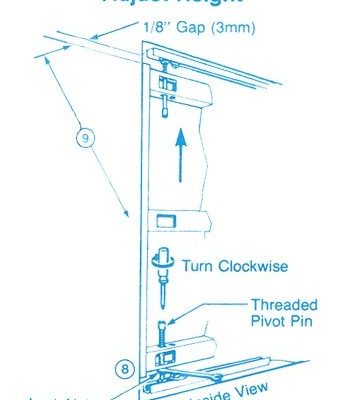
1. Locate the top pivot bracket. On most bifold doors, you’ll find a bracket at the top. This usually has screws that can be adjusted.
2. Use your screwdriver. Gradually tighten or loosen the screws on the bracket. Tightening usually raises the door, while loosening lowers it.
3. Check the height frequently. After each adjustment, measure the door’s height again to ensure you’re moving in the right direction.
If the door feels stuck or doesn’t align properly after these adjustments, don’t worry. You may need to make small tweaks to the bottom pivot as well.
Aligning the Bifold Door for Smooth Operation
After adjusting the height, aligning the door is the next step to ensure it glides smoothly. Think of this as aligning your bike tires; if they’re off, your ride won’t be smooth. Here’s how to ensure your bifold door operates effectively:
1. Check the bottom pivot. Similar to the top pivot, you can tighten or loosen screws on the bottom bracket to further adjust how the door hangs.
2. Use a level. Place a level on top of the door to check for evenness. Adjust screws as needed until the bubble is centered.
3. Test the door. Open and close the door multiple times, watching for any sticking or dragging.
If you notice any resistance, you may need to go back and make more adjustments. Remember, sometimes it takes a little trial and error to get it just right.
When to Call a Professional
While adjusting the height of a bifold door can be a simple DIY project, there are times when it’s best to call in a professional. Here are some signs that you might want to consider this option:
– Severe damage: If your door is warped or cracked, adjustments may not fix the issue.
– Complex installations: If your bifold door is part of a larger system (like a fancy sliding door), it might require expert help.
– Persistent problems: If, after multiple attempts to adjust, the door continues to stick or isn’t functioning correctly, a professional can diagnose underlying issues.
Remember, there’s no shame in asking for help! Sometimes a fresh set of eyes can make all the difference.
Final Thoughts on Bifold Door Adjustments
Adjusting the height of a bifold door might seem daunting at first, but it’s manageable with the right tools and techniques. Just like a well-fitted pair of pants, a properly adjusted door can make your space feel more comfortable and functional. By taking the time to assess, measure, and adjust, you can prevent future issues and enjoy the ease of smooth operation.
So whether you’re tackling this project on your own or calling in a pro, you now have a solid understanding of how to get it done. Happy adjusting!