Imagine your door as a lid on a cooler. If it’s not closing tight, all that ice melts way faster than it should. Same idea with your home. When there’s a gap between your door and the frame, you’re losing energy 24/7—whether you’re cranking the AC in summer or pumping heat in winter. The good news? You don’t need fancy tools or a pro contractor to fix this. If you have a screwdriver and can handle a few basic steps, adjusting your exterior door hinges is totally doable for most homeowners.
Most modern doors, whether you’ve got a classic wood entry from Therma-Tru or a steel model from Schlage, use similar hinge setups. If you’re ready to give your door a little tune-up for better energy efficiency, let’s walk through everything you need to know.
Why Exterior Door Hinges Matter For Energy Efficiency
It might seem like a small detail, but the position of your door hinges can make a big difference in how well your door seals. Over time, heavy use, changing temperatures, or just plain settling of the house can cause hinges to loosen or sag. When that happens, you can end up with visible gaps around your door—prime spots for unwanted airflow.
Think back to the last time you felt a draft near your front door or noticed a little light sneaking through the edge. That’s basically your home’s insulation leaking straight out into the wild. When you lose that tight fit against the weatherstripping, it’s not just about cold air; you’re letting in moisture, dust, and even bugs. Worse still, your HVAC system has to work overtime to make up for all that lost energy.
Honestly, most people don’t realize how big of a difference a properly adjusted door can make. It’s kind of like wearing shoes that fit perfectly instead of ones that flop around—everything just works better. Getting your hinges dialed in isn’t just about comfort; it can actually save you real money on energy bills and keep your home feeling cozy year-round.
Common Signs Your Door Hinges Need Adjustment
You might be wondering, “How do I even know if my door hinges are off?” It’s not always obvious until you start looking for a few telltale signs.
- Visible gaps: Stand inside on a sunny day and see if you can spot any daylight around the edges of the closed door. Any light means you’re losing energy.
- Sticking or dragging: If the door scrapes the floor, frame, or suddenly feels tough to open or close, your hinges could be sagging.
- Loose or squeaky hinges: Hinges that make noise or wiggle at all should be tightened or adjusted, not just ignored.
- Drafts or temperature changes: If you feel cold or heat near the door, but nowhere else, that’s often a hinge alignment issue.
Sometimes the problem is super subtle—like a thin line of breeze or your doorknob feeling “off.” Don’t just chalk it up to an old house or bad weather. A quick hinge adjustment can often make things feel solid and sealed again.
Tools You’ll Need To Adjust Exterior Door Hinges
Before you get started, let’s round up what you’ll need. The good news is, adjusting most exterior door hinges doesn’t require anything fancy. In fact, you probably already have most of these tools in your kitchen junk drawer.
- Screwdriver (usually Phillips-head, sometimes flat-head)
- Hammer (for tapping hinges back into place if needed)
- Utility knife (if you have to adjust weatherstripping or paint buildup)
- Shims or cardboard (for supporting the door during adjustments)
- Level (optional, but helps make sure everything’s square)
- WD-40 or hinge lubricant (to quiet squeaks and help things move smoothly)
Depending on your specific door – maybe you’re dealing with a heavy steel model with extra security screws, or an older wooden entry with painted-over hinges – you might need a little extra elbow grease. Still, even a total beginner can handle this with a bit of patience.
Step-By-Step: How To Adjust Door Hinges For Maximum Energy Efficiency
Let me explain the core process. Adjusting your exterior door hinges is really about getting the door to fit snugly in the frame—without rubbing, sticking, or leaving gaps. Here’s how to do it:
- Check the alignment: Close the door and check for gaps around the frame, especially at the top and sides. Look for any spots where the weatherstripping isn’t making contact.
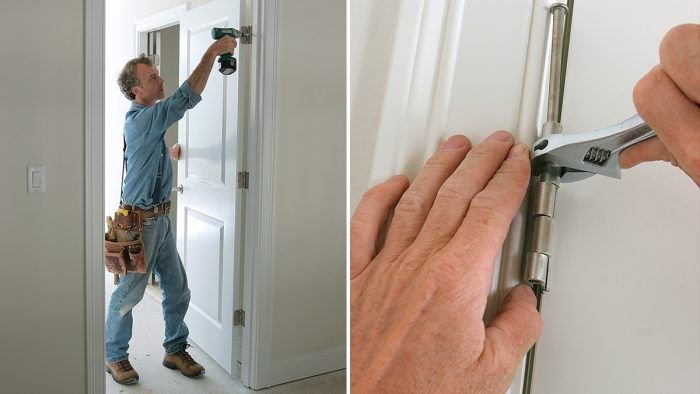
- Tighten the screws: Using your screwdriver, go hinge by hinge and make sure all screws are snug. Loose screws are a super common cause of door sagging or shifting.
- Lift or shift the door: If the door still hangs unevenly, you may need to adjust the hinge position. Place a shim under the door to support it, remove the screws from one hinge at a time, and move the hinge slightly (up, down, or sideways), then re-fasten the screws.
- Test and repeat: After each change, close the door and check again for fit. Adjust as needed until the door sits evenly and the weatherstripping forms a continuous seal.
Honestly, the hardest part is just being patient and making adjustments bit by bit. Sometimes the tiniest tweak on a hinge makes a huge difference in how the door closes.
Dealing With Common Problems While Adjusting Hinges
You might hit a few snags, especially with older doors or if you’re dealing with paint, rust, or stubborn hardware. Don’t worry, most of these issues have straightforward fixes.
- Stripped screw holes: If the screws won’t tighten because the holes are stripped, you can fill them with wooden toothpicks and wood glue, then reinsert the screws for a tighter fit.
- Painted-over hinges: Use a utility knife to carefully score around the hinge before removing screws, so you don’t peel paint or damage the frame.
- Rust or squeaky hinges: Spray a little lubricant like WD-40 and wipe off the excess. It keeps things moving smoothly and prevents future sticking.
- Stubborn alignment: If you’ve adjusted everything and still have a gap, try adding a thin cardboard shim behind the hinge leaf that’s set deeper into the frame. This pushes the door over a bit to improve fit.
Here’s the thing: Don’t force anything. If the door isn’t moving the way you want, double-check the frame for warping or damage. Sometimes the issue is bigger than just the hinges.
How Weatherstripping and Hinges Work Together
You might be thinking, “Aren’t weatherstripping and hinges totally separate things?” Not really—they work as a team. Think of the hinges as the steering wheel for your door. If the hinges aren’t set right, your weatherstripping can’t form that perfect, energy-saving seal around the edge.
If you finish adjusting your hinges and still feel a draft, check your weatherstripping. Sometimes it’s crushed, missing, or just worn out (especially around high-use doors like those from Therma-Tru or Schlage). Replacing or repositioning the weatherstripping can make all the difference in maximizing energy efficiency.
If you want maximum energy efficiency, you need both good alignment and quality weatherstripping. Don’t skip one or the other—think of them as a package deal for keeping your heating and cooling where you want it.
When To Consider Replacing Hinges Or Calling A Pro
Most hinge issues are easy to fix at home, but sometimes you’ll run up against a problem that’s just not DIY-friendly. If your door frame is warped, split, or rotting, or if the hinges are badly bent or rusted out, you might need new hardware—or even a fresh door.
You might also run into trouble if your door is especially heavy, extra secure, or has custom hinge hardware. In those cases, it’s not a bad idea to call in a handyman or door specialist. They have the right tools and know-how to get everything lined up perfectly without damaging your entryway.
Here’s my rule: If you’ve tried the basic adjustments and the door still doesn’t seal up, it’s time to ask for help. There’s no shame in protecting your investment (and your energy bill) with a professional tune-up.
Tips For Keeping Exterior Door Hinges Working Efficiently
Once you’ve got your door hinges dialed in, a little ongoing care goes a long way. Keeping things running smoothly helps maintain that energy-saving seal for years to come.
- Inspect hinges regularly: Check every few months for loose screws or squeaks, especially after big weather swings.
- Lubricate as needed: A squirt of lubricant keeps rust and noise at bay, and helps prevent future sticking.
- Keep the area clean: Wipe away dirt, leaves, and debris around your door—grit can get lodged in hinges over time.
- Replace worn parts: If you notice bent, rusted, or damaged hinges, swap them for new ones. It’s an easy upgrade that pays off in both energy savings and security.
Every little bit helps when it comes to keeping your home comfortable and efficient. The time you spend on these small fixes adds up to real money saved.
Closing Thoughts
Getting your exterior door hinges adjusted for maximum energy efficiency isn’t just a “nice to have”—it’s a smart, practical maintenance move that anyone can tackle. You’ll keep your home warmer in winter, cooler in summer, and save money year-round, all while making sure your front door looks and feels rock solid.
Remember, it’s not about being a pro—just about paying attention to the little things. With a basic tool kit and a few careful tweaks, you can step inside and feel the difference every time you come home. So, the next time you spot a draft or see that slim line of light by your door, you’ll know exactly what to do.